
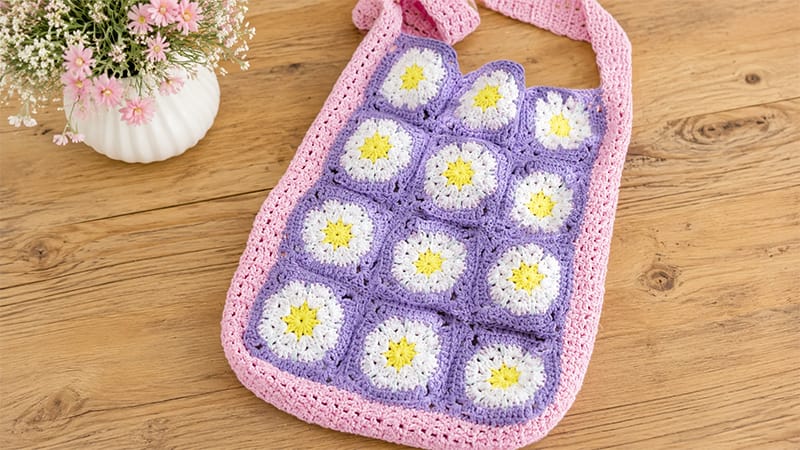
Embrace the ultimate fusion of retro charm and modern utility with this granny square hobo bag. Characterized by its slouchy, effortless silhouette and colorful floral-motif squares, this bohemian accessory is as fun to make as it is to wear.
Getting Started
Materials & Tools
Before diving into your first stitch, gather the following supplies:
- Yarn: High-quality 5-ply combed cotton (such as Loopara). To achieve the classic retro palette, you will need four distinct shades: Forest Green, Sky Blue, Sunset Orange, and Deep Purple.
- Crochet Hook: 3.0 mm (Size C-2 or D-3 depending on your brand’s conversion).
- Notions: A sharp pair of scissors, a blunt-tipped yarn needle for weaving in ends and seaming, and a few locking stitch markers to assist with alignment during assembly.
Gauge & Pattern Notes
- Tension: Consistent tension is the secret to a perfectly square motif. If your tension tends to change, your squares will vary in size, making assembly difficult.
- Hook Consistency: Do not switch hook brands or sizes mid-project, as sizing standards can vary slightly.
- Color Changes: To transition smoothly between the flower petals and background rows, cut your working yarn at the end of the designated round, pull it through the final loop, and attach your next color to any chain-space or stitch using a slip knot or standing stitch.
Section 1: The Floral Granny Square Motif
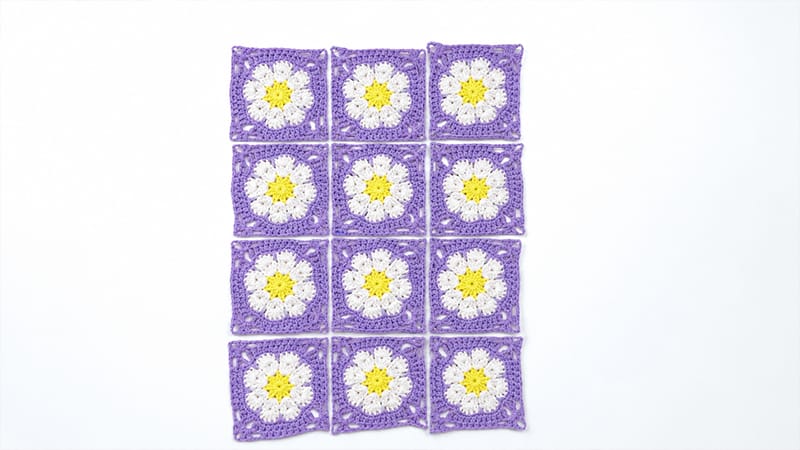
You will need to create a grand total of 24 individual squares (12 squares for each side of the bag).
Abbreviation Key:
ch = chain | sl st = slip stitch | sc = single crochet
hdc = half double crochet | dc = double crochet | tr = treble crochet
Round 1 (The Flower Core): Begin by forming a magic ring. Chain 3 (counts as your first double crochet here and throughout). Work 1 double crochet into the ring, then chain 1. Work 2 double crochet into the ring, chain 1. Repeat from * to * 6 more times.
Close the loop tightly by pulling the yarn tail. Join with a slip stitch to the top of your beginning chain-3. Fasten off and switch to your next color. (You should have 8 pairs of double crochets separated by 8 chain-1 spaces).
Round 2 (Expanding the Petals): Secure your new yarn color into any chain-1 space from the previous round. Chain 3, then work 1 double crochet into that same space. Chain 2. In the next chain-1 space, work 4 double crochets, then chain 2.
Repeat from * to * 6 more times. To finish the very first cluster, work 2 double crochets back into the initial starting space. Join with a slip stitch to the top of the beginning chain-3. Fasten off and change colors.
Round 3 (Forming the Flower Tips): Attach your third yarn color to any chain-2 space. Chain 2 (counts as a half double crochet). In the same space, work 3 double crochets and 1 half double crochet.
Move to the next chain-2 space and work the following sequence: 1 half double crochet, 3 double crochets, and 1 half double crochet. Repeat from * to * in each remaining space around. Join with a slip stitch to the top of the beginning chain-2. Fasten off and change colors.
Round 4 (The Stabilizing Border): Attach your next color to any stitch. Chain 1. Work 1 single crochet into every stitch around the perimeter of the flower.
You will finish with exactly 48 single crochets. Join with a slip stitch to the first single crochet. Do not fasten off; continue with the same color.
Round 5 (Squaring the Circle): Chain 2 (counts as an hdc). Work 1 half double crochet into each of the next 7 stitches. In the next stitch, work 1 double crochet. In the following stitch, create your first corner by working: (1 treble crochet, chain 2, 1 treble crochet).
Now, begin the repeating pattern for the remaining three sides: Work 8 half double crochets across the side, 1 double crochet in the next stitch, and then form a corner in the next stitch with (1 treble crochet, chain 2, 1 treble crochet).
Repeat this sequence 2 more times until you reach the start of the round. Join with a slip stitch to the top of the beginning chain-2.
Round 6 (Final Framing): Chain 2 (counts as an hdc). Work 1 half double crochet in each of the next 2 stitches. Chain 2. Skip the next stitches to reach the corner chain-2 space; inside this corner space, work (2 double crochets, chain 3, 2 double crochets).
Chain 2, skip the next cluster of stitches, and work 6 half double crochets evenly along the side. Chain 2. Repeat from * to * 2 more times.
For the final side, work the corner sequence (2 double crochets, chain 3, 2 double crochets), chain 2, and work 3 half double crochets to complete the side. Join with a slip stitch, fasten off, and weave in all yarn tails neatly on the back of the square.
Section 2: Layout & Motif Connection
    Assembly Visual Aid (Make 2 Panels)
            [Sq 1]  [Sq 2]
    [Sq 3]  [Sq 4]  [Sq 5]  [Sq 6]
    [Sq 7]  [Sq 8]  [Sq 9]  [Sq 10]
            [Sq 11] [Sq 12]
Prep Work
Lay out your finished squares on a flat surface to arrange your color palette. Ensure all flowers are oriented in the same direction.
Take a quick photo of your layout with a smartphone; this will serve as your blueprint so you don’t accidentally mix up the order while sewing.
Seaming the Panels
- Divide your 24 squares into two groups of 12. Each group of 12 will form one side panel of the hobo bag.
- Place two adjacent squares together with their right sides facing each other (you will be sewing on the wrong side).
- Thread your yarn needle with a matching shade of yarn. Starting at the corner chains, insert your needle only through the inner loops (the back loop of the front square and the front loop of the back square). This hidden whipstitch method creates a clean, flat seam on the outside.
- When crossing intersections where four corners meet, stitch back and forth dynamically through the center junction to reinforce the structural integrity of the bag.
- Repeat this process until you have two identical, fully assembled 12-square panels.
Section 3: Crafting the Adjustable Strap
The strap utilizes a classic granny stripe texture that naturally complements the bag’s body while offering excellent durability.
- Row 1: Create a slip knot and chain 17. In the third chain from your hook, work 2 double crochets. Chain 1, skip the next chain stitch. Work 3 double crochets into the next chain, chain 1, skip 1 stitch. Repeat from * to * twice more, finishing with 3 double crochets in the last chain stitch. Turn your work.
- Row 2: Chain 3 (counts as a double crochet). Work 2 double crochets directly into the first chain-space from the previous row. Chain 1, skip the stitch cluster. Work 3 double crochets into the next chain-space, chain 1. Repeat across, ending with 3 double crochets in the final space. Turn.
- Rows 3–170: Repeat the Row 2 sequence. This builds a sturdy, continuous strap.Pro Tip: 170 rows is a standard measurement for a crossbody drop. Wrap the unfinished strap over your shoulder to test the length; add more rows if you prefer a longer drop, or subtract rows if you are petite or want a shorter shoulder-bag fit. Fasten off, leaving a long tail for seaming.
Section 4: Final Bag Integration
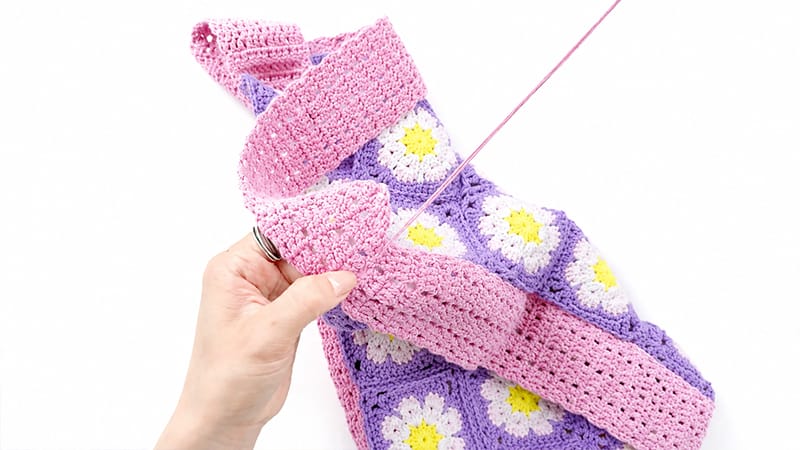
The strap acts as a gusset that wraps completely around the sides and bottom of the bag, connecting the front and back panels together.
       [ Strap Wraps Around Panels ]
             /=============\
            ||   [Panel]   ||
            ||    Front    ||
            ||             ||
             \=============/
- Alignment: Lay your front panel down flat with the wrong side facing out. Pin the long edge of your strap along the left side, bottom, and right side of the panel, perfectly aligning the edges.
- The Slip-Stitch Join: Insert your crochet hook through both the edge of the strap and the outer edge of the bag panel. Pull up a loop and slip stitch along the entire perimeter. Working through the side braids of the strap creates a sturdy, locked-in border.
- Attaching the Second Panel: Place the back panel over the assembly (wrong side facing out) and repeat the slip-stitch joining process along the opposite side of the strap.
- Closing the Loop: Bring the two raw ends of the strap together at the top apex. Using your yarn needle, seam them together securely using a back-and-forth mattress stitch.
- Reinforcement: Go back to the areas where the strap meets the top corners of the bag opening. Using your yarn needle and a double strand of yarn, sew extra reinforcing stitches into these high-stress corners. This prevents sagging and stops the weight of your items from snapping the stitches over time.
- The Reveal: Weave in any remaining yarn ends, clip them clean, and turn your completed hobo bag right side out! Treat it to a light steam blocking to perfectly settle the stitches.
