
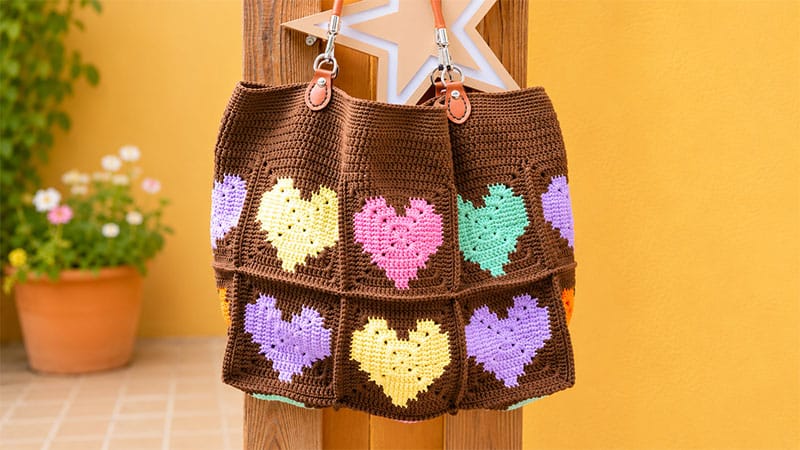
This charming crochet tote bag blends vintage granny square styling with a sweet, romantic heart motif.
Constructed by joining individual illustrated squares, this functional accessory features a structured opening and sturdy leather strap accents, making it both an eye-catching statement piece and a durable everyday bag.
Project Specifications
Required Materials
| Material | Specifications / Quantity |
|---|---|
| Yarn | Loopara 5-ply combed cotton (or equivalent weight yarn) |
| Crochet Hook | 3.0 mm (US Size C/2 or D/3) |
| Notions | Sharp scissors, yarn needle, locking stitch markers |
| Hardware | Leather straps with D-buckle attachments |
Pattern Abbreviations (US Terms)
- ch: Chain
- dc: Double crochet
- sl st: Slip stitch
- dc inc: Double crochet increase (work 2 double crochets into the same stitch or space)
- mr: Magic ring / Adjustable loop
Crochet Heart Granny Square Pattern
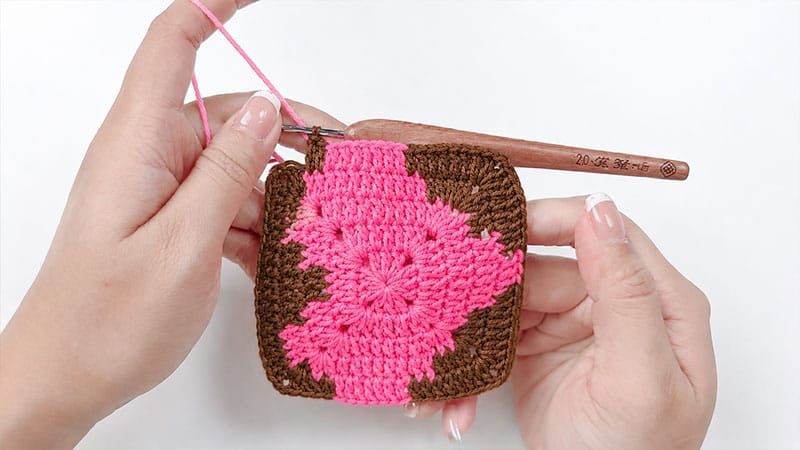
Color Management Note: This pattern uses two contrasting yarn colors (referred to as Red for the heart/accents and White for the background). To keep your work looking immaculate, carry your yarn neatly on the wrong side or use an invisible join technique when switching colors.
Step-by-Step Rounds
Round 1 (Red): Form a magic ring. Chain 3 (this and all subsequent starting chain-3s count as your first double crochet). Work 2 double crochets into the ring, then chain 2. Repeat the sequence of [3 double crochets, chain 2] three more times. Close the round by working a slip stitch into the third chain of your starting cluster. Snip the yarn and fasten off.
Round 2 (Red): Attach yarn to any corner chain-2 space. Work [chain 3, 1 double crochet, chain 2, 1 dc inc] all inside that corner space. Double crochet into each of the next 3 stitches. Repeat the corner and side sequence of [(1 dc inc, chain 2, 1 dc inc) in the corner, followed by 3 double crochets along the side] three times. Slip stitch into the top of the initial chain-3 to close.
Round 3 (Two-Tone):
- Slip stitch across the next 2 stitches to reach the corner space.
- First Side: In the corner, work [chain 3, 1 double crochet, chain 2, 1 dc inc]. Double crochet into the next 2 stitches. Transition to White yarn, then work 3 double crochets. Cut or drop the white yarn, switch back to Red, and work 2 double crochets.
- Remaining Sides: Repeat the sequence of [(1 dc inc, chain 2, 1 dc inc) in the corner space, followed by 7 double crochets along the side] three times using your red yarn. Secure the round with a slip stitch into the starting chain-3.
Round 4 (Two-Tone):
- Slip stitch across 2 stitches into the corner.
- Side 1: Work [chain 3, 1 double crochet, chain 2, 1 dc inc] in the corner, then 2 double crochets in red. Switch to White, work 7 double crochets.
- Side 2: Switch to Red, work 2 double crochets, then a corner of [1 dc inc, chain 2, 1 dc inc]. Double crochet across the next 9 stitches.
- Side 3: Switch to White, work 2 double crochets, then a corner of [1 dc inc, chain 2, 1 dc inc], followed by 2 double crochets. Switch to Red, work 7 double crochets.
- Side 4: Switch to White, work 2 double crochets, then a corner of [1 dc inc, chain 2, 1 dc inc], followed by 2 double crochets. Switch to Red and double crochet across the final 9 stitches. Fasten off the red yarn.
Round 5 (Two-Tone):
- Join the white yarn in the corner. Work [chain 3, 1 double crochet, chain 2, 1 dc inc], followed by 15 double crochets along the edge.
- Work a standard corner [1 dc inc, chain 2, 1 dc inc], then 2 double crochets in white. Switch to Red, work 7 double crochets.
- Switch to White, work 6 double crochets, a corner of [1 dc inc, chain 2, 1 dc inc], and 6 more double crochets. Switch to Red, work 3 double crochets.
- Switch to White, work 6 double crochets, a corner of [1 dc inc, chain 2, 1 dc inc], and 6 more double crochets. Switch to Red, work 7 double crochets. Fasten off the red yarn.
- Switch back to White, work the remaining 2 double crochets of the side, and slip stitch to the top of the starting chain-3.
Round 6 (White): Slip stitch 2 times to reach the corner. Work [chain 3, 1 double crochet, chain 2, 1 dc inc] in the corner, then double crochet into the next 19 stitches. Repeat the sequence of [(1 dc inc, chain 2, 1 dc inc) in the corner space, followed by 19 double crochets along the side] three times. Slip stitch to the initial chain-3, fasten off, and neatly weave in all remaining yarn tails.
Assembly & Construction
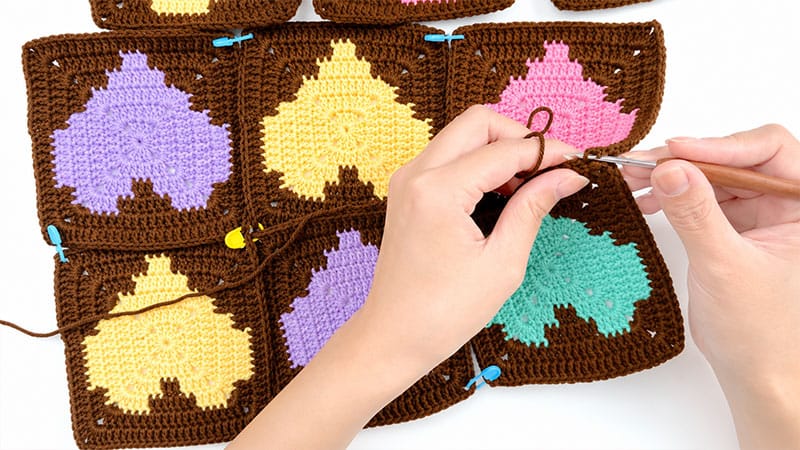
Joining the Squares
- Arrangement: Lay out your finished squares according to your desired bag layout. Ensure all heart motifs are oriented facing upward. Use locking stitch markers to pin the squares together and keep them aligned.
- Seaming: Place two motifs back-to-back with right sides facing out. Starting at a corner space, insert your hook through both pieces, pull up a loop, and single crochet across to join them. Maintain a relaxed, even tension so the seams do not puck or distort the bag.
- Intersection Points: When crossing previously seamed rows, work a single crochet directly into the junction to keep the layout smooth.
- Body Assembly: Complete all long vertical joins first, followed by the horizontal lines. Once flat assembly is complete, fold the piece in half according to your layout design and use single crochet borders to seal the bottom and side edges shut. Weave all loose ends securely into the wrong side of the fabric.
Fashioning the Bag Opening
- Round 1: Join your background yarn at the top rim of the bag with a slip knot. Chain 3 and double crochet evenly around the entire perimeter. When crossing over the valleys where two squares meet, execute a double crochet decrease to keep the edge flat and uniform. Join with a slip stitch.
- Rounds 2–6: Chain 3, then work 1 double crochet into every stitch around. Repeat for a total of 5 rows of double crochet.
- Rounds 7–13: Chain 1, then work 1 single crochet into every stitch around. Repeat for a total of 7 rows of single crochet to create a sturdy, non-stretch border. Fasten off and weave in the ends.
Strap and Hardware Attachment
- Positioning: Center your leather D-buckle tabs onto the reinforced single crochet rim at the top openings of the bag.
- Sewing: Thread a yarn needle with a split strand of matching yarn (or a heavy-duty sewing thread) for extra security. Stitch through the pre-punched holes in the leather hardware, passing through the crochet fabric multiple times.
- Finishing: Knot the yarn firmly on the interior of the bag, weave in the remaining tails, and clip into place your matching leather shoulder straps.
Care and Maintenance
- Daily Handling: To preserve the structural integrity of the stitches, avoid hanging the tote bag by its handles when it is heavily loaded. Gently brush off any lint or surface dust after use.
- Washing Instructions: Hand wash only. Submerge the bag in lukewarm water mixed with a delicate wool or cotton detergent. Press out soapy water gently—never wring, twist, or scrub the fabric. Rinse thoroughly, press out excess moisture with a clean towel, reshape the bag while damp, and lay it completely flat to air dry away from direct sunlight.
- Storage Advice: Keep your bag in a cool, well-ventilated space. Lightly fill the interior with acid-free tissue paper to preserve its shape during seasonal storage, and place it inside a breathable cotton dust bag.
