
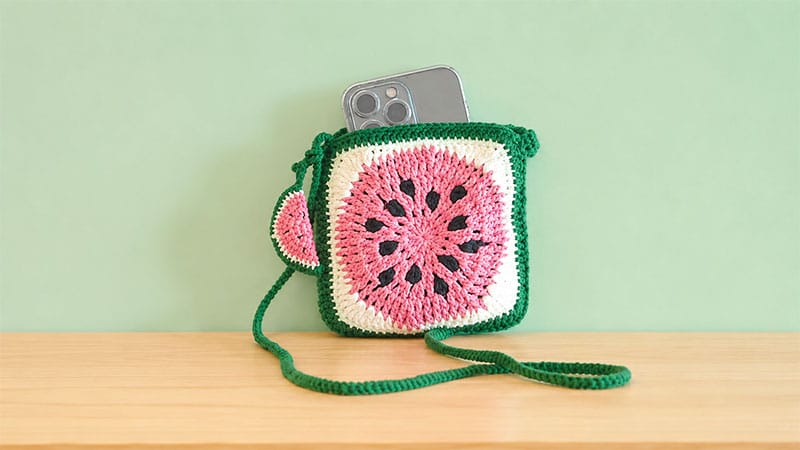
Bring a pop of juicy color to your warm-weather wardrobe with this vibrant watermelon-inspired mini bag.
Perfectly sized at 5 x 5 inches, this compact accessory is just right for holding your daily essentials—like keys, lip balm, and a smartphone—while adding a playful, handmade touch to any outfit.
By combining standard crochet stitches with a rich palette of cherry red, crisp white, and deep forest green, you will create a structured, professional-looking accessory that is as fun to make as it is to carry.
Project Specifications & Materials
Recommended Yarn & Colors
For a sturdy bag that holds its shape, use a high-quality 4-ply combed cotton or milk cotton yarn (such as Loopara) in the following shades:
- Color A: Cherry Red (for the juicy center)
- Color B: Black (for the seeds)
- Color C: Crisp White (for the inner rind)
- Color D: Light Green (for the outer rind)
- Color E: Forest Green (for the border and strap)
Tools & Notions
- Crochet Hook: 2.3 mm (or size needed to obtain a firm, tight tension)
- Essentials: Yarn needle, sharp scissors, and stitch markers
Pattern Abbreviations (US Terms)
- ch: Chain
- sc: Single crochet
- hdc: Half double crochet
- dc: Double crochet
- tr: Treble crochet
- FP dc: Front post double crochet
- sl st: Slip stitch
- bo: Bobble stitch (4-dc cluster into the same stitch, keeping the last loop of each stitch on your hook, then yarn over and pull through all loops)
- inc: Increase (work two of the designated stitches into the same space)
Step-by-Step Crochet Instructions
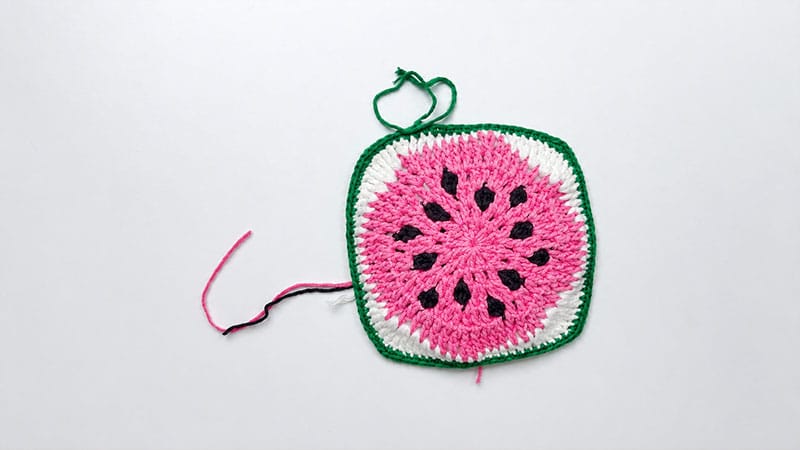
1. The Watermelon Granny Squares (Make 2)
We will start by crocheting a circle for the fruit center, then square it off using taller stitches at the corners.
- Round 1 (Red): Form a magic ring. Ch 3 (counts as first dc), ch 1. Work [1 dc, ch 1] 11 times into the ring. Join with a sl st to the 3rd chain of your starting hook. (12 dc spaces)
- Round 2 (Red): Ch 3, ch 1, 1 dc in the same base stitch. [Ch 1, 1 dc in next stitch, ch 1, (1 dc, ch 1, 1 dc) in the following stitch]. Repeat the pattern inside the brackets 5 times around. Ch 1, 1 dc, ch 1, then sl st to the starting ch-3 to close.
- Round 3 (Red & Black Seeds): Ch 3, ch 1. Pull up Black yarn to work 1 bo (seed), ch 1. Switch back to Red: [Ch 1, (1 dc, ch 1, 1 dc, ch 1), (ch 1, 1 dc, ch 1, 1 dc, ch 1). Switch to Black: 1 bo, ch 1]. Repeat around 5 times. Finish with Red by working a sequence of double crochets and chains to match the pattern, then sl st to close.
- Round 4 (Red & Black Seeds): Ch 3, ch 1, 1 dc, (ch 1, 1 dc, ch 1, 1 dc), ch 1, 1 dc, ch 1. [Switch to Black: 1 bo, ch 1. Switch to Red: ch 1, 1 dc, ch 1, (1 dc, ch 1, 1 dc, ch 1) twice, 1 dc, ch 1]. Repeat around 5 times, finishing with a final black seed and red filler stitches. Sl st to close.
- Round 5 (Red): Drop the black yarn completely. Ch 3, ch 1, 1 dc. Work a regular rhythm of [ch 1, 1 dc, ch 1, 1 dc, (ch 1, 1 dc, ch 1, 1 dc)] 13 times around to expand the circle. Sl st to close.
- Round 6 (Red): Ch 3, ch 1. Textured round: [(FP dc around the next post, ch 1) 6 times, then work a (FP dc, ch 1, FP dc, ch 1) increase in the next stitch]. Repeat this sequence 8 times around. Sl st to close.
- Round 7 (White Rind – Squaring Off): Attach White yarn. Ch 3, 1 dc inc, 1 tr inc, (work 3 tr in the next stitch to form a sharp corner), 1 tr inc, 1 dc inc, 1 dc, 1 hdc, 1 hdc. [Work 5 sc along the flat side, 1 hdc, 1 hdc, 1 dc, 1 dc inc, 1 tr inc, (3 tr in the corner stitch), 1 tr inc, 1 dc inc, 1 dc, 1 hdc, 1 hdc]. Repeat around 3 times to finish the square. Sl st to join.
- Round 8 (Light Green): Attach Light Green. Ch 1, work 6 sc down the side, then 3 sc into the exact corner stitch. [Work 21 sc along the flat side, 3 sc in the corner stitch] 3 times. Finish with 16 sc, then sl st to the first sc.
- Round 9 (Forest Green Border): Attach Forest Green. Ch 2, work 8 hdc down the side, then 3 hdc into the corner stitch. [Work 23 hdc along the flat side, 3 hdc in the corner stitch] 3 times. Finish with 17 hdc. Sl st to join, fasten off, and weave in all yarn tails securely.
2. The Crab Stitch Strap
Leave a generous tail of Forest Green yarn before beginning your slip knot.
- Chain 2. Work 1 sc into the second chain from your hook, then turn your work.
- Identify the two small strands on the left edge of your stitch, work 1 sc into them, and turn.
- Repeat this sequence continuously until your cord reaches your preferred crossbody or shoulder length. Ch 1, cut the yarn leaving a long tail, and pull through to secure.
3. The Decorative Watermelon Charm
This mini 3D slice hangs from the handle for an extra touch of character.
- Rounds 1–6 (Red & Black): Create a magic ring with Red. Work 7 sc into the center. Continue working in increasing spiral rounds (adding 7 stitches per round) until you have a flat, 42-stitch red circle. Use a single strand of Black yarn to embroider small seeds scattered across the surface.
- Round 7 (White): Attach White yarn. Ch 1, [5 sc, 1 sc inc] 7 times around. Fasten off.
- Round 9 (Forest Green Rind): Double your green yarn for extra thickness. Fold your completed red and white circle exactly in half into a wedge shape. Working through both thicknesses to close the wedge, chain 1, work an increase at the corner, sc across the curved edge, and finish with an increase at the opposite corner. Note: Pause halfway through to lightly stuff the inside with a pinch of poly-fil stuffing to make it plump.
- Round 10 (Hanging Loop): Ch 30 from the corner of the wedge, then slip stitch back into the first green stitch to form a hanging loop. Fasten off and hide the tails inside the charm.
Assembly & Finishing Touches
   [ Bag Opening - Top Left Unjoined ]
   +---------------------------------+
   |                                 |
   |     Panel 1 (Front Side)        |
   |                                 |
   |      [Slip Stitch Join]         |  <-- Connects 3 outer sides
   |                                 |
   |     Panel 2 (Back Side)         |
   |                                 |
   +---------------------------------+
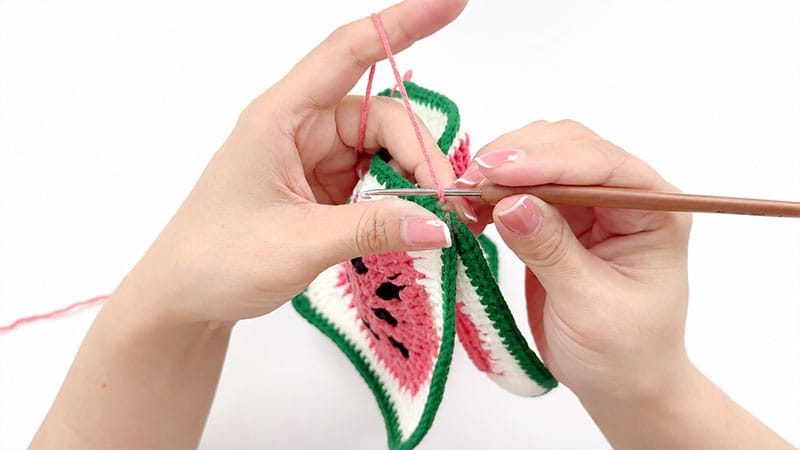
Joining the Panels
- Place your two completed watermelon squares together, ensuring the right sides are facing outward. Secure them in place with stitch markers.
- Using Forest Green yarn, insert your hook through the outer loops of both panels at a top corner.
- Slip stitch down the first side, across the bottom, and up the third side, keeping your tension loose so the bag doesn’t pucker. Leave the top side completely open.
- Once joined, work 1 round of single crochet evenly around the entire top opening of the bag to create a clean, reinforced rim.
Securing the Strap & Charm
- Thread one raw end of your green cord through the designated attachment point on the exterior side of the bag.
- Use your yarn needle and the long yarn tails to sew the strap firmly onto the bag frame, repeating the stitches multiple times for maximum strength. Knot it securely on the inside.
- Repeat this process on the opposite side, ensuring the strap isn’t twisted.
- Loop your 3D watermelon charm around the base of the strap where it meets the bag frame, pulling the wedge through its own 30-chain loop to lock it in place.
Care and Cleaning Guide
- Daily Maintenance: Shake out any loose crumbs or dirt after use. Avoid pulling or catching the outer loops on jewelry or keys.
- Washing: Hand washes only. Submerge the bag in cool water mixed with a drop of gentle, fabric-safe soap. Swish gently without twisting or scrubbing the embroidery.
- Drying & Storage: Press the bag flat between two clean towels to remove excess water. Reshape the squares into a perfect 5-inch alignment and let them air dry completely flat. To protect the strap from stretching over time, store the bag flat in a drawer rather than hanging it from a hook.
