
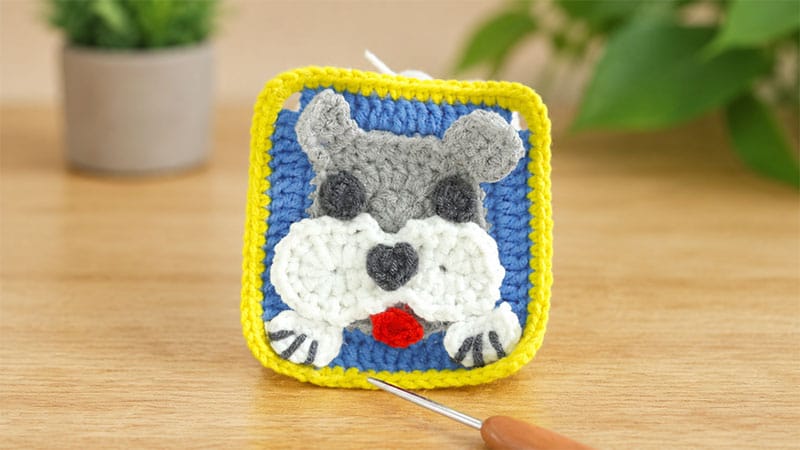
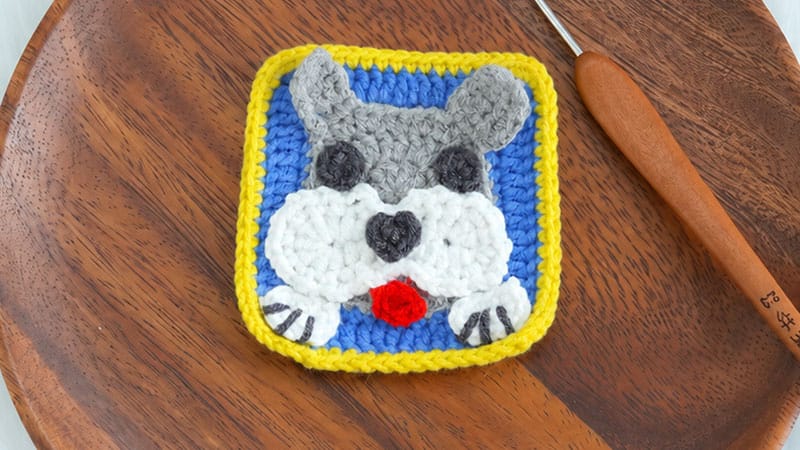
Bring some canine charm to your next yarn project with this adorable Dog Granny Square! Perfect for blankets, tote bags, or nursery decor, this pattern blends a classic granny square border with a sweet, multi-dimensional puppy face.
Whether you want to replicate your own furry best friend or create a colorful pack of different breeds, this beginner-to-intermediate pattern is highly customizable and bound to make tails wag.
Gear & Materials
- Yarn: Loopara 4-ply combed milk cotton (or any sports weight yarn) in White, Green, Orange, Red, and two shades of Grey.
- Hook Size: 2.3 mm (or size needed to obtain tight, clean stitches).
- Notions: Tapestry needle, scissors, stitch markers, and a dab of fabric glue or hot melt adhesive for securing facial pieces.
Abbreviations (US Terms)
- ch: chain
- sl st: slip stitch
- sc / hdc / dc: single / half double / double crochet
- inc: increase (2 stitches in the same space)
- BLO: back loops only
- dc2tog / sc2tog: decrease stitches over the next two spaces
Step-by-Step Pattern Instructions
1. The Square Base
Note: We begin by shaping the central head structure before transitioning into a traditional squared border.
- Round 1: Start with a ch 5. In the 4th chain from your hook, execute [1 dc, ch 1, 2 dc]. Work 6 dc back down the chain, then place [2 dc, ch 1, 2 dc] into the final chain loop.
- Round 2: Ch 3, then 1 dc. Create your first corner with [2 dc, ch 3, 2 dc]. Work 4 dc across. For the curved bottom, work a sequence of increases: 3 hdc inc, 2 dc inc, then 3 hdc inc. Crochet 2 dc, followed by a dc inc. Form your second corner using [2 dc, ch 3, 2 dc] and finish the round with 2 dc.
- Round 3: Ch 3. Work [1 dc, ch 3, 2 hdc] into the corner space. Put down 6 hdc. Work a series of curves: 3 hdc inc, 2 hdc, then another 3 hdc inc. Crochet 6 hdc down the side. In the next corner, work [2 hdc, ch 3, 1 dc]. Finish the row with 4 dc and snip your yarn to fasten off.
- Round 4 (Shaping the Face): Attach yarn to work in BLO. Ch 4, then work 7 sc. Crochet 2 hdc, then [1 hdc, 1 dc] in the next stitch. Ch 3, followed by [1 dc, 1 hdc]. Sc 1, ch 2, skip 2 stitches, and sl st 2. Ch 2, skip 2, sc 1. Work [1 hdc, 1 dc], ch 3, then [1 dc, 1 hdc]. Work 2 hdc, 7 sc, ch 4, sc 1, sl st 1, and finish with 8 hdc.
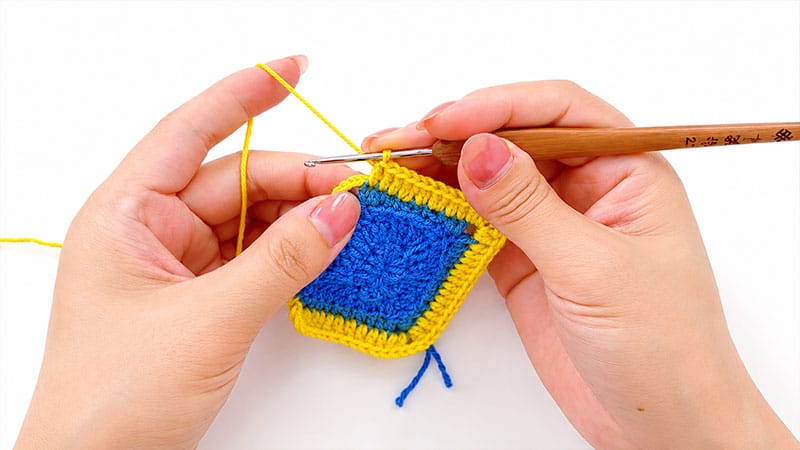
- Round 5 (Squaring Off): Connect your background border color. Ch 3, 3 dc. Dc2tog across the next two stitches, then 5 dc. Create a classic corner: [2 dc, ch 3, 2 dc]. Work 11 dc across the flat edge. Work another corner [2 dc, ch 3, 2 dc]. Work 5 dc, dc2tog, 5 dc. Build your third corner [2 dc, ch 3, 2 dc], follow with 11 dc, and establish your final corner [2 dc, ch 3, 2 dc]. End with a single dc and join.
- Round 6: Switch color if desired. Work sc around the entire perimeter, placing 5 sc into each of the ch-3 corner spaces to create a crisp border edge.
2. Facial Features & Details
Floppy Ears (Make 2)
- Rows 1–4: Ch 1, work 3 sc across. Turn at the end of each row.
- Row 5: Sc3tog to decrease the tip of the ear into a gentle point.
- Edging: Work 4 sc evenly down one side of the ear, 3 sc up the opposing side, and sl st to the start to finish.
The Snout/Mouth
- Round 1: Ch 12. Starting in the 4th chain from your hook, work [2 dc, 1 hdc]. Follow with 2 hdc, 3 sc, and 2 hdc. In the end chain, work a turning curve of [1 hdc, 5 dc, 1 hdc]. Working down the opposite side of the chain, complete 2 hdc, 3 sc, 2 hdc, 1 hdc, and 2 dc.
- Round 2: Repeat the sequence of [1 sc, ch 2] 5 times. Work 1 sc, then 3 sl st. Skip a stitch, then repeat [1 sc, ch 2] 9 times. Sc 1, skip 1, 2 sl st, skip 1, and finish with [1 sc, ch 2] 5 times.
The Tongue
- Round 1: Ch 3. Sc into the second chain from the hook. Place 3 sc into the final chain to round the corner, then finish with 1 sc on the underside.
The Nose
- Round 1: Inside a magic ring, work: 1 sc, 1 hdc, 1 dc, 1 hdc, 1 sc. Pull the ring tight and join.
The Eyes (Make 2)
- Round 1: Work 6 sc into a magic ring. Join with a sl st and leave a tail for sewing.
The Decorative Paw
- Round 1: Ch 4. Work 2 sc into the second chain from the hook. Work 5 sc, 1 sc, and 4 sc around the chain to form a tiny oval paw pad. Use your eye-colored yarn to stitch small toe lines.
Assembly & Finishing Touches
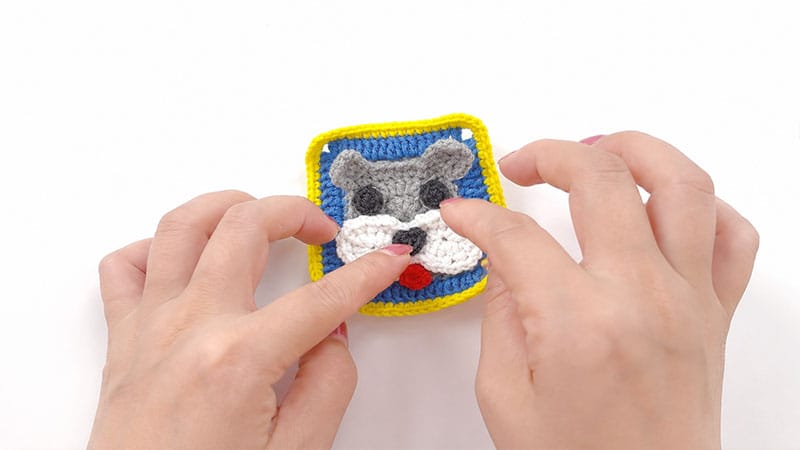
- Layout: Before picking up your needle, place the snout, tongue, nose, and eyes onto the center of your base square. Use sewing pins to secure them temporarily so nothing shifts.
- Stitching: Using your yarn needle and matching thread tails, applique the facial features onto the base.
- Ears & Paws: Sew the floppy ears to the upper corners of Round 4 so they frame the face nicely. Glue or sew the paw accent to a bottom corner of the square.
Care Guide
To ensure your handmade puppy squares stay looking pristine, treat them with a little extra love:
- Washing: Always opt for hand-washing in cool water with a gentle wool or delicate fiber wash. Never wring or twist the squares—instead, gently press out excess water by rolling them flat inside a clean towel.
- Drying: Lay the squares perfectly flat on a sweater drying rack away from the harsh sun. Gently nudge the facial features back into symmetry while the yarn is still damp.
- Storage: Keep your completed squares in a breathable fabric bag or a cotton bin. Toss in a few cedar balls to keep pests away naturally without relying on harsh chemicals.
