
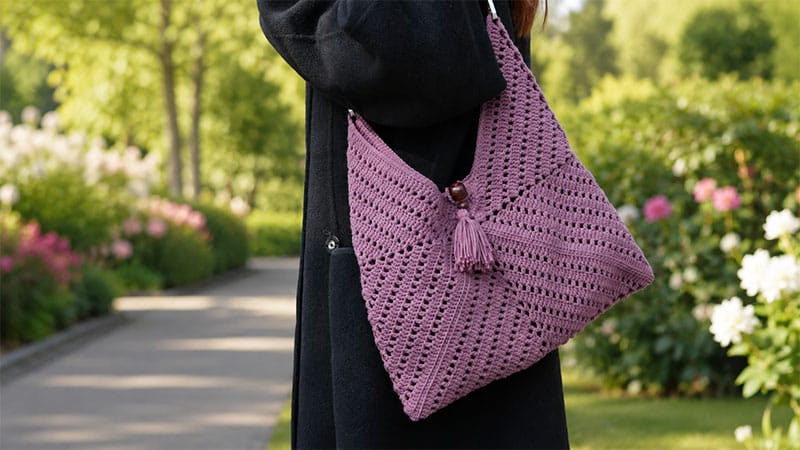
Elevate your daily style with this chic, structured tote built from just three minimalist blocks. By using a dense arrangement of stitches and a tight hook size, this project skips the typical “holy” look of traditional lace and creates a modern, durable fabric with subtle geometric texture.
Pattern Essentials & Specifications
Dimensions
- Individual Block: 9×9 inches
- Assembled Bag: Approximately 12.5 x 12.9 inches high
Tools & Materials
- Yarn: Loopara 5-ply combed milk cotton (or equivalent weight 3/Sport weight cotton yarn).
- Hook Size: 3.0 mm (chosen specifically to create a tight, stiff drape that holds its shape).
- Notions: Yarn needle, scissors, locking stitch markers.
- Hardware & Accents: Pre-made bag strap, coordinating large and small wooden beads.
Key Terms (US Crochet Terminology)
- ch: Chain
- dc: Double crochet
- hdc: Half double crochet
- sl st: Slip stitch
- sk: Skip a stitch
- MR: Magic Ring / Magic Circle
Step-by-Step Crochet Instructions
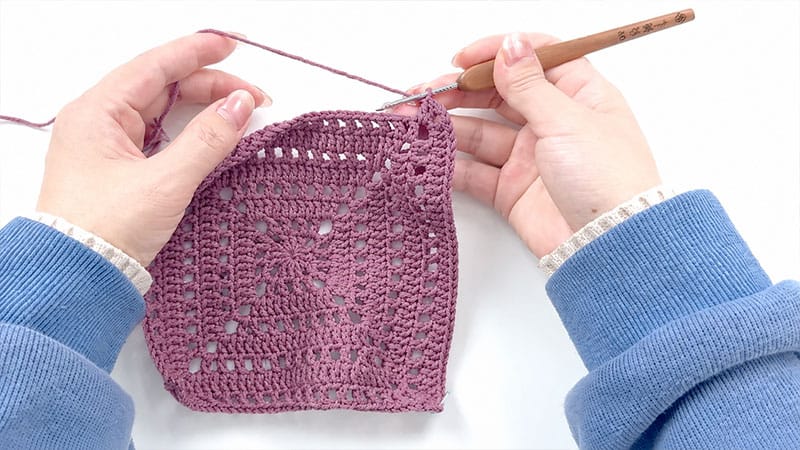
The Foundation Blocks (Make 3)
Note: This design alternates between solid double-crochet rows and open mesh rows to build a subtle, radiating grid pattern.
- Round 1: Inside a MR, ch 3 (counts as first dc). Work 2 dc. *Ch 3, 3 dc* repeat 3 times. Join the final corner by executing a ch 1 followed by an hdc into the top of the starting ch-3. (This positions your hook perfectly to start the next round from the center of the corner).
- Round 2 (Mesh): Ch 4 (counts as dc + ch 1). [Sk 1, dc, ch 1] twice. *In the corner space work (dc, ch 3, dc). [Ch 1, sk 1, dc] twice, ch 1* repeat around to the starting corner. Work a final dc into the first space, ch 1, hdc to join.
- Round 3 (Solid): Ch 3, dc into the corner space. Work 1 dc in every stitch and ch-1 space across the side (7 dc total). *(2 dc, ch 3, 2 dc) in the corner space, 7 dc across the side* repeat around. End with 2 dc in the first corner, ch 1, hdc to join.
- Round 4 (Mesh): Ch 4, [sk 1, dc, ch 1] 5 times. *(dc, ch 3, dc) in the corner space, ch 1, dc, [ch 1, sk 1, dc] 5 times, ch 1* repeat around. End with dc in the starting space, ch 1, hdc to join.
- Round 5 (Solid): Ch 3, dc in corner. Work 15 dc evenly across the side. *(2 dc, ch 3, 2 dc) in the corner, 15 dc across side* repeat around. End with 2 dc in the starting corner, ch 1, hdc to join.
- Round 6 (Mesh): Follow the established mesh logic, increasing the side count to 9 skipped-stitch repeats between corners. Join with ch 1, hdc.
- Round 7 (Solid): Follow solid stitch logic, working 23 dc across each side. Join with ch 1, hdc.
- Round 8 (Mesh): Work mesh logic with 13 skipped-stitch repeats across each side. Join with ch 1, hdc.
- Round 9 (Solid): Work solid stitch logic with 31 dc across each side. Join with ch 1, hdc.
- Round 10 (Mesh): Work mesh logic with 17 skipped-stitch repeats across each side. Join with ch 1, hdc.
- Round 11 (Solid): Work solid stitch logic with 39 dc across each side. Join with ch 1, hdc.
- Round 12 (Mesh): Work mesh logic with 21 skipped-stitch repeats across each side. Join with ch 1, hdc.
- Round 13 (Solid Final): Ch 3, dc in corner. Work 47 dc across each side. At the corners, work (2 dc, ch 3, 2 dc). When completing the final corner, ch 3, sl st to the initial ch-3 to close perfectly. Fasten off and weave in all loose tails.
Assembly & Finishing Flourishes
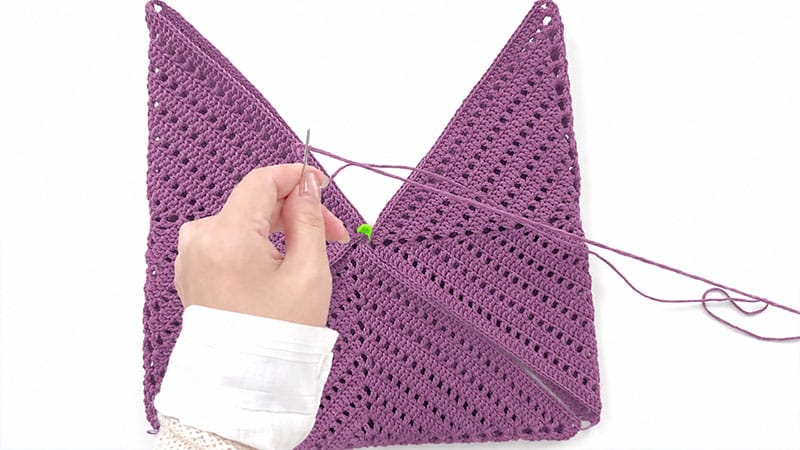
Seaming the Panels
- Layout: Arrange the three squares into an “L” shape or a shallow V-configuration, depending on your preferred origami bag layout. Use stitch markers to align the corners precisely.
- The Stitch: Face the right sides together. Thread your yarn needle and use a firm whipstitch through the back loops only (BLO) of the edge stitches. This keeps the seam strong but hidden. Double-stitch the starting and ending points for security.
Sculpting the Side Tabs
To create a clean anchor point for the hardware straps, you will crochet small tapered tabs directly onto the top sides of the bag.
- Row 1: Join yarn at the designated upper side edge. Ch 3, secure into the third stitch from the side crease, work 2 dc, secure to the opposite side stitch.
- Row 2 (Increase): Ch 3, anchor to the next side stitch, turn. Work an increase (2 dc in one stitch), 3 dc across, increase in the last stitch, and anchor to the corresponding side stitch.
- Row 3 (Increase): Ch 3, anchor, turn. Increase, 5 dc across, increase, anchor.
- Row 4 (Increase): Ch 3, anchor, turn. Increase, 7 dc across, increase, anchor.
- Edging: Repeat this tab configuration on the parallel side. Without cutting the yarn, work a clean round of single crochet (sc) around the entire upper rim of the bag to unify the raw edges. Fasten off.
Adding Accents & Accoutrements
- Bead Border: Thread a sewing needle with matching yarn. Securely anchor large wooden accent beads along the top border, spacing them evenly every 3 double-crochet stitches.
- Chain Link: Chain 20 firmly to create a short structural loop. Fasten this loop securely to the top opening of the bag to act as your primary anchor for the strap hardware.
- The Signature Tassel: Wrap your yarn around a 4-inch card or your fingers roughly 30 times. Tie the top bundle firmly with a 20cm strand. Cut the bottom loops open. Thread the top anchor strands upward through a small wooden bead, then a large wooden bead. Secure this entire tassel assembly directly below the main wooden bead on the bag. Tie a secure wrap around the tassel neck (1cm below the bead) to finish the look.
Care and Longevity Guide
Daily Maintenance
This bag features a dense stitch profile, but to prevent stretching, avoid carrying excessively heavy items. If any stray yarn ends pop out over time, gently tuck them back inside using a small crochet hook rather than cutting them.
Washing
Hand washes only in lukewarm water using a delicate wool or cotton rinse. Press the water out gently between clean towels—never twist or wring the fabric.
Drying & Storage
Reshape the bag manually while damp and dry it flat on a horizontal surface away from direct sunlight. Store it flat or stuffed with clean tissue paper inside a breathable cotton dust bag to preserve its silhouette. Do not store long-term hanging from its straps.
