

Create your own edgy, retro-inspired accessory with this Skull Granny Square Bag. Perfect for everyday use or as a spooky statement piece, this project transforms classic crochet techniques into a creepy-cool tote.
Below is a detailed, fully rewritten guide to making and assembling your bag from scratch.
Project Overview & Materials
This intermediate-friendly pattern yields a sturdy, eye-catching tote bag made by joining individual skull-themed motifs. Expect to practice magic rings, unique shaping stitches, and flat slip-stitch joining.
Required Materials
- Yarn: Loopara 5-ply combed cotton (or any Category 2/3 cotton yarn) in your chosen colors.
- Hook Size: 3.0 mm crochet hook (or size needed to obtain tight, crisp tension).
- Hardware: 2 D-rings and a premade strap (or hardware to attach your handmade strap).
- Notions: Stitch markers, yarn needle, and sharp scissors.
Stitch Abbreviations (US Terms)
- ch: Chain
- sc: Single crochet
- hdc: Half double crochet
- dc: Double crochet
- sl st: Slip stitch
- MR: Magic ring
1. The Skull Granny Square Motif
(Make 27 total)
Pro-Tip: To give your skulls a crisp, distinct shape, keep your tension relatively tight during Rounds 1 and 2.
Round 1 (The Skull Core)
Form a MR. Ch 2 (counts as your first dc). Work 9 dc into the center of the ring. Next, create the jaw/base shaping by working: ch 5, 1 dc, ch 3, 1 dc, and ch 5. Gently pull the yarn tail to tighten the magic ring close. Join with a sl st to the top of your beginning ch-2.
Round 2 (Defining the Skull Outline)
Ch 1 (does not count as a stitch). Work 1 sc into each of the first 9 dc from the previous round. Continue with 6 sc across the next chain space.
- To form the bottom corner: Sl st, ch 2, 2 dc, ch 2, sl st all into the next space.
- Work 6 sc along the final chain space. Sl st to the first sc to join. Fasten off yarn and neatly weave in your ends.
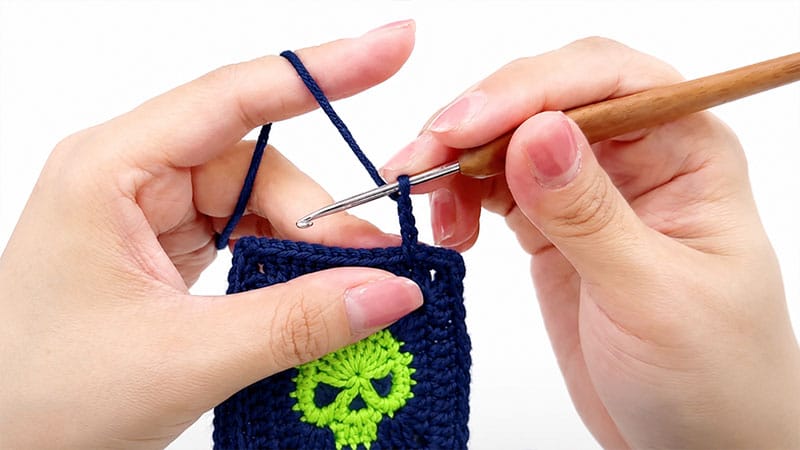
Round 3 (Squaring the Motif – Color Change)
Attach your background color yarn to any corner space.
- Starting Corner: (1 dc, ch 3, 2 dc) in the same space.
- Sides & Corners: *Work 1 dc, 3 hdc, 1 dc along the side. In the next corner space, work (2 dc, ch 3, 2 dc).* Repeat from * to * once more.
- Bottom Edge: Work 1 dc, 3 sc, 1 dc across the jawline edge. Work a standard corner in the next space: (2 dc, ch 3, 2 dc).
- Final Side: Work 1 dc, 3 hdc, 2 dc. Sl st to the initial stitch to close the round.
Round 4 (The Final Border)
Repeat the following sequence 4 times around the square: Work 9 dc evenly across the straight edge, and place a standard corner of (2 dc, ch 3, 2 dc) into the corner chain spaces. Sl st to join, fasten off, and leave a medium tail for joining.
2. Crocheting the Straps
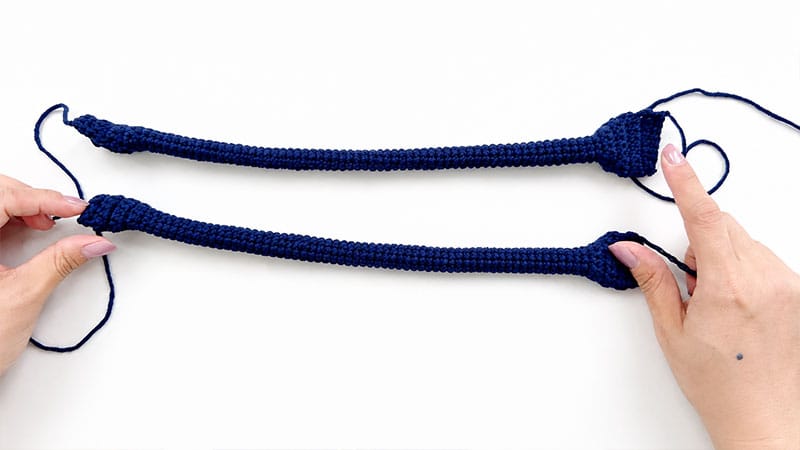
(Make 2)
Base & Setup
Leave a 10-inch yarn tail before making your slipknot (you will use this later to sew the strap to the bag). Ch 9.
Segment 1 (The Anchor)
Starting in the 2nd ch from your hook, work 8 sc. *Ch 1, turn, and work 8 sc.* Repeat from * to * 7 more times (8 rows total).
Segment 2 (The Main Body)
Sl st into the first stitch, ch 1. *Work 8 sc, sl st to the side, ch 1.* Repeat this sequence 59 times to build the length of your strap.
Segment 3 (The Ending Anchor)
Repeat the row-by-row sequence from Segment 1: *Work 8 sc, ch 1, turn* 9 times total. Cut your yarn, leaving a 10-inch tail for assembly.
3. Bag Assembly Guide

Step-by-Step Joining
- Layout: Arrange your 27 finished skull squares into your desired layout panel and secure adjacent corners temporarily with stitch markers.
- Horizontal Seams: Place two squares facing each other with their wrong sides together. Working through the inside loops (the back loop of the front square and the front loop of the back square), use your hook to slip stitch the squares together.
- Continuous Joining: Follow your layout rows, slip-stitching continuously across the long horizontal lines. Secure and fasten off at the end of each long row.
- Vertical Seams: Repeat the process along the vertical seams. When crossing over previous horizontal joins, work a tight sl st directly into the center junction to keep the intersection flush.
- Shaping the Bag: Fold the fully joined flat panel in half with the right sides facing inward (inside out). Use stitch markers to align the side profiles and the bottom base perfectly.
- Seaming the Edges: Slip stitch down the sides and across the bottom of the bag to secure its structure. Fasten off and weave in all yarn tails securely.
Finishing the Opening
Turn the bag right-side out. Attach your yarn to the top opening rim and work two complete rounds of single crochet all the way around the border to clean up the edges and add structural integrity.
Attaching Hardware & Straps
- D-Rings: Position a D-ring on each exterior side profile of the bag, roughly 1 cm below the top edge opening. Using a yarn needle and a double strand of matching yarn, securely sew the hardware in place with multiple structural passes.
- Straps: Use the long yarn tails left on your crocheted straps to securely whipstitch them to your bag’s anchoring points or loop them directly through your hardware.
4. Care & Maintenance
To ensure your handmade cotton bag lasts for seasons to come, follow these cleaning guidelines:
| Care Type | Instructions |
| Daily Upkeep | Shake out loose debris after use. Spot-clean minor dirt or spills immediately using a damp cloth and mild soap. Avoid rubbing vigorously to prevent fabric pilling. |
| Washing | Submerge the bag in cool water mixed with a drop of gentle detergent. Massage softly by hand. Rinse thoroughly until water runs completely clear. Do not wring. Roll in a dry towel to press out excess water. |
| Drying & Storage | Lay the bag completely flat on a towel to air-dry, reshaping the skull motifs while damp. Once 100% dry, stuff lightly with tissue paper to preserve its shape and store in a cool place away from sunlight. |
