
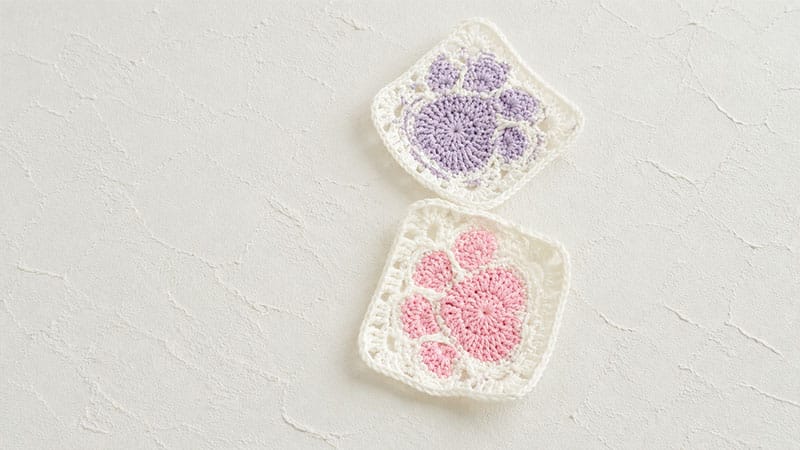
This charming pattern blends traditional granny square techniques with unique stitch placement to create a beautifully defined cat paw. Ideal for advanced beginners and intermediate crocheters, it results in a sturdy 3-inch square that will delight any feline lover.
Materials Needed
- Yarn: 4-ply combed cotton yarn (such as Loopara) in two contrasting shades:
- Color A (Background): Light Purple
- Color B (Paw Pads & Detail): Soft Pink
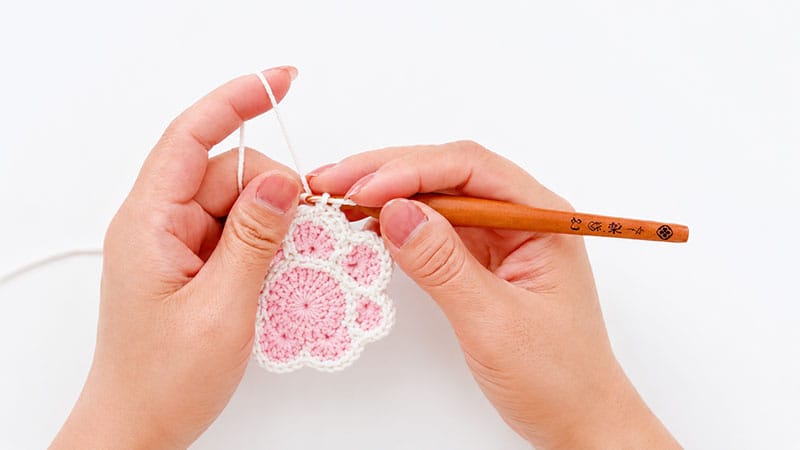
- Hook: 2.3 mm crochet hook
- Notions: Stitch markers, yarn needle, and sharp scissors
Pattern Abbreviations (US Terms)
- ch: chain
- st / sts: stitch/stitches
- sl st: slip stitch
- sc: single crochet
- hdc: half double crochet
- dc: double crochet
- tr: treble crochet
- inc: increase (2 stitches worked into the same loop)
- FPdc: Front Post double crochet
- Popcorn: Work 5 dc into the same stitch, drop the loop from your hook, insert hook into the first dc, grab the dropped loop, and pull it through to create a textured puff.
Step-by-Step Pattern Instructions
Step 1: Crafting the Base Foundation
We begin by establishing the center structure using the background color.
- Round 1 (Color A): Form a magic ring. Ch 3 (counts as your first dc), then work 15 dc directly into the ring. Pull the tail tight to close the center hole. Join with a sl st to the top of the beginning ch-3. (16 sts)
- Round 2 (Color A): Ch 1. Sc in the first st. In the next sequence of stitches, work:
[hdc, dc inc], followed by2 tr incover the next two stitches, then[dc inc, hdc]. Sc in the next st. Continue the sequence around to mirror the shapes:[hdc, dc],[dc, tr],[tr, dc],[dc, hdc]. Sc in the next st. Repeat the initial increase sequence:[hdc, dc inc],2 tr inc,[dc inc, hdc]. Sc in the last st. Join with a sl st to the first sc and fasten off.
Step 2: Shaping the Pink Paw Pad
Switching to your contrast color defines the central toes and pad.
- Round 3 (Color B): Attach your pink yarn. Ch 1. Work 3 sc, followed by 5 sc inc to widen the curve. Sc in the next 2 sts. Work 1 Popcorn stitch (this creates the first toe), then work 6 sc inc across the top curve. Work another Popcorn stitch (the second toe). Finish the round with 2 sc, 5 sc inc, and 3 sc. Secure the edge with an invisible join and fasten off.
Step 3: Building the Purple Outer Frame
We now reattach the background color to transition our rounded paw into a structured motif.
- Row 1 (Color A): Join yarn at the designated 3rd-row contrast point. Ch 2, dc inc, then work 3 dc into a single stitch. Skip 3 sts. Work
2 separate clusters of [3 dc in 1 st]. Skip 4 sts. Work another2 separate clusters of [3 dc in 1 st]. Skip 3 sts, work[dc inc, hdc]. Turn your work and sl st across. - Row 2 (Color A): Skip the first st. Work
2 separate clusters of [3 dc in 1 st]. Sl st into the large space, skip 2 sts, work 2 separate clusters of [3 dc in 1 st]—repeat this sequence twice. Skip 2 sts, work a final set of2 separate clusters of [3 dc in 1 st]. Sl st into the final stitch of the previous row to secure. Fasten off.
Step 4: Defining the Claws
- Round 1: Work
[2 sc, 2 sc inc, 2 sc, FPdc around the post from the previous row]a total of 3 times. Follow with 2 sc, 2 sc inc, 2 sc, and join with a sl st. - Round 2: Ch 1, sc in the first st.
*Ch 3, skip 3 sts, sc in the next st*—Repeat this sequence 5 times across the round. Ch 1, skip 3, hdc, ch 1, turn. - Round 3: Sc directly into the large space, ch 5, sc in the next space, ch 3, sc in the next space, ch 3, sc in space, ch 5. Sc into the next section, ch 3, skip 3, sc, ch 3, skip 3, sc. Skip 3, tr. In the next space, work
[tr, ch 3, dc]. Ch 3, skip 3, sc. Ch 3, skip 5, sc (this marks the middle alignment). Ch 3, skip 3, work[dc, ch 3, tr], followed by a standalone tr. Skip 3, sc, ch 3, skip 3, sc. Ch 1, hdc into the starting marker stitch, ch 2, turn.
Step 5: Squaring Off the Edges
This final round frames everything into a perfect 3-inch square.
- Round 4: In the first large gap, work
[tr, sc inc]. Ch 1. In the next space, work[sc, hdc], ch 1. - Corner Creation: In the corner space, work
[3 tr, ch 3, 3 tr]. Ch 1. - Down the flat side, work 3 separate clusters
3 dcinto the chain spaces, separating each cluster with a ch-1. - Repeat the Corner Creation
[3 tr, ch 3, 3 tr]at the next turn. Mirror the stitch combinations[tr, sc inc]and[sc inc, hdc]in the remaining spaces, completing the square framework. Join with a sl st to the very first stitch of the round, fasten off, and weave in your loose yarn ends securely.
Finishing & Care Tips
Tension Check: Keep your stitches relatively firm when forming the central paw pads so they pop forward, but relax your tension slightly on the outer framing chains to prevent the square from curling inward.
Blocking is Magic: To achieve perfectly straight edges and an exact 3-inch size, damp-block your finished squares. Pin them down onto a foam blocking mat using rustproof pins, spritz lightly with water, and let them dry completely before joining.
