
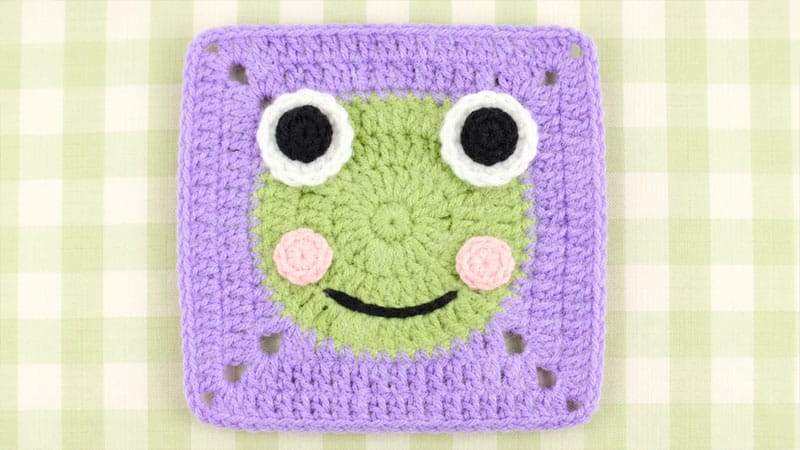
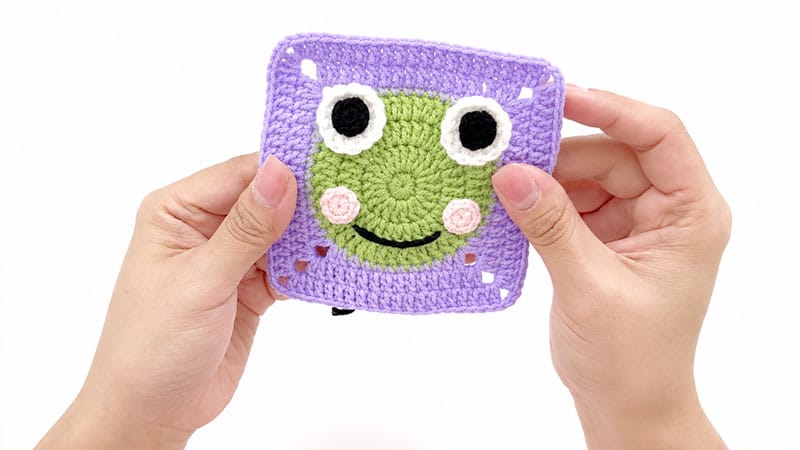
Bring a splash of whimsical charm to your next crochet project with this adorable Frog Granny Square!
Featuring a sturdy, circular center that transforms seamlessly into a crisp square border, this pattern is perfect for blankets, tote bags, or cozy cardigans.
With its bright, blushing cheeks and expressive eyes, this little amphibian is bound to put a smile on your face.
Materials & Tools
- Yarn: 4-ply Combed Cotton (e.g., Loopara or similar brand) in five colors:
- Green (Main body and square framing)
- White (Eyes and background border)
- Yellow (Alternative background accent)
- Pink (Blushing cheeks)
- Black (Pupils and embroidered smile)
- Hook size: 2.3 mm (or size needed to obtain a tight, neat tension)
- Notions: Stitch markers, yarn needle, sharp scissors, and hot melt adhesive (or textile glue) for securing applique pieces.
Pattern Notes & Abbreviations
This pattern uses US Crochet Terms.
- ch: Chain
- sc: Single crochet
- hdc: Half double crochet
- dc: Double crochet
- inc: Increase (work 2 stitches into the same stitch)
- sl st: Slip stitch
- MR: Magic Ring
- [ ] / ( ): Repeat instructions within brackets the specified number of times.
Pro-Tip: The initial chain-3 at the beginning of double crochet rounds counts as your first double crochet stitch throughout the pattern.
Step-by-Step Crochet Instructions
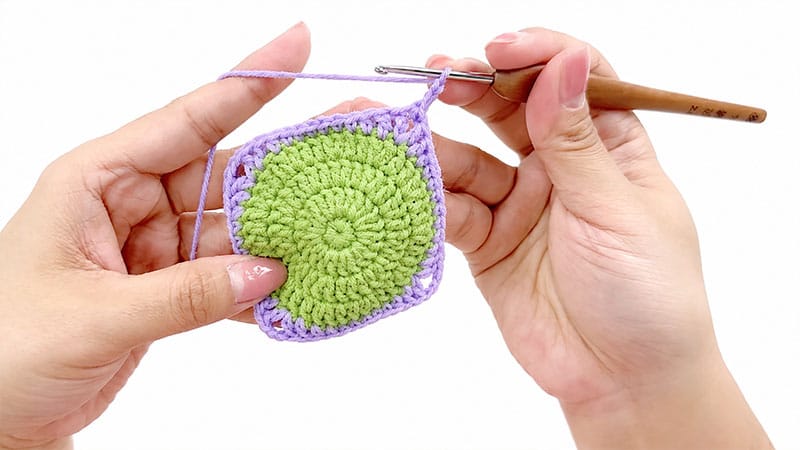
The Main Base & Square Frame
Start with Green yarn to build the frog’s face, transitioning to White or Yellow to square it off.
- Round 1: Form an MR. Work 11 sc into the ring. Join with a sl st to the first sc. Ch 3 (counts as 1 dc here and throughout). [11 stitches]
- Round 2: Work a dc inc into every stitch around. Join with a sl st. Ch 3. [22 stitches]
- Round 3: Create the expanding circle. [1 dc in the next stitch, 1 dc inc in the following stitch] repeat 11 times around. Join with a sl st. Ch 3. [33 stitches]
- Round 4: [1 dc in each of the next 2 stitches, 1 dc inc in the following stitch] repeat 11 times around. Join with a sl st. Fasten off the green yarn and weave in your loose tail. [44 stitches]
- Round 5:Switch to your background color (White or Yellow). Attach yarn with a ch 3.
- Work [1 dc, 1 hdc, 6 sc, 1 hdc, 1 dc, then form a corner by working (1 dc, ch 3, 1 dc) all into the next stitch].
- Repeat this sequence 3 times around.
- For the final stretch, work 1 dc, 1 hdc, 6 sc, 1 hdc, 1 dc, and finish with (1 dc, 1 hdc) in the last space to complete the square profile. Join with a sl st. Ch 3.
- Round 6: Expanding the square. Work 12 dc across the straight edge. When you reach the corner ch-3 space, work your corner cluster: [(2 dc, ch 3, 2 dc)]. Repeat this sequence around the remaining three sides. Complete the round with 2 dc and 1 hdc. Ch 3.
- Round 7: Final smoothing round. Work 16 dc along the straight edge. In each corner ch-3 space, work [(2 dc, ch 3, 2 dc)]. Repeat around all four sides. Finish the final side with 2 dc, join with a sl st, fasten off, and cleanly weave in the remaining ends.
Rosy Cheeks (Make 2)
Using Pink yarn.
- Round 1: Create an MR. Work 8 sc directly into the ring. Join the first stitch with a sl st. Fasten off, leaving a short tail if gluing, or a long tail if you prefer to sew them down.
The Eyes (Make 2 of each part)
White Outer Eye
Using White yarn.
- Round 1: Create an MR. Work 6 sc into the ring. Join with a sl st, ch 2.
- Round 2: Work a dc inc into each of the 6 stitches around. Join with a sl st, fasten off, and secure the ends.
Black Pupil
Using Black yarn.
- Round 1: Create an MR. Work 6 sc into the loop. Join with a sl st, fasten off, and clip excess yarn.
Assembly & Finishing Touches
     [Eye: White + Black]    [Eye: White + Black]
              \                /
         ____________________________
        |    🌸                🌸    |
        |   [Cheek]  ( ^ _ ^ ) [Cheek] |
        |             [Smile]        |
        |____________________________|
- Assemble the Eyes: Layer the black pupils onto the center of the white outer eye discs. Secure them together using a drop of hot melt adhesive or a few quick stitches.
- Face Placement: Place your main square flat on your workspace. Position the completed eyes along the upper rim of the green inner circle. Place the two rosy pink cheeks slightly lower down on either side of the face.
- Affix the Appliques: Once you are happy with the symmetry, use your hot melt adhesive to cleanly glue the pieces down (or use a yarn needle to sew them in place).
- Embroider the Expression: Thread a yarn needle with a strand of black yarn. Sew a simple, cheerful curved line right between the cheeks to give your frog a joyful smile.
Care Guide
To ensure your finished piece stays vibrant and holds its shape, follow these maintenance steps:
- Washing: Hand washing in cool water with a mild, eco-friendly wool wash is highly recommended. If you choose to machine wash, place the item inside a mesh lingerie bag on a delicate cycle.
- Drying: Never wring or twist the crochet piece. Gently press the water out by rolling it inside a clean, dry towel. Lay it perfectly flat on a flat surface to dry.
- Blocking: Gently reshape the outer corners with your fingers while damp to ensure the square blocks out beautifully.
