
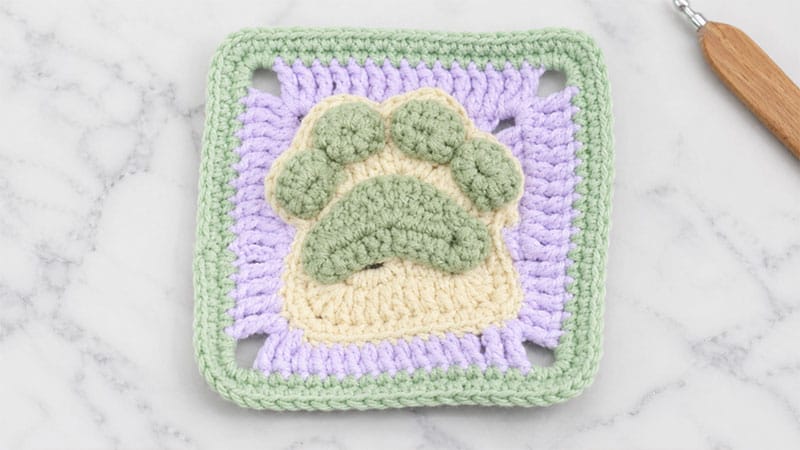
This pattern uses specialized structural stitches (like working into specific loops) to lift the paw motif off the background. It is completed by crocheting a separate central “pad” and small toe elements, which are assembled at the end.
Required Supplies
- Yarn: 4-ply combed milk cotton yarn (or a similar sport-weight yarn) in four contrasting colors (e.g., A: Base Background, B: Accent Motif, C: Main Paw Pad, D: Toes).
- Hook: 2.3 mm (or size needed to obtain a tight, neat gauge).
- Notions: Tapestry needle, scissors, stitch markers, and fabric glue or hot melt adhesive for secure assembly.
Stitch Abbreviations (US Terms)
- ch: chain
- sl st: slip stitch
- sc/sc inc: single crochet / single crochet increase (2 sc in one stitch)
- hdc: half double crochet
- dc/dc inc: double crochet / double crochet increase (2 dc in one stitch)
- tr: treble crochet
- dc2tog: double crochet two together (decrease)
- BLO / FLO: back loops only / front loops only
- sk: skip
Step-by-Step Crochet Instructions
1. The Square Base
Rounds 1–2: Establishing the Core
- Round 1: Form a magic ring. Ch 4, work 3 dc into the ring. Ch 2, 3 dc, 1 tr. Ch 1, finish the cluster with 9 sc. Pull the yarn tail firmly to close the central hole completely.
- Round 2: Ch 3, dc in the same space, 3 dc. Work 5 dc in the next space, then 3 dc. Work a dc inc, followed by 5 dc. Work 7 dc, then 5 dc. Join with a sl st to the initial chain and fasten off.
Rounds 3–4: Texturing the Background
- Round 3 (FLO): Working exclusively in the front loops, ch 3, dc in same st. Work a dc inc, then 2 dc. [3 dc in next st, 2 dc] repeat once. Work 2 consecutive dc incs, then ch 1 and turn your work. Sk 1 st, 3 hdc, sk 1 st, 1 sc. [Sk 1 st, 5 dc, sk 1 st, 1 sc] repeat twice. Sk 1 st, 3 hdc, and finish with a sl st.
- Round 4: Ch 1, turn. Work 1 sc. Repeat the following sequence 3 times: [3 sc in the next st, 2 sc, 1 sl st, 2 sc]. Work 3 consecutive sc incs, then 2 sc. Work 5 sc, followed by two sets of [3 sc in the next st]. Work 9 sc, two more sets of [3 sc in the next st], and finish with 6 sc before joining with a sl st.
Rounds 5–7: Transforming into a Square
- Round 5 (BLO): Attach your second background color to the back loops only. Ch 6, sk 2 sts, 3 dc, sk 2 sts. Ch 6, sl st to join and fasten off.
- Round 6: Working into the remaining front loops, execute [1 sc, 1 hdc, 1 tr]. Transition to the back loops for the corner structure: [5 dc, ch 3, 4 dc]. Work 3 dc along the side, then work the next corner into the back loops: [4 dc, ch 3, 5 dc]. Work 1 tr. Finish the side in the back loops with 1 hdc, 1 sc, and a sl st.
- Round 7: Ch 4, 3 tr, sk 1 st. Create a corner using [1 tr, ch 3, 1 tr], then 1 tr, sk 1 st. Work 11 dc, sk 1 st. Work 1 tr, create a corner [1 tr, ch 3, 1 tr], 1 tr, sk 1 st. Work 3 tr, then 8 tr. Create a wider corner with [2 tr, ch 3, 2 tr], followed by 11 tr. Create the final corner with [2 tr, ch 3, 2 tr], work 8 tr, and join with a sl st.
Rounds 8–9: Framing and Borders
- Round 8: Ch 1. Repeat the sequence [5 sc, 5 sc into the corner space, 10 sc] four times around the perimeter.
- Round 9: Ch 1. Accentuate the final border by repeating [7 sc, 3 sc into the corner stitch, 12 sc] four times. Fasten off and weave in your ends.
2. The Central Paw Pad
This separate element creates the large, distinctive heart-shaped pad of the paw.
- Round 1: Ch 10. Starting in the second chain from your hook, work 3 sc into the same loop. Work 7 sc down the chain. In the turning space, work 6 sc, then transition along the opposite side of the chain: [1 hdc, 1 dc], 1 dc2tog, [5 tr into a single chain space], 1 dc2tog, [1 dc, 1 hdc]. Finish the round with 3 sc in the final chain loop, and join with a sl st. Fasten off, leaving a tail for positioning.
3. The Toes (Make 4)
These small circular elements complete the paw print structure.
- Round 1: Ch 3. Work 1 sc into the second chain from your hook. In the remaining stitches, work a cluster of 5 sc, followed by another cluster of 4 sc to form a tight, neat circle. Join with a sl st and fasten off.
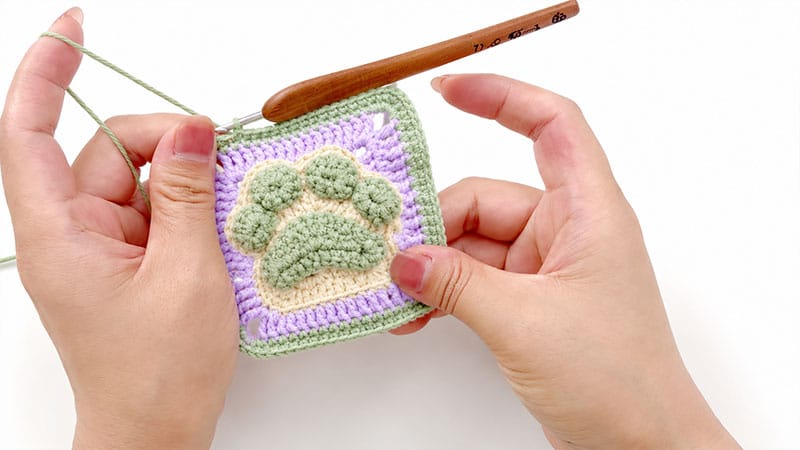
Assembly & Finishing
       [Toe]   [Toe]   [Toe]   [Toe]

             [ Central Pad ]

       =========================
       [      Square Base      ]
- Block Your Pieces: For clean edges, lightly steam or wet-block your background squares and paw pieces before assembling.
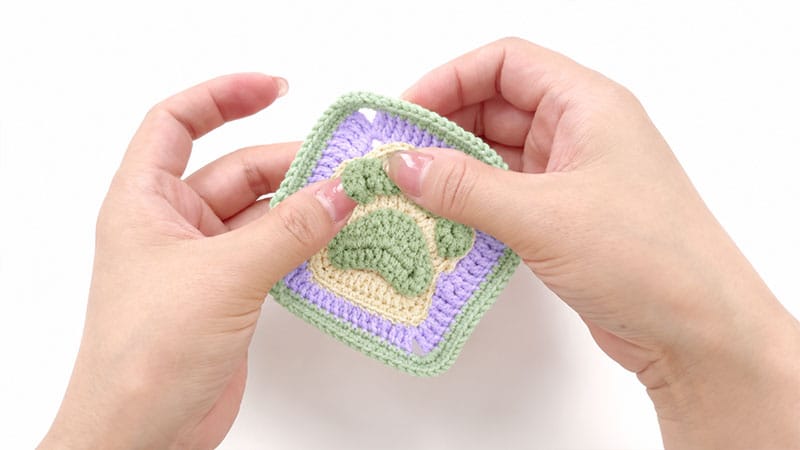
- Placement: Center the large paw pad onto the lower-middle section of the square base. Arrange the 4 small toes in a slight arch directly above the main pad.
- Securing: Use a small amount of hot melt adhesive or fabric glue to temporarily pin the pieces in place, then use a tapestry needle to neatly sew the elements down through the surface stitches of the base square.
Longevity and Care Advice
Washing: To maintain the structural crispness of the raised paw motif, hand-wash the finished items in lukewarm water with a mild wool or cotton wash. Avoid wringing the fabric.
Drying: Lay flat on a dry towel and reshape the corners manually. Never hang-dry crochet pieces, as the weight of the water will stretch the squares into rectangles.
Color Preservation: If utilizing high-contrast colors (like white and dark brown), add a splash of white vinegar to the first rinse cycle. This acts as a natural mordant to lock in the dyes and prevent bleeding.
