
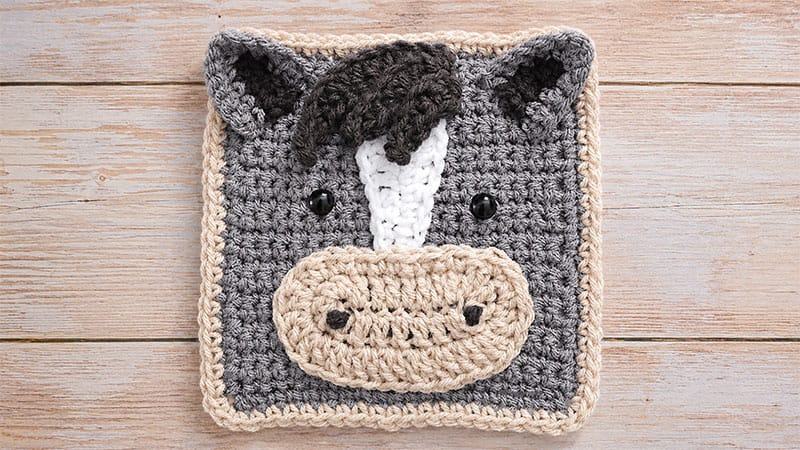
Bring this adorable equine friend to life with this simple, embellishment-based granny square alternative. By crocheting a solid square base and layering dimensional pieces, you will create a beautifully textured animal portrait.
Project Specifications
- Skill Level: Beginner / Advanced Beginner
- Finished Size: Standard animal block (approximately 7–8 inches, depending on tension)
- Estimated Time: 1 to 2 hours
- Terminology: US Crochet Terms
Gather Your Supplies
- Yarn: Medium Weight / Worsted Weight (Category 4) acrylic yarn (e.g., Red Heart Super Saver) in four distinct colors:
- Color A (Main Body): Medium Brown (Cafe Latte)
- Color B (Muzzle/Border): Oatmeal/Beige (Buff Beige)
- Color C (Mane/Ears/Nostrils): Dark Chocolate Brown (Coffee)
- Color D (Blaze): Clean White
- Hook: Size H/8 (5.0 mm) crochet hook
- Notions:
- Two 10mm plastic safety eyes (or black scrap yarn for embroidery)
- Tapestry needle for sewing and weaving ends
- Scissors
Step-by-Step Patterns
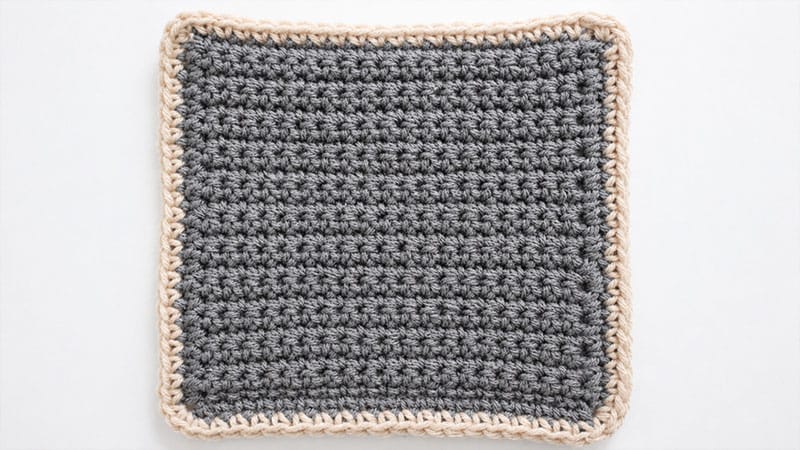
1. The Main Base Square
Using Color A (Medium Brown)
- Foundation Row: Leave a short tail and work 21 chain stitches.
- Row 1: Insert your hook into the second chain from your hook. Work 1 single crochet (sc). Continue placing 1 sc into every remaining chain stitch across. Chain 1 and turn your work. (20 sc)
- Rows 2 through 23: Work 1 sc into every stitch across the row. At the end of each row, chain 1 and turn. (20 sc per row)
- First Border Edge: After completing Row 23, do not turn. Instead, continue working sc stitches evenly down the three remaining raw edges of your square to create a clean perimeter. Put 2 chains in each corner space to allow the square to lie flat.
Switching Colors for the Final Border:
- Drop Color A and join Color B (Beige) in the final stitch. Cut Color A.
- Final Border Round: Work 1 sc into every stitch completely around all four sides of the square. To successfully turn the corners without curling, place exactly 2 sc into each corner space. Slip stitch to the first stitch to join. Fasten off, leaving a clean edge.
2. The Shaped Snout (Muzzle)
Using Color B (Beige), this piece is worked in an oval shape around both sides of a central foundation chain.
- Foundation Chain: Chain 10.
- Round 1:
- Skip the first 2 chains (counts as your first stitch space). Work 1 double crochet (dc) into each of the next 6 chains.
- In the very last chain stitch, work 4 dc to round the corner.
- Now, rotate your piece to work along the opposite side of your original foundation chain. Work 1 dc into the next 7 loops.
- Work 4 dc into the final loop to round the second corner. Slip stitch to the top of the beginning chain to join, then chain 1.
- Round 2:
- Work 1 sc into each of the first 7 stitches.
- Work 2 sc into the next stitch, followed by 2 half double crochets (hdc) into the following stitch.
- Work 2 dc into each of the next 11 stitches to widen the lower muzzle.
- Work 2 hdc into the next stitch, and finish with 2 sc into the last stitch.
- Slip stitch to join. Fasten off, leaving a long yarn tail for assembly.
Nostril Detail: Using your tapestry needle and Color C (Dark Brown), embroider two small horizontal parallel lines onto the front of the beige snout to represent the nostrils.
3. The Facial Blaze (White Stripe)
Using Color D (White)
- Foundation Chain: Chain 10.
- Row 1:
- Starting in the 3rd chain from your hook, work 1 dc into each of the next 4 chains.
- Work 1 hdc into the following chain, then 1 sc into each of the next 2 chains.
- In the final chain stitch, create a crisp point by working: (1 sc, chain 1, 1 sc) all into that single loop.
- Pivot to work down the back loops of the foundation chain: Place 1 sc into each of the first 2 loops, 1 hdc into the next loop, and 1 dc into the remaining 5 loops.
- Fasten off, ensuring you leave a long yarn tail.
4. The Layered Mane
The horse’s mane is built by creating three cascading yarn pieces using Color C (Dark Brown).
- Piece 1 (Large): Chain 11. Start in the 2nd chain from the hook: 1 sc in the first 2 chains, 1 hdc in the next 2 chains, and 1 dc in all remaining chains across. Fasten off.
- Piece 2 (Medium): Chain 9. Start in the 2nd chain from the hook: 1 sc in the first 2 chains, 1 hdc in the next 2 chains, and 1 dc in all remaining chains across. Fasten off.
- Piece 3 (Small): Chain 7. Start in the 2nd chain from the hook: 1 sc in the first 2 chains, 1 hdc in the next 2 chains, and 1 dc in the final 2 chains. Fasten off.
5. The Dimensioned Ears (Make 2)
The ears feature a dark background with a lighter accent row.
- Row 1: Using Color C (Dark Brown), chain 5. Starting in the 2nd chain from your hook, work 1 sc, 1 hdc in the next chain, and 1 dc in each of the last two chains.
- Row 2: Pull up a loop of Color A (Medium Brown) to join. Chain 1 and turn. Work 1 sc into the first 3 stitches, 2 sc into the apex/tip stitch, and 1 sc down the remaining 4 stitch spaces. Chain 1 and turn.
- Row 3: Work 1 sc into the first 3 stitches, 2 sc into each of the next 3 stitches to round the top of the ear, and 1 sc into the final 3 stitches. Fasten off, leaving a tail for attachment.
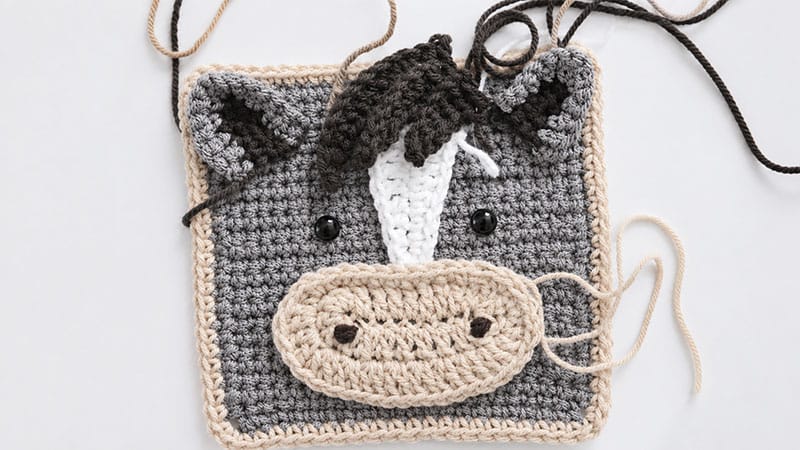
Assembly & Finishing Touches
- Block Your Pieces: Before sewing, weave in all minor stray ends. Lightly steam or block the main base square so it sits perfectly flat.
- Position the Facial Blaze: Center the white stripe vertically on the upper middle section of the square base. Pin it in place and whipstitch down securely using the white yarn tail.
- Attach the Muzzle: Place the prepared beige snout on the lower half of the square. Position it so the top curve slightly overlaps the bottom edge of the white face stripe. Securely sew it down around the perimeter.
- Arrange the Mane: Layer the three mane pieces at the top of the head, overlapping them slightly to give a full, textured look. Sew down securely right above the white blaze.
- Secure the Ears: Stitch the base of the ears to the left and right upper corners of the main brown square, angling them slightly outward.
- Place the Eyes: Secure your 10mm plastic safety eyes on either side of the white stripe, just above the muzzle line. (Alternatively, use a small amount of black yarn to embroider sleepy or round eyes).
Design Variation: Want a magical twist? Add a small, stuffed yellow or metallic cone to the forehead center to easily transform this pattern into a fairytale unicorn!
