
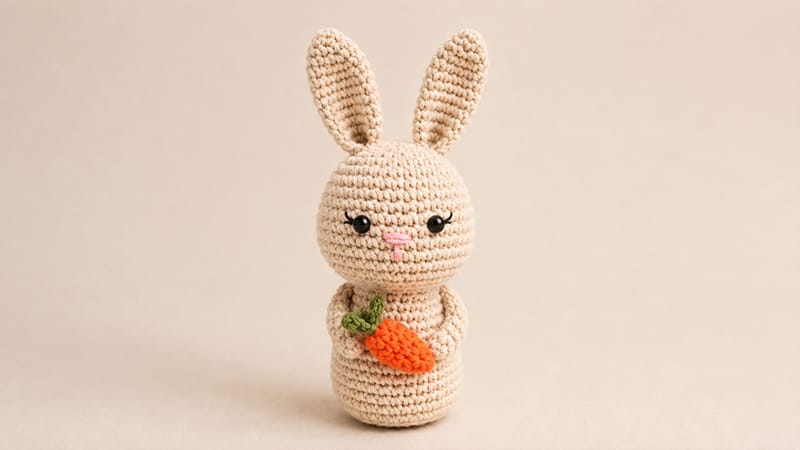
Meet your next favorite crochet project: a sweet, legless bunny amigurumi designed to stand perfectly upright on any flat surface.
Measuring just around 10 cm, this compact creation works wonderfully as a cozy desk buddy, a thoughtful handmade gift, or a charming keychain accessory.
Its streamlined design makes it beginner-friendly and swift to complete, requiring minimal sewing. While carrying a little carrot adds an extra layer of personality, you can easily omit it for a sleeker keychain build.
Grab your yarn, hook, and stuffing—let’s jump right into bringing this delightful little bunny to life!
Materials & Tools
- Yarn: Cotton yarn (Ricorumi or equivalent) in Brown, Orange, Green, and Pink
- Crochet Hook: 3.0 mm
- Safety Eyes: 6 mm (adjust size if using different yarn/hook weights)
- Yarn Needle
- Black Embroidery Floss
- Fiberfill Stuffing
- Scissors
Abbreviations & Stitches
| Abbreviation | Meaning |
|---|---|
| MR | Magic Ring |
| st / sts | Stitch / Stitches |
| sc | Single Crochet |
| inc | Increase (2 single crochet in one stitch) |
| dec | Decrease (Single crochet 2 stitches together) |
| ch | Chain |
| sl st | Slip Stitch |
| BLO | Back Loop Only |
| FLO | Front Loop Only |
Pattern Instructions
1. Head & Body (Worked as One Piece)
Stuff firmly with fiberfill as you progress.
- Rnd 1: 6 sc into a MR [6]
- Rnd 2: inc in every st around [12]
- Rnd 3: (1 sc, inc) × 6 [18]
- Rnd 4: (2 sc, inc) × 6 [24]
- Rnd 5: (3 sc, inc) × 6 [30]
- Rnd 6: (4 sc, inc) × 6 [36]
- Rnds 7–9: sc in all 36 sts [36] (3 rounds)
- Rnd 10: (5 sc, inc) × 6 [42]
- Rnds 11–14: sc in all 42 sts [42] (4 rounds)
Assembly Note: Attach the 6 mm safety eyes between Rnds 10 and 11, leaving about 6–8 stitches of separation between them.
- Rnd 15: (5 sc, dec) × 6 [36]
- Rnd 16: (4 sc, dec) × 6 [30]
- Rnd 17: (3 sc, dec) × 6 [24]
- Rnd 18: (2 sc, dec) × 6 [18]
- Rnd 19 (Neck/Body Expansion): (2 sc, inc) × 6 [24]
- Rnd 20: sc in all 24 sts [24]
- Rnd 21: (3 sc, inc) × 6 [30]
- Rnds 22–24: sc in all 30 sts [30] (3 rounds)
- Rnd 25: (4 sc, inc) × 6 [36]
- Rnds 26–29: sc in all 36 sts [36] (4 rounds)
- Rnd 30: (5 sc, inc) × 6 [42]
- Rnd 31: sc in all 42 sts [42]
- Rnd 32 (Flat Base Ridge): In BLO, (5 sc, dec) × 6 [36]
- Rnd 33: (2 sc, dec) × 9 [27]
- Rnd 34: (1 sc, dec) × 9 [18]
Facial Details: Using pink yarn, stitch a small triangular nose centered between the eyes. Thread black embroidery floss to add delicate eyelashes near the outer corners of each eye. Top off the stuffing inside the body.
- Rnd 35: dec around 9 times [9]
- Rnd 36: (1 sc, dec) × 3 [6]
Fasten off, weave the tail through the remaining front loops, pull tight to seal, and weave in the end.
2. Ears (Make 2)
Worked in Brown yarn. Do not stuff.
- Rnd 1: 4 sc into a MR [4]
- Rnd 2: (1 sc, inc) × 2 [6]
- Rnd 3: (1 sc, inc) × 3 [8]
- Rnd 4: (1 sc, inc) × 4 [10]
- Rnd 5: (1 sc, inc) × 5 [12]
- Rnds 6–12: sc in all 12 sts [12] (7 rounds)
- Rnd 13: Press the top edges flat and crochet 6 sc straight across through both layers [6]
Fasten off, leaving a long tail for sewing.
3. Arms (Make 2)
Worked in Brown yarn. Do not stuff.
- Rnd 1: 4 sc into a MR [4]
- Rnd 2: (1 sc, inc) × 2 [6]
- Rnds 3–8: sc in all 6 sts [6] (6 rounds)
Fasten off, leaving a long tail for attachment.
4. Tail
Worked in Brown yarn.
- Rnd 1: 6 sc into a MR [6]
- Rnd 2: inc in every st around [12]
- Rnds 3–4: sc in all 12 sts [12] (2 rounds)
Fasten off, leaving a tail for sewing. Lightly stuff before attaching.
5. Mini Carrot
Root (Orange Yarn)
- Rnd 1: 4 sc into a MR [4]
- Rnd 2: (1 sc, inc) × 2 [6]
- Rnd 3: sc in all 6 sts [6]
- Rnd 4: (2 sc, inc) × 2 [8]
- Rnd 5: sc in all 8 sts [8]
- Rnd 6: dec around 4 times [4]
- Close the top opening by weaving through the BLO of Rnd 6.
Leaves (Green Yarn)
- Join green yarn into any remaining FLO of Rnd 6.
- Work: (ch 3, 2 sl st back down the chain, then sl st into the next FLO) repeat 3 times. Finish with a final sl st.
Fasten off and hide yarn ends.
Final Assembly
- Ears: Stitch both ears securely to the crown of the head (around Round 4 or 5).
- Arms: Attach the arms to the sides of the body just beneath the neck seam.
- Tail: Sew the tail onto the lower back, positioned slightly above the bottom base line to help maintain balance.
- Carrot: Stitch the carrot between the bunny’s paws if desired, or leave it free-standing!
