
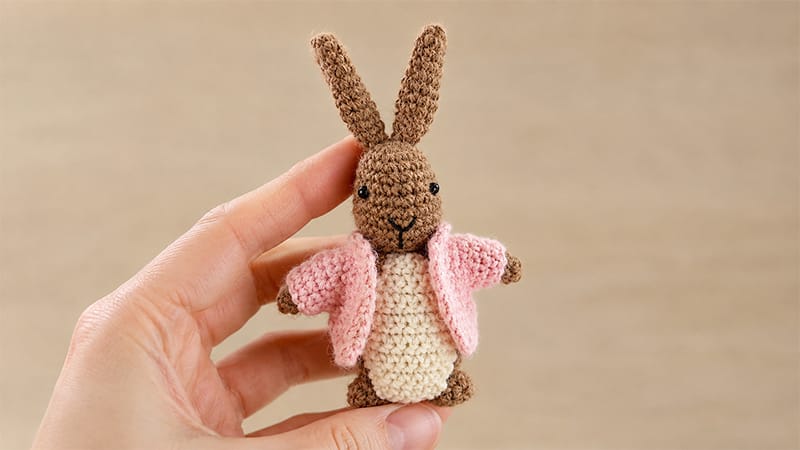
Welcome to this charming Peter Rabbit crochet amigurumi project! If you love crafting tiny, detailed figures, this tiny bunny, complete with a tailored cozy jacket, is a delight to create.
Utilizing soft alpaca wool yarn and a fine hook gives this standard-style plushie an extraordinarily delicate, rustic texture.
Step into the world of miniature fiber arts and bring this classic storybook friend to life with standard stitches and simple shaping.
Materials & Tools
- Yarn: Sport weight alpaca yarn in Beige, Brown, and a Jacket Color of your choice.
- Hook: 1.5 mm crochet hook.
- Notions: Thin black embroidery thread, yarn needle, sewing pins, scissors, fiberfill stuffing, and a stuffing tool.
- Finished Size: Approximately 7–8 cm tall.
Pattern Abbreviations
- MR: Magic ring
- ch: Chain
- sc: Single crochet
- sl st: Slip stitch
- inc: Increase (2 sc in same stitch)
- dec: Decrease (Invisible single crochet decrease)
- R (Raglan): 3 sc worked into the same stitch
Crochet Instructions
Head
Using Brown yarn.
- Rnd 1: 6 sc into MR [6]
- Rnd 2: 6 inc [12]
- Rnd 3: (3 sc,inc)×3 [15]
- Rnd 4: (4 sc,inc)×3 [18]
- Rnd 5: (5 sc,inc)×3 [21]
- Rnd 6: 21 sc [21]
- Rnd 7: (6 sc,inc)×3 [24]
- Rnds 8–10: 24 sc (3 rounds) [24]
- Rnd 11: (2 sc,dec)×6 [18]
- Rnd 12: (1 sc,dec)×6 [12]
Fasten off, leaving a tail for closing if needed. Stuff head firmly.
Ears (Make 2)
Using Brown yarn. Do not stuff.
- Rnd 1: 6 sc into MR [6]
- Rnd 2: (1 sc,inc)×3 [9]
- Rnd 3: 9 sc [9]
- Rnd 4: (2 sc,inc)×3 [12]
- Rnds 5–8: 12 sc (4 rounds) [12]
- Rnd 9: (2 sc,dec)×3 [9]
- Rnd 10: 9 sc [9]
Fasten off, leaving a long thread. Pinch flat and stitch opening closed.
Arms (Make 2)
Using Brown yarn. Do not stuff.
- Rnd 1: 6 sc into MR [6]
- Rnds 2–8: 6 sc (7 rounds) [6]
Fasten off, leaving a long thread. Flatten the top edge and sew closed.
Legs (Make 2)
Using Brown yarn. Do not stuff.
- Rnd 1: 6 sc into MR [6]
- Rnd 2: (1 sc,inc)×3 [9]
- Rnds 3–4: 9 sc (2 rounds) [9]
Fasten off, leaving a long tail. Flatten top edge and sew shut.
Body
Using Brown yarn. Stuff firmly as you go.
- Rnd 1: 6 sc into MR [6]
- Rnd 2: 6 inc [12]
- Rnd 3: (1 sc,inc)×6 [18]
- Rnd 4: (2 sc,inc)×6 [24]
- Rnd 5: (7 sc,inc)×3 [27]
- Rnds 6–8: 27 sc (3 rounds) [27]
- Rnd 9: (7 sc,dec)×3 [24]
- Rnds 10–12: 24 sc (3 rounds) [24]
- Rnd 13: (6 sc,dec)×3 [21]
- Rnd 14: 21 sc [21]
- Rnd 15: (5 sc,dec)×3 [18]
- Rnd 16: 18 sc [18]
- Rnd 17: (4 sc,dec)×3 [15]
- Rnd 18: (3 sc,dec)×3 [12]
- Rnd 19: 12 sc [12]
Fasten off, leaving a long tail to attach to the head.
Belly Panel
Using Beige yarn. Worked in flat turning rows. Chain 1 and turn at the end of every row.
- Foundation: Ch 5. Start in 2nd ch from hook.
- Rows 1–2: 4 sc (2 rows) [4]
- Row 3: Inc,2 sc,inc [6]
- Row 4: 6 sc [6]
- Row 5: Inc,4 sc,inc [8]
- Rows 6–11: 8 sc (6 rows) [8]
- Row 12: Dec,4 sc,dec [6]
- Rows 13–15: 6 sc (3 rows) [6]
- Row 16: Dec,2 sc,dec [4]
Fasten off, leaving a long tail for sewing.
Tail
Using Beige yarn.
- Rnd 1: 6 sc into MR [6]
- Rnd 2: 6 inc [12]
- Rnd 3: 12 sc [12]
- Rnd 4: (1 sc,dec)×4 [8]
Fasten off, leaving a tail. Add a small pinch of fiberfill.
Miniature Jacket
Worked in turning rows. Ch 1 and turn at end of each row. Note: R=3 sc into the exact same stitch.
- Foundation: Ch 20. Begin in 2nd ch from hook.
- Row 1: 3 sc,R,2 sc,R,5 sc,R,2 sc,R,3 sc [28]
- Row 2: 4 sc,R,4 sc,R,7 sc,R,4 sc,R,4 sc [36]
- Row 3: 5 sc,R,6 sc,R,9 sc,R,6 sc,R,5 sc [44]
- Row 4: 6 sc,R,8 sc,R,11 sc,R,8 sc,R,6 sc [52]
- Row 5 (Divide for Sleeves): 8 sc, skip 10 sts, work 15 sc, skip 10 sts, work 8 sc [31]
- Rows 6–7: 31 sc (2 rows) [31]
- Row 8: Dec,27 sc,dec [29]
- Row 9: Dec,25 sc,dec [27]
Fasten off and weave in ends.
Sleeves
- Attach yarn to the first stitch of a sleeve opening.
- Ch 1, work 10 sc around. Join with a sl st to the first stitch.
- Ch 1, turn. Work 10 sc, join with sl st. Fasten off and weave in end.
- Repeat for second sleeve opening.
Collar
- Join yarn at top corner edge of initial foundation neckline.
- Work 2 rows of 19 sc each (turn at end of Row 1). Fasten off and finish ends.
- Lightly steam-block the jacket with an iron using a damp press cloth.
Assembly Steps
Facial Features
Sculpt eye sockets using thread sculpting between Rounds 6 and 7 (approx 8 sts apart). Secure safety eyes or embroider small black dots. Embroider a 2 st-wide nose at Round 9 and extend a straight vertical mouth line down 2 rounds.
Ears & Head
Attach ears centered across Rounds 1–2 on top of the head. Stitch the head firmly onto the top opening of the body.
Limbs & Tail
Position legs low on the body (around Rounds 3–5). Attach arms just 1 round below the neck seam. Fasten the tail to the lower back, ensuring it acts as a tripod support so the rabbit stands stably.
Belly & Jacket
Center the beige belly panel on the front of the torso (neck to base) and stitch down around the edges. Dress the rabbit in its newly pressed jacket!
