
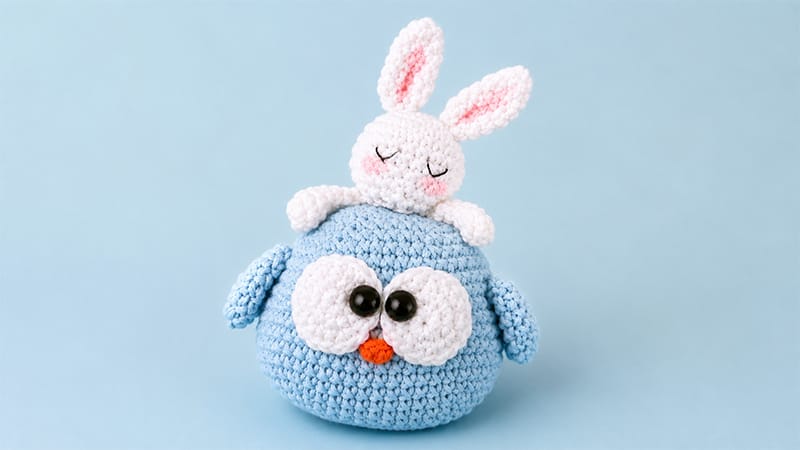
This delightful Chick with Bunny Amigurumi project combines two springtime favorites into one seamless, charming figure!
Crafting this duo requires minimal assembly, making it a fast and satisfying piece for crafters of any skill level.
With simple crochet techniques and a touch of soft pink makeup on the cheeks and ears, you can bring this adorable creation to life.
Grab your yarn and hook, follow the clear steps below, and prepare to craft a cute hybrid plushie that makes a perfect handmade gift!
Materials & Essentials
- Yarn: Cotton VN 1mm (Yellow, White, and a small amount of Orange for the beak)
- Crochet Hook: 2.0 mm
- Safety Eyes: Black safety eyes or embroidery thread
- Stuffing: Polyester Fiberfill
- Notions: Tapestry needle, scissors, and a stitch marker
Abbreviations (US Terms)
- MR: Magic Ring
- st / sts: Stitch / Stitches
- ch: Chain
- sc: Single Crochet
- inc: Increase (2 sc in the same st)
- dec: Decrease (sc 2 together)
- sl st: Slip Stitch
Pattern Instructions
Main Body (Chick – Yellow Yarn)
Create the oval base foundation:
- Foundation: Chain 12. Working along both sides of the chain, start in the 2nd ch from the hook.
- Round 1: 10 sc, 3 sc into the last ch; working on the opposite side: 9 sc, inc (24 sts)
- Round 2: inc, 9 sc, 3 inc, 9 sc, 2 inc (30 sts)
- Round 3: inc, 10 sc, inc, [1 sc, inc] × 2, 10 sc, inc, 1 sc, inc, 1 sc (36 sts)
- Round 4: 2 sc, inc, 11 sc, inc, [2 sc, inc] × 2, 11 sc, inc, 2 sc, inc (42 sts)
- Round 5: 1 sc, inc, 12 sc, inc, [3 sc, inc] × 2, 12 sc, inc, 3 sc, inc, 2 sc (48 sts)
- Rounds 6–14: sc in each st around (48 sts)
- Round 15: [6 sc, dec] × 6 (42 sts)
- Round 16: [5 sc, dec] × 6 (36 sts)
- Round 17: [4 sc, dec] × 6 (30 sts)
- Round 18: [3 sc, dec] × 6 (24 sts) (Start stuffing firmly)
- Round 19: [2 sc, dec] × 6 (18 sts)
- Round 20: [1 sc, dec] × 6 (12 sts)
- Round 21: 6 dec (6 sts)
Fasten off, weave the tail through the remaining loops to close, and hide the end inside.
Chick Wings (Make 2 – Yellow Yarn)
- Round 1: 6 sc in MR (6 sts)
- Round 2: 6 inc (12 sts)
- Rounds 3–6: sc in each st around (12 sts)
Fasten off, leaving a long thread for attaching to the sides of the chick body. Do not stuff.
Eye Backings (Make 2 – White Yarn)
- Round 1: 6 sc in MR (6 sts)
- Round 2: 6 inc (12 sts)
- Round 3: [1 sc, inc] × 6 (18 sts)
Fasten off, leaving a long tail for sewing onto the main face.
Bunny Attachment (White Yarn)
1. Bunny Head
- Round 1: 6 sc in MR (6 sts)
- Round 2: 6 inc (12 sts)
- Round 3: [1 sc, inc] × 6 (18 sts)
- Round 4: [2 sc, inc] × 6 (24 sts)
- Rounds 5–8: sc in each st around (24 sts)
- Round 9: [2 sc, dec] × 6 (18 sts)
- Round 10: [1 sc, dec] × 6 (12 sts)
Stuff the head firmly. Fasten off with a long tail for assembly.
2. Bunny Ears (Make 2)
- Round 1: 6 sc in MR (6 sts)
- Round 2: [1 sc, inc] × 3 (9 sts)
- Rounds 3–7: sc in each st around (9 sts)
Fasten off, leaving a tail for attachment. Do not stuff.
3. Bunny Arms (Make 2)
- Round 1: 6 sc in MR (6 sts)
- Rounds 2–6: sc in each st around (6 sts)
Fasten off, leaving a long end for sewing.
Assembly & Finishing Touches
- Facial Setup: Attach the black safety eyes to the center of the white eye circles, then secure the white circles to the front of the yellow body. Embroider a small orange beak between the eyes.
- Body Details: Stitch the yellow wings securely onto the sides of the chick.
- Bunny Details: Sew the two bunny ears onto the top of the white bunny head, and secure the small arms to its body.
- Final Assembly: Attach the completed bunny element securely to the chick according to your preferred design placement.
- Rosy Cheeks: Using a soft pink blush brush, apply subtle makeup to the bunny’s cheeks and inner ears to complete the look!
