
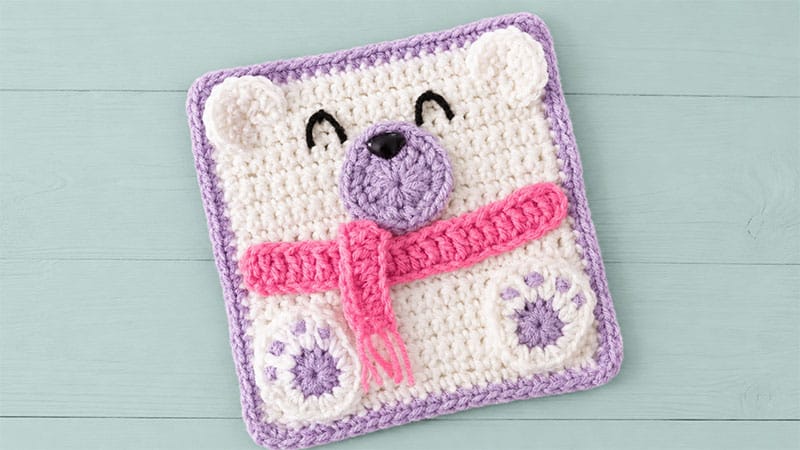
Perfect for crocheters of all skill levels, this project begins with a simple single-crochet base that transitions into a clean, contrasting border.
The real magic happens during assembly, where easy-to-create applique pieces—like dimensional ears, a cozy fringed scarf, and cute little paws—bring this charming arctic character to life.
Materials Needed
- Yarn: Medium-weight/Worsted weight yarn ($4$) in White, Dusty Gray, Turquoise Blue, and a small amount of Black.
- Hook Size: H/8 ($5.0\text{ mm}$) crochet hook
- Notions: Tapestry needle, scissors, and an optional safety nose.
Step-by-Step Pattern Instructions
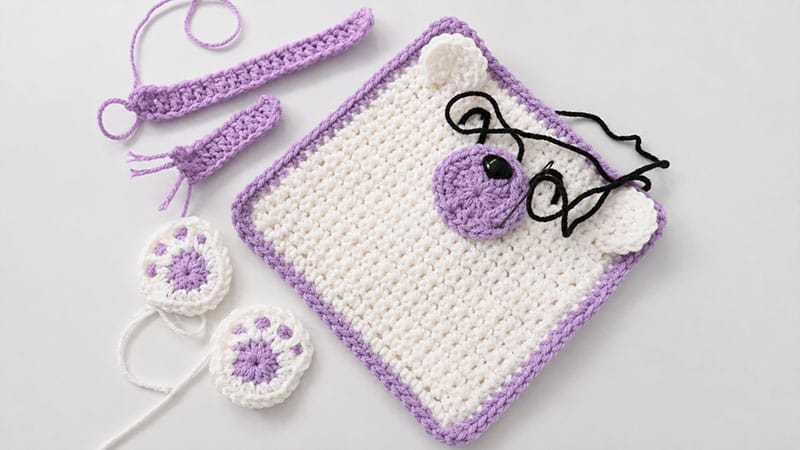
1. The Base Square
This square is worked from the bottom up in rows, then finished with a clean border.
- Row 1: Using White yarn, chain $21$. Work a single crochet (SC) into the second chain from your hook and into each remaining chain across. Chain $1$ and turn your work. ($20$ SC)
- Rows 2–23: SC in every stitch across. Chain $1$ and turn at the end of each row.Tip: Double-check your measurements here. If your piece doesn’t look perfectly square due to your personal tension, add or subtract a row or two.
- The Edge: Do not turn after Row 23. Work SC stitches evenly down the three raw sides of your square, placing $2$ chains in each corner to turn the bend smoothly.
- The Border: Drop the white yarn and join your Dusty Gray yarn. Fasten off the white. Work one SC into every stitch around all four sides of the square, placing $2$ SC stitches into each corner. Slip stitch to join, fasten off, and weave in your loose ends.
2. The Ears (Make 2)
- Row 1: Using White yarn, create a magic ring. Chain $1$ and work $6$ SC into the ring. Do not join into a circle; instead, chain $1$ and turn your work to create a half-circle.
- Row 2: Work $2$ SC into each stitch across ($12$ SC). Fasten off, ensuring you leave a long yarn tail for sewing.
- Assembly: Sew the flat edge of the ears onto the top two corners of your gray border.
3. The Snout
- Round 1: Using Dusty Gray yarn, create a magic ring. Chain $2$, then work $8$ double crochets (DC) followed by $4$ half-double crochets (HDC) into the ring. Join with a slip stitch to the top of your first DC. Chain $1$.
- Round 2: Work $2$ SC into every stitch around the circle. Slip stitch to join, then fasten off, leaving a long tail.
- Details: Embroider a nose and mouth using your black yarn and a tapestry needle (or secure your safety nose into the gray circle). Sew the completed snout onto the center of the white square, roughly 6 rows down from the top edge.
4. The Two-Piece Scarf
- Main Scarf: Using Turquoise Blue yarn, chain $24$. Work a DC into the 4th chain from your hook and into each chain across. To finish the edge nicely, chain $3$ and slip stitch into the very last chain. Fasten off, leaving a long tail.
- Scarf Tail: Chain $13$. Work a DC into the 4th chain from your hook and into each chain across. Fasten off. Cut a few short strands of turquoise yarn and loop them through the final DC stitch to create a fringed tassel effect.
- Assembly: Center the main scarf near the bottom third of the bear’s face. Overlap the short scarf piece at an angle in the middle to make it look like a wrapped winter scarf, then sew both pieces securely in place.
5. The Paws (Make 2)
- Round 1: Using Dusty Gray yarn, form a magic ring. Chain $1$ and work $12$ SC into the ring. Before closing the round, pull through your White yarn to join to the first SC. Fasten off the gray.
- Round 2: Using the white yarn, work $2$ SC into each of the first $7$ stitches, then work $2$ DC into each of the remaining $5$ stitches. Fasten off, leaving a long tail.
- Details: If desired, use a scrap of gray yarn to stitch three little claw lines onto the white section of the paw. Sew the paws onto the bottom two corners of your square.
Finishing Touches
Because this project involves sewing on multiple appliques, the back of your square will have visible stitches.
If you are joining multiple animal squares into a blanket or a large pillow, consider backing the final project with a soft fleece fabric or crocheting plain white backing squares to stitch back-to-back with your bear, hiding the messy side completely!
