
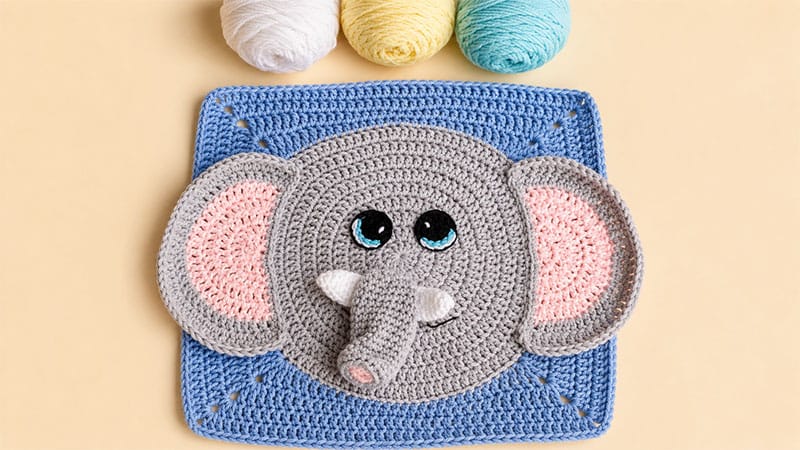
Bring a touch of the safari to your next crochet project with this adorable Elephant Granny Square! Originally designed as Part 9 of Tonya Bush’s year-long Wildlife Animal Blanket Crochet-Along (CAL), this textured, oversized 14″ x 14″ square is perfect for character blankets, playful nursery pillows, or standalone wall hangings.
What makes this pattern truly special is its whimsical, 3D design. Instead of a flat applique, the elephant features a textured, scrunched trunk and realistic little tusks that pop right off the fabric, making it a wonderful sensory experience for little hands.
Combined with expressive, multi-colored crochet cartoon eyes and beautifully contoured, oversized ears, this square is packed with personality.
Pattern Overview & Supplies
This pattern uses basic crochet stitches to create a flat circle for the elephant’s head, which is then dynamically squared off using escalating stitch heights.
The facial features and ears are crocheted separately and stitched onto the front panel at the end.
Finished Measurements & Gauge
- Final Size: Approximately 14” x 14” square.
- Gauge: First 4 rounds of the head circle = 4” across (or 4 double crochet stitches = 1”).
Recommended Materials
- Yarn: Medium Worsted Weight (Category 4) acrylic yarn (such as Red Heart Super Saver).
- Light Gray (approx. 115 yards) for the head, ears, and trunk.
- Frosty Green (approx. 80 yards) for the background squaring rounds.
- Baby Pink (approx. 42 yards) for the inner ears and trunk detail.
- White (approx. 26 yards) for the tusks and eye highlights.
- Black (approx. 11 yards) for the pupils and an embroidered smile.
- Turquoise Blue (approx. 1 yard) for the iris detail.
- Hook: Size I/9 (5.5 mm) crochet hook (or size needed to obtain gauge).
- Notions: Tapestry needle, sharp scissors, and a stitch marker for the continuous rounds.
Essential Pattern Notes
- Ch-3 Beginning: The initial chain-3 at the start of any double crochet row or round always counts as your very first stitch.
- Working in Rounds: The main face circle and the eyes are joined at the end of each round with a slip stitch. However, the trunk and tusks are worked in a seamless, continuous spiral; do not slip stitch to join these rounds, and use a stitch marker to keep track of your first stitch.
Detailed Step-by-Step Instructions
1. The Main Face Panel
Using Light Gray yarn.
- Round 1: Form a magic circle. Chain 3, then work 11 double crochets (dc) directly into the ring. Pull the yarn tail to close the center hole tightly. Join with a slip stitch (sl st) to the top of your beginning ch-3.
(12 stitches total) - Round 2: Ch 3, work 1 dc in the very same stitch. Work 2 dc into every remaining stitch around. Join with a sl st to the top of the ch-3.
(24 stitches) - Round 3: Ch 3, work 1 dc in the same stitch. Work 1 dc in the next stitch. *Work 2 dc in the following st, then 1 dc in the next st.* Repeat from * to * all the way around. Join with a sl st to the top of the ch-3.
(36 stitches) - Round 4: Ch 3, work 2 dc in the next stitch. *Work 1 dc in each of the next 2 stitches, then 2 dc in the following st.* Repeat from * to * until 1 stitch remains. Work 1 dc in that final stitch, then join with a sl st to the top of the ch-3.
(48 stitches) - Round 5: Ch 3, work 1 dc in the same stitch. Work 1 dc in each of the next 3 stitches. *Work 2 dc in the next st, then 1 dc in each of the next 3 stitches.* Repeat from * to * across the round. Join with a sl st to the top of the ch-3.
(60 stitches) - Round 6: Ch 3, work 1 dc in the next stitch, then 2 dc in the following st. *Work 1 dc in each of the next 4 stitches, then 2 dc in the next st.* Repeat from * to * until 2 stitches remain. Work 1 dc in each of the last 2 stitches, then join with a sl st to the top of the ch-3.
(72 stitches) - Round 7: Ch 3, work 1 dc in the same stitch. Work 1 dc in each of the next 5 stitches. *Work 2 dc in the next st, then 1 dc in each of the next 5 stitches.* Repeat from * to * across the round. Join with a sl st to the top of the ch-3.
(84 stitches) - Round 8: Ch 3, work 1 dc in each of the next 2 stitches, then 2 dc in the following st. *Work 1 dc in each of the next 6 stitches, then 2 dc in the next st.* Repeat from * to * until 3 stitches remain. Work 1 dc in each of the final 3 stitches, then join with a sl st to the top of the ch-3.
(96 stitches) - Round 9: Ch 3, work 1 dc in the same stitch. Work 1 dc in each of the next 7 stitches. *Work 2 dc in the next st, then 1 dc in each of the next 7 stitches.* Repeat from * to * across the round. Join with a sl st to the top of the first stitch. Fasten off the gray yarn and weave in the ends.
(108 stitches)
2. Squaring Off the Background
Switch to Frosty Green yarn to transform the circle into a granny square.
- Round 10: Securely join your green yarn into the first stitch of Round 9. Ch 1, then single crochet (sc) into that same stitch. Sc in the next st. Work 1 half double crochet (hdc) in each of the next 4 sts, 1 dc in each of the next 4 sts, and 1 treble crochet (tr) in each of the next 4 sts. *In the next stitch, create a corner by working: (2 tr, ch 2, 2 tr). Then work down the side: 1 tr in each of the next 4 sts, 1 dc in each of the next 4 sts, 1 hdc in each of the next 4 sts, 1 sc in each of the next 2 sts, 1 hdc in each of the next 4 sts, 1 dc in each of the next 4 sts, and 1 tr in each of the next 4 sts.* Repeat from * to * two more times. To finish the final side, work: (2 tr, ch 2, 2 tr) in the next stitch to create the last corner, then 1 tr in each of the next 4 sts, 1 dc in each of the next 4 sts, and 1 hdc in each of the next 4 sts. Join with a sl st to your initial sc.
(120 stitches + 4 corner spaces) - Round 11: Ch 1, sc in the same stitch, then sc in the next st. Work 1 hdc in each of the next 4 sts, 1 dc in each of the next 6 sts, and 1 tr in each of the next 4 sts. *Inside the ch-2 corner space, work: (2 tr, ch 2, 2 tr). Then work down the side: 1 tr in each of the next 4 sts, 1 dc in each of the next 6 sts, 1 hdc in each of the next 4 sts, 1 sc in each of the next 2 sts, 1 hdc in each of the next 4 sts, 1 dc in each of the next 6 sts, and 1 tr in each of the next 4 sts.* Repeat from * to * two more times. To finish the final side, work: (2 tr, ch 2, 2 tr) in the corner space, then 1 tr in each of the next 4 sts, 1 dc in each of the next 6 sts, and 1 hdc in each of the next 4 sts. Join with a sl st to the first sc.
(136 stitches + 4 corner spaces) - Rounds 12 – 13: Ch 3 (this counts as your first stitch). *Double crochet in every stitch across until you reach the ch-2 corner space. Inside the corner space, work: (2 dc, ch 2, 2 dc).* Repeat from * to * all the way around the square. Sl st to the top of the beginning ch-3 to close. Fasten off your yarn and cleanly weave in all background ends.
(Round 12 will have 152 stitches; Round 13 will have 168 stitches)
3. The 3D Applique Pieces
Elephant Ears (Make 2)
Start with Baby Pink yarn to create the inner ear.
- Row 1 (Right Side): Form a magic circle. Ch 3, then work 5 dc into the ring. Turn your work.
(6 stitches) - Row 2: Ch 3, dc in the very same stitch. Work 2 dc in every remaining stitch across. Turn.
(12 stitches) - Row 3: Ch 3, dc in the same stitch, 1 dc in the next st. *Work 2 dc in the next st, 1 dc in the next st.* Repeat from * to * across the row. Turn.
(18 stitches) - Row 4: Ch 3, dc in the same stitch, 1 dc in each of the next 2 sts. *Work 2 dc in the next st, 1 dc in each of the next 2 sts.* Repeat from * to * across the row. Turn.
(24 stitches) - Row 5: Ch 3, dc in the same stitch, 1 dc in each of the next 3 sts. *Work 2 dc in the next st, 1 dc in each of the next 3 sts.* Repeat from * to * across the row. Turn. Fasten off the pink yarn.
(30 stitches) - Row 6: Join the Light Gray yarn to the first stitch. Ch 3, dc in the same stitch. [Work 1 dc in each of the next 4 sts, then 2 dc in the next st] repeat this bracketed sequence once. Work 1 sc in each of the next 4 sts. Work 2 dc in the next st. [Work 1 dc in each of the next 4 sts, 2 dc in the next st] repeat this bracketed sequence twice. Work 1 dc in each of the last 4 sts. Turn.
(36 stitches) - Row 7: Ch 3, dc in the same stitch, 1 dc in each of the next 5 sts. [Work 2 dc in the next st, 1 dc in each of the next 5 sts] repeat this sequence once. Work 2 sc in the next stitch, then 1 sc in each of the next 5 sts. [Work 2 dc in the next st, 1 dc in each of the next 5 sts] repeat this sequence twice.
- For the Right Ear: Do not turn your work. Single crochet evenly along the entire outside raw edge of the ear panel (aim for roughly 28 to 32 sc stitches total, placing 2 to 3 stitches into the edge of each row end). Skipping increases on this outer border causes the ear to cup slightly forward. Fasten off, leaving a long yarn tail for assembly.
- For the Left Ear: Turn your work first, then proceed to single crochet evenly along the outside edge exactly like the right ear. Fasten off, leaving a long tail.
Dynamic 3D Trunk
Start with Baby Pink yarn.
- Round 1: Form a magic circle. Ch 1, work 6 sc into the ring.
(6 stitches) - Round 2: Work 2 sc into every stitch around. Fasten off the pink yarn.
(12 stitches) - Round 3: Join Light Gray yarn. *Work 2 sc in the next stitch, then 1 sc in the following st.* Repeat from * to * around.
(18 stitches) - Round 4: Working strictly in the Back Loops Only (BLO) for this round to create a structural ledge, sc in each of the 18 stitches around.
- Rounds 5 – 18: Working through both loops normally, sc in every stitch around in a continuous spiral.
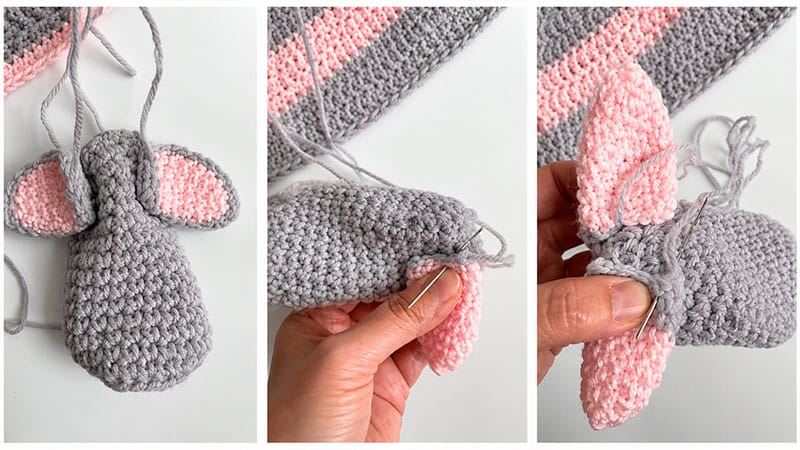
- Finishing: Fasten off, leaving an extra-long tail. Thread your tapestry needle with the tail and weave it through the stitches of the final round, cinching it tightly together to create a scrunched look.
Design Tip: Leaving the trunk completely un-stuffed allows it to remain flexible and beautifully rippled! If you prefer a firmer trunk, add a very minimal amount of fiberfill before cinching.
Little White Tusks (Make 2)
Using White yarn in continuous, seamless rounds.
- Round 1: Form a magic circle. Ch 1, work 6 sc into the ring.
(6 stitches) - Round 2: *Sc in each of the next 2 stitches, then 2 sc in the following st.* Repeat from * to * once.
(8 stitches) - Round 3: *Sc in each of the next 3 stitches, then 2 sc in the following st.* Repeat from * to * once.
(10 stitches) - Rounds 4 – 9: Sc in each stitch around. Fasten off, leaving a long tail for sewing.
Cartoon Eyes (Make 2)
- Round 1 (Pupil): Using Black yarn, form a magic circle. Ch 3, work 10 dc into the ring. Join with a sl st to the top of the ch-3 and pull the center closed. Fasten off black, leaving a long tail.
(11 stitches) - Row 2 (Iris): Join Turquoise Blue yarn into the first stitch of Round 1. Slip stitch in each of the next 5 stitches. Fasten off blue.
- Row 3 (Eye Highlight): Join White yarn into that very same first stitch of Round 1 (positioning your hook just behind the blue slip stitches). Sl st in each of the next 5 stitches. Fasten off white, leaving a long tail.
- Detailing: Use the remaining white tail to embroider a small, bright accent dot or catchlight directly onto the black section of the eye to bring it to life.
Final Assembly
To ensure your elephant has a balanced expression, lay all the pieces flat on top of the green background panel before threading your needle.
- The Trunk & Tusks: Position the two white tusks right behind the top, flat edge of the gray trunk. Use the white yarn tails to sew them securely to the back of the trunk structure.
- Attaching the Ears: Position the right and left ears on the sides of the gray head circle (overlapping the transition where the gray circle meets the green squaring rows). Sew them flat along their straight edges using the gray yarn tails so they frame the face nicely.
- Embroider the Smile: Using a length of black yarn, stitch a cheerful curve onto the center of the gray face where the mouth will sit.
- Attach the Face Elements: Place your assembled trunk-and-tusk combination directly over the center of the face (partially over your embroidered smile for a cute effect) and sew down the base firmly.
- Set the Eyes: Position the two eyes just above and flanking the trunk. Sew them down securely using your leftover yarn tails, hiding your stitches beneath the borders of the eye pieces. Weave in any remaining yarn tails on the back of the square.
