
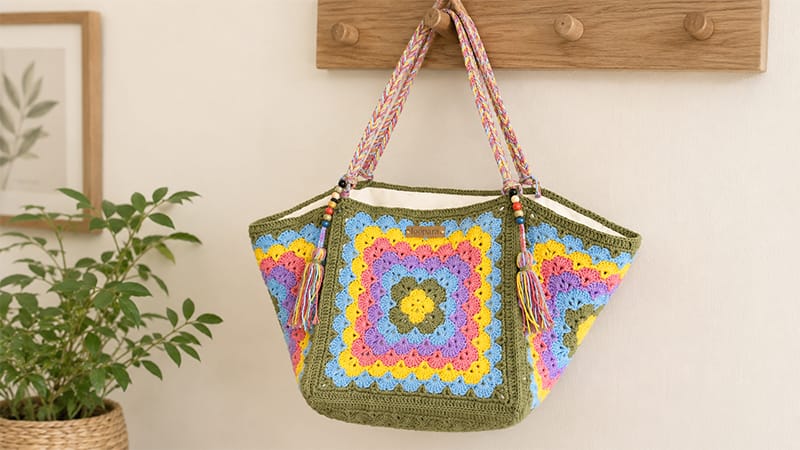
This beautiful, bohemian-inspired tote bag is built from five oversized squares. Four detailed mandala-style blocks form the vibrant side panels, while a fifth solid-colored square creates a sturdy base.
The resulting construction yields a structured, three-dimensional bag with a flat bottom that holds its shape beautifully—perfect for beach days, farmers’ markets, or a daily carryall.
Pattern Overview & Dimensions
- Width: Approximately 18 inches (46 cm)
- Height: Approximately 14 inches (35 cm) (excluding handles)
- Strap Drop: Approximately 12 inches (31 cm)
- Design Element: Four multi-colored decorative motif panels, one solid base panel, integrated fabric lining, and dual braided shoulder straps accented with custom beaded tassels.
Materials & Notions
Yarn
Loopara 5-Ply Combed Milk Cotton Yarn (or an equivalent Category 3/DK weight milk cotton blend). Milk cotton is highly recommended for its crisp stitch definition, vibrant color payoff, and structural integrity.
- Main Color (MC): Terracotta (used for the base, square borders, and assembly)
- Coordinating Colors (CC1, CC2, CC3, CC4): Yellow, Red, Lilac, and Sky Blue (or any 4 high-contrast shades of your choice)
Hooks
- Main Body Hook: 3.0 mm (US C/2 or D/3) – used to create a dense, secure fabric.
- Strap Hook: 6.0 mm (US J/10) – used to manage multiple strands simultaneously.
Extras & Tools
- Sharp yarn needle
- Fabric scissors
- Locking stitch markers
- Positioning clips (for lining alignment)
- Lining fabric (cotton or canvas preferred)
- Sewing needle and matching thread
- Decorative large-hole beads (20 total, 5 per tassel)
Abbreviations (US Terms)
- ch: chain
- sl st: slip stitch
- sc: single crochet
- dc: double crochet
- sh: shell stitch (group of stitches worked into the same space)
- inc: increase (working multiple stitches into the same base stitch)
- st(s): stitch(es)
Section 1: Crocheting the Panels (Make 5)

- For the 4 Side Panels: Change colors every two rounds to create a gradient mandala effect (e.g., Rounds 1–2 in Yellow, Rounds 3–4 in Red, Rounds 5–6 in Lilac, Rounds 7–8 in Sky Blue, and Round 9 in Terracotta).
- For the Base Panel: Work all 9 rounds entirely in your Main Color (Terracotta).
Use the 3.0 mm hook for all 5 squares. Each completed block should measure 10 inches (26 cm) across.
Stitch Pattern Instructions
Round 1: Form a magic ring. Ch 3 (counts as the first dc here and throughout), ch 1. Work [1 dc into the ring, ch 1] 7 times. Join with a sl st to the 3rd chain of your starting ch-3. (8 dc, 8 ch-1 spaces)
Round 2: Sl st into the first ch-1 space. Ch 1 (does not count as a stitch). Work [1 sc into the next space, 7 dc into the subsequent space] 4 times. Join with a sl st to the very first sc. (4 flower-like petals created)
Round 3: Ch 4 (counts as 1 dc plus ch 1), work [1 dc, ch 3, 1 dc, ch 1, 1 dc] all into the same joining stitch. Ch 5, skip the petal setup, and work [1 dc, ch 1, 1 dc, ch 3, 1 dc, ch 1, 1 dc] into the next sc stitch. Repeat from * to * 2 more times. Ch 5, sl st to the 3rd chain of the beginning ch-4 to close.
Round 4: Ch 1. Work [1 sc into the ch-3 corner space, 7 dc into the next ch-5 loop] 8 times total around the perimeter. Join with a sl st to the initial sc.
Round 5: Ch 4 (counts as 1 dc plus ch 1), 1 dc in the same stitch. Ch 5. Work [1 dc, ch 1, 1 dc, ch 3, 1 dc, ch 1, 1 dc] into the next sc (this forms the new corner). Ch 5, work [1 dc, ch 1, 1 dc] into the next sc, ch 5. Repeat from * to * around, ensuring corners and side spaces line up symmetrically. Join with a sl st to the 3rd chain of the starting sequence.
Round 6: Ch 1. Work [1 sc into the corner ch-3 space, 7 dc into the following ch-5 loop] 12 times evenly around the entire square. Join with a sl st to the opening sc.
Round 7: Ch 4 (counts as 1 dc plus ch 1), 1 dc in the same stitch. [Ch 2, 1 sc in the center of the next petal, ch 2, work (1 dc, ch 1, 1 dc) in the next interval space] twice. Ch 2, 1 sc in the next petal, ch 2. At the corner sc, work [1 dc, ch 1, 1 dc, ch 3, 1 dc, ch 1, 1 dc]. Repeat this sequence across all four sides. Join with a sl st to the 3rd chain of the starting sequence.
Round 8: Ch 1. Distribute your stitches evenly across the edges: work 8 sc increases along the starting segments, and [ch 2, followed by 12 sc increases along the straight edge] 3 times. Finish with ch 2 and 4 final sc increases. Join with a sl st to the first sc.
Round 9: Ch 3. Work 15 dc across the side stitches. When you reach a corner space, work [2 dc, ch 2, 2 dc] directly into the corner interval. Work 24 dc evenly along the straight edge. Repeat from * to * 3 times. Complete the final side with 8 dc. Join with a sl st to the top of your starting ch-3. Fasten off and weave in all loose ends cleanly on the wrong side.
Section 2: Layout & Assembly
       [ Side Panel 1 ]
              |
[Side 2] -- [ BASE ] -- [Side 4]
              |
       [ Side Panel 3 ]
Step 1: Layout Setup
Lay the solid-colored base square flat on your workspace. Place the four mandala squares around each of the four sides of the base square.
Use your locking stitch markers or positioning clips to hold the edges together, ensuring the right sides are facing inward (you will be seaming on the wrong side).
Step 2: The Mattress Stitch Seaming
Thread your yarn needle with a long strand of your Main Color (Terracotta) yarn.
- Align the stitches of the base square one-to-one with the bottom edge of a side panel.
- Insert your needle into the center loop of the corner stitch.
- Pass the needle back and forth through the inside loops only (the loops directly touching when sides are held together) of opposing stitches.
- Maintain a relaxed, even tension. Pulling the yarn too tightly will cause the seams to pucker and warp the bag’s silhouette.
Step 3: Corner Anchoring
As you reach the intersection where multiple squares meet, secure the joint with an extra interlocking slip stitch to reinforce the high-stress area before moving down the next seam.
Step 4: Three-Dimensional Assembly
Once all four side panels are connected to the flat base, bring the vertical side edges of adjacent side panels together. They will naturally fold upward to form a basket shape. Stitch these four vertical seams using the same mattress stitch method. Fasten off and weave in your ends tightly.
Section 3: Fabric Lining Integration
An integrated fabric lining prevents the crochet stitches from stretching over time and keeps small items from slipping through the openwork design.
Step 1: Measuring and Cutting
Lay your assembled crochet bag flat. Measure the total interior width and height, adding an extra 1 inch (2.5 cm) around all perimeters to serve as a seam allowance. Cut out your lining fabric pieces based on these dimensions.
Step 2: Preparing the Fabric
Fold the lining panels with right sides together. Sew the sides and bottom edges using a sewing machine or a backstitch by hand. Fold the top raw edge down by 0.5 inches (1.2 cm) toward the wrong side of the fabric and press flat with an iron to create a clean hem.
Step 3: Installation
Keep the crochet bag inside out. Insert the fabric lining sleeve into the bag (the right side of the fabric should now be visible when you look inside the bag). Align the top pressed hem of the lining with the inside top border of the crochet panels. Secure everything in place with your positioning clips.
Step 4: Blind Stitching
Using a standard sewing needle and matching sewing thread, sew the lining to the top round of crochet stitches using an invisible blind hem stitch. Take care to only catch the back loops of the crochet stitches so the thread cannot be seen from the outside of the bag.
Section 4: Heavy-Duty Braided Straps (Make 2)
Using multiple strands creates a thick, comfortable strap that won’t dig into your shoulder or over-stretch.
Step 1: Setup
Gather six long strands of yarn (one of each color used in the bag project to create a speckled tweed effect). Switch to your 6.0 mm hook. Leave a generous 10-inch (25 cm) tail unworked, and tie a secure slip knot around your hook.
Step 2: The Multi-Strand Chain
Incorporate a dual-loop technique for extra strength:
- Hold your main working yarn cluster behind the hook.
- Bring the front tail loop over the hook from front to back.
- Yarn over with the working cluster and pull through both loops on your hook.
Step 3: Growing to Length
Repeat this dynamic loop-over process consistently until your braided cord reaches your desired handle length (approximately 12–15 inches or 31–38 cm).
Step 4: Mounting
Leave another 10-inch (25 cm) yarn tail at the end before cutting and fastening off. Thread these long tails through the upper corners of your bag’s side panels using your yarn needle. Tie a substantial, decorative knot on the exterior to lock the handles firmly in place.
Section 5: Beaded Mandala Tassels (Make 4)
Step 1: Creating the Fringe Bundle
Cut twenty-four 4.7-inch (12 cm) strands of yarn using a mix of all six project colors. Set them aside in a uniform pile.
Step 2: Hanging Loop Construction
Using a single strand of 5-ply yarn and your 3.0 mm hook, crochet a simple chain of 12 slip stitches. Leave long, unworked tails on both ends of this small chain.
Step 3: Core Binding
Center your crocheted chain perpendicularly over the middle of your yarn strand bundle. Carefully split a piece of 5-ply yarn down into a thinner 2-ply thread.
Wrap this thinner thread tightly around the center point of the bundle several times to cinch it together, finishing with a double knot.
Step 4: Creating the Tassel Head
Fold all the loose bundle strands downward around the center binding so they point in the same direction.
Wrap another length of 2-ply yarn around the outside of the bundle, about 0.5 inches (1.2 cm) below the top fold, creating a distinct rounded “head” for the tassel. Secure it with a knot and bury the ends inside the fringe.
Step 5: Bead Accents
Straighten the fringe strands with your fingers and trim the bottom edges perfectly flat with your scissors.
Take the two long tails from your top hanging loop and thread 5 decorative beads onto them, sliding them down so they rest right on top of the tassel head.
Step 6: Final Placement
Tie one completed tassel securely to each of the four base corners where the handles meet the bag panels, or affix them to the bottom corner points of the tote for an authentic bohemian flair. Trim any remaining anchor threads closely. Your Big Granny Square Tote Bag is now ready for use!
