
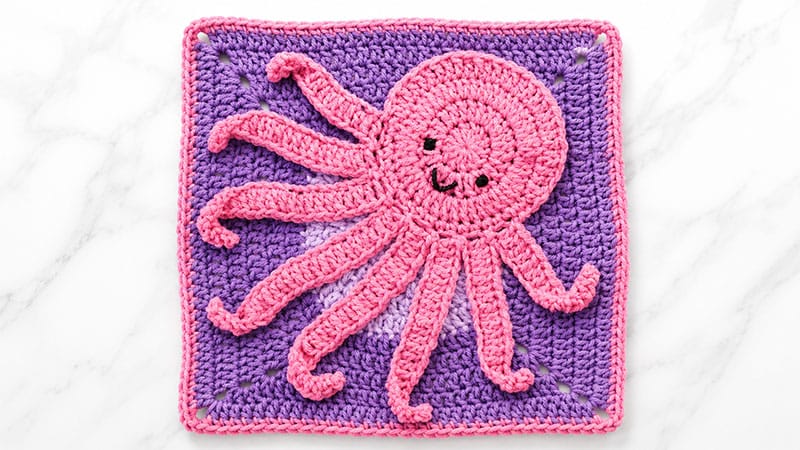
Bring a touch of playful marine life to your next crochet project with this adorable Pink Octopus square!
Perfect as a standalone motif or as the fifth installment of an ocean-themed crochet-along (CAL), this design features a dimensional, eight-armed octopus stitched flat and then joined onto a background.
The unique, varying lengths of the tentacles give this little sea creature a natural, dynamic curl that brings the entire square to life.
Project Overview
- Skill Level: Advanced Beginner
- Finished Size: Standard 7×7 inch or 8×8 inch granny square (depending on your gauge and background choices)
- Key Techniques: Magic Ring, working in rounds, changing stitch heights for shaping, and surface sewing/applique attachment.
Materials Needed
- Main Color (MC): Worsted weight yarn in a vibrant pink (e.g., Red Heart Super Saver in Perfect Pink)
- Background Color (BC): Worsted-weight yarn in a water-themed shade (e.g., light blue, teal, or a textured bubble stitch square)
- Accents: A small amount of black medium-weight yarn for facial features
- Hooks: Size H-8 / 5.00mm crochet hook (or size needed to meet your preferred square gauge)
- Notions: Tapestry needle for assembly and embroidery, scissors, and optional stitch markers
Abbreviations (US Terms)
- CH: Chain
- SL ST: Slip Stitch
- SC: Single Crochet
- HDC: Half Double Crochet
- DC: Double Crochet
- ST(S): Stitch(es)
Step-by-Step Crochet Instructions
Part 1: The Octopus Body
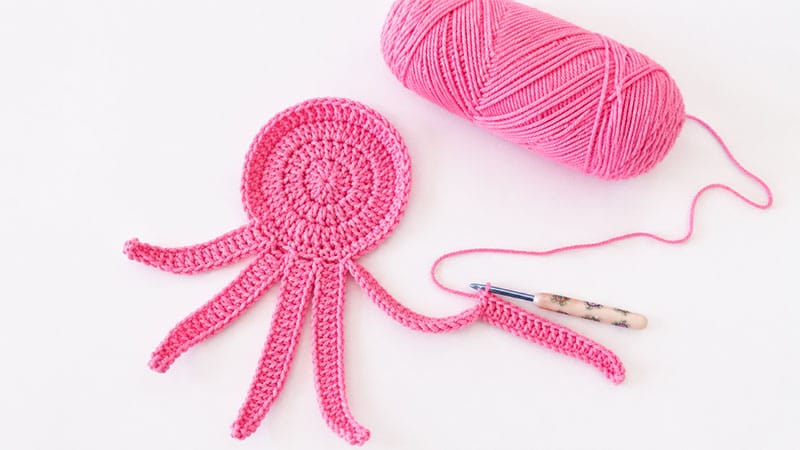
The head and upper body are worked in concentric rounds to form a sturdy, flat circle that subtly transitions in height to prepare for the tentacles.
- Round 1: Form a Magic Ring. CH 2 (does not count as a stitch here or throughout). Work 12 DC into the ring. Pull the ring tight, join with a SL ST to the first DC, and CH 2. (12 DC)
- Round 2: Work 2 DC into every stitch around. Join with an SL ST to the first DC, and CH 2. (24 DC)
- Round 3: Work 2 DC into every stitch around. Join with an SL ST to the first DC, then CH 1. (48 DC)
- Round 4: SC in each of the first 16 stitches. For the remaining 32 stitches, work 1 DC into each. Join with an SL ST to the first SC. Do not fasten off; proceed directly to the tentacles.
Part 2: The Cascading Tentacles
The arms are worked in a single row right off the base of the body. By skipping a stitch on the body between each arm, they spread out naturally. The changing chain lengths create a beautiful symmetry.
- Arm 1: CH 16. Turn, SC in the 2nd and 3rd CH from hook. HDC in the next 4 chains. DC in all remaining chains across. Skip the next stitch on the body round, and secure the arm to the following stitch with an SL ST.
- Arm 2: CH 20. Turn, SC in the 2nd and 3rd CH from hook. HDC in the next 4 chains. DC in all remaining chains across. Skip the next body stitch, join with a SL ST to the next.
- Arm 3: CH 24. Turn, SC in the 2nd and 3rd CH from hook. HDC in the next 4 chains. DC in all remaining chains across. Skip the next body stitch, join with a SL ST to the next.
- Arm 4: CH 28. Turn, SC in the 2nd and 3rd CH from hook. HDC in the next 4 chains. DC in all remaining chains across. Skip the next body stitch, join with a SL ST to the next.
- Arm 5: CH 28. Turn, SC in the 2nd and 3rd CH from hook. HDC in the next 4 chains. DC in all remaining chains across. Skip the next body stitch, join with a SL ST to the next.
- Arm 6: CH 24. Turn, SC in the 2nd and 3rd CH from hook. HDC in the next 4 chains. DC in all remaining chains across. Skip the next body stitch, join with a SL ST to the next.
- Arm 7: CH 20. Turn, SC in the 2nd and 3rd CH from hook. HDC in the next 4 chains. DC in all remaining chains across. Skip the next body stitch, join with a SL ST to the next.
- Arm 8: CH 16. Turn, SC in the 2nd and 3rd CH from hook. HDC in the next 4 chains. DC in all remaining chains across. Skip the next body stitch, join with a SL ST to the next.
Finishing the Applique: Cut your yarn, leaving an extra-long tail (approx. 18–24 inches) which you will use later to sew the entire octopus onto your backing square. Pull the yarn through the final loop to secure.
Assembly & Facial Embroidery
      [ Upper Right Corner ]
         ( Octopus Head )
         /    /   |   \    \
       (Wavy, Curled Tentacles)
         \    \   |   /    /
     [ Across the Square Diagonal ]
1. Embroidering the Face
Before attaching the motif to your square, add the personality!
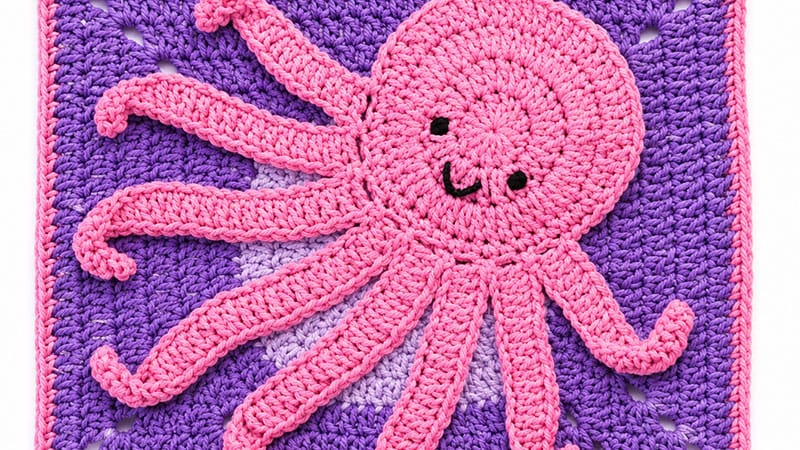
- The Eyes: Thread your tapestry needle with a strand of black yarn. Locate Round 2 on the head, just below the central magic ring. Wrap the black yarn around two adjacent stitches approximately 5 times to create a bold, raised eye. Repeat this a few stitches over for the second eye.
- The Smile: Direct your needle between and slightly below the two eyes, creating a small, friendly “V” or “U” shape anchored into the stitches. Secure all tails neatly on the back of the applique.
2. Joining the Granny Square
- Placement: Lay your pre-made background granny square flat. Position the octopus head near the top right corner, angling the body diagonally so the tentacles sweep down toward the center and bottom left.
- Stitching: Thread the long pink yarn tail into your needle. Whipstitch around the perimeter of the head first.
- Styling the Arms: As you move down to the tentacles, allow them to twist and curl naturally. Pin them in an expressive, flowing arrangement across the square. Sew down the main length of each arm, leaving the very tips loose if you want a 3D effect, or securing them flat for durability.
Weave in any remaining yarn ends on the back of your square, block your finished piece, and your cheerful octopus square is ready to be joined into your blanket!
