
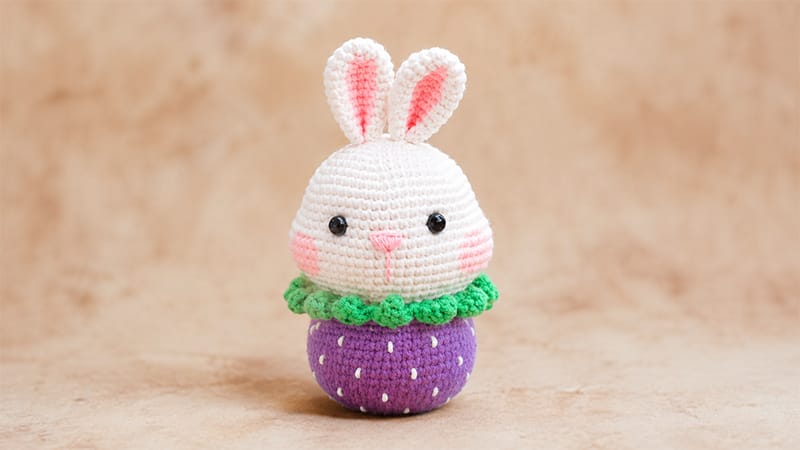
Today, you will learn how to make an adorable strawberry bunny amigurumi. This delightful pattern features a fluffy white or pink rabbit nestled inside a cozy red strawberry shell.
Perfect for beginner and intermediate crocheters alike, this project comes together quickly with clear steps.
Whether you are crafting a heartfelt homemade gift for a loved one or creating a playful new addition to your plushie collection, this project will surely bring warmth and pure joy.
Abbreviations & Materials
Abbreviations (US Terms)
- MR: Magic Ring
- st(s): Stitch(es)
- sc: Single Crochet
- inc: Increase (2 sc in the same stitch)
- dec: Decrease (single crochet 2 stitches together)
- ch: Chain
- slst: Slip Stitch
- hdc: Half Double Crochet
- dc: Double Crochet
- tr: Treble (Triple) Crochet
Materials Needed
- Yarn: Plush chenille yarn in Pink (or White), Red, and Green
- Safety Eyes: 8 mm
- Fiberfill Stuffing
- Yarn Needle & Scissors
- Pink Makeup Blush (for cheeks)
Pattern Instructions
Part 1: Bunny Head
Worked in Pink (or White) plush yarn in continuous rounds.
- Round 1: Start with 6 sc in a MR. (6 sts)
- Round 2: Work 2 sc in each stitch around. (12 sts)
- Round 3: [1 sc, 1 inc] × 6. (18 sts)
- Round 4: [2 sc, 1 inc] × 6. (24 sts)
- Round 5: [3 sc, 1 inc] × 6. (30 sts)
- Round 6: [4 sc, 1 inc] × 6. (36 sts)
- Round 7: [5 sc, 1 inc] × 6. (42 sts)
- Round 8: [6 sc, 1 inc] × 6. (48 sts)
- Round 9: [7 sc, 1 inc] × 6. (54 sts)
- Rounds 10–14: Sc in each stitch around. (54 sts for 5 rounds)
- Round 15: 12 sc, 6 inc, 18 sc, 6 inc, 12 sc. (Forms cheek shaping) (66 sts)
- Rounds 16–20: Sc in each stitch around. (66 sts for 5 rounds)
- Round 21: 12 sc, 6 dec, 18 sc, 6 dec, 12 sc. (54 sts)
- Round 22: [7 sc, 1 dec] × 6. (48 sts)
- Round 23: [6 sc, 1 dec] × 6. (42 sts)
Note: Insert 8 mm safety eyes between Rounds 14 and 15, spacing them approximately 8–10 stitches apart. Stuff the head firmly with fiberfill. Fasten off.
Part 2: Strawberry Body
Worked in Red plush yarn from the bottom tip upwards.
- Round 1: Start with 6 sc in a MR. (6 sts)
- Round 2: [1 sc, 1 inc] × 3. (9 sts)
- Round 3: [2 sc, 1 inc] × 3. (12 sts)
- Round 4: [1 sc, 1 inc] × 6. (18 sts)
- Round 5: [2 sc, 1 inc] × 6. (24 sts)
- Round 6: [3 sc, 1 inc] × 6. (30 sts)
- Round 7: [4 sc, 1 inc] × 6. (36 sts)
- Round 8: [5 sc, 1 inc] × 6. (42 sts)
- Round 9: [6 sc, 1 inc] × 6. (48 sts)
- Round 10: [7 sc, 1 inc] × 6. (54 sts)
- Rounds 11–18: Sc in each stitch around. (54 sts for 8 rounds)
- Round 19: [7 sc, 1 dec] × 6. (48 sts)
- Round 20: Sc in each stitch around. (48 sts)
- Round 21: [6 sc, 1 dec] × 6. (42 sts)
- Round 22: Sc in each stitch around. (42 sts)
Fasten off, leaving a long yarn tail for sewing the head to the body. Stuff the body firmly.
Part 3: Bunny Ears (Make 2)
Worked in Pink (or White) plush yarn.
- Round 1: Start with 6 sc in a MR. (6 sts)
- Round 2: Work 2 sc in each stitch around. (12 sts)
- Round 3: [1 sc, 1 inc] × 6. (18 sts)
- Rounds 4–7: Sc in each stitch around. (18 sts for 4 rounds)
- Round 8: [7 sc, 1 dec] × 2. (16 sts)
- Round 9: Sc in each stitch around. (16 sts)
- Round 10: [6 sc, 1 dec] × 2. (14 sts)
- Round 11: Sc in each stitch around. (14 sts)
- Round 12: [5 sc, 1 dec] × 2. (12 sts)
Fasten off, leaving a yarn tail for attachment. Do not stuff the ears.
Part 4: Leaf Collar
Worked in Green yarn.
- Chain Base: Start by chaining 48.
- Leaf Motif: Beginning in the 2nd chain from the hook, work: 1 slst, 1 sc, 1 hdc, 1 dc, 1 tr.
- Skip 2 chains, then repeat the leaf pattern: (1 slst, ch 6, 1 slst, 1 hdc, 1 dc, 1 tr) in the next sequence.
- Continue repeating across the chain until you reach the end to complete the leafy crown. Fasten off.
Assembly & Finishing Touches
- Attach Head & Body: Sew the head to the top opening of the strawberry body (matching the 42-stitch openings).
- Attach Ears: Flatten the top of the ears and sew them securely to the top of the bunny head between Rounds 4 and 6.
- Attach Leaves: Wrap the green leaf collar around the neck area (where the strawberry base meets the bunny head) and stitch it into position.
- Details: Using white yarn, embroider small seed accents onto the red strawberry body.
- Blush: Gently apply real cosmetic blush or pink fabric shade onto the bunny cheeks directly below the eyes for a sweet finishing touch.
