
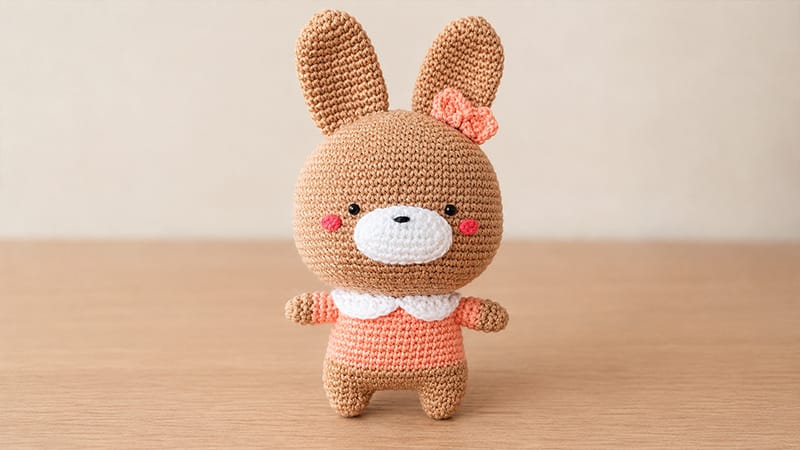
Crafting your own Sakura Bunny brings a charming, handmade plush to life with simple stitches and delicate details.
Featuring sweet pastel tones, cute embroidered details, and a cozy removable-look Peter Pan collar, this piece makes a wonderful gift or decorative keepsake.
The worked construction combines acrylic yarns with a micro-hook to achieve an ultra-dense finish that holds its shape. Follow these step-by-step instructions to create your customized bunny plush.
Required Materials
- Yarn: Worsted weight (Size 4) acrylic in light pink, white, and yellow; DK weight (Size 3) in dark pink
- Tools: 2.75 mm crochet hook, yarn needle, sewing needle, stitch marker, scissors, fabric glue
- Extras: 5 mm safety eyes, black embroidery thread, pink felt fabric, fiberfill stuffing
Stitch Guide & Abbreviations
- MR / Ch / St: Magic Ring / Chain / Stitch
- Sc / Dc / Hdc / Slst: Single Crochet / Double Crochet / Half Double Crochet / Slip Stitch
- Inc / Dec: Increase (2 sc in same st) / Decrease (sc 2 together)
- Inc 3: 3 single crochet in the same stitch
- FLO / BLO: Front Loops Only / Back Loops Only
Pattern Instructions
Head (Light Pink)
- R1: 6 sc in MR (6)
- R2: Inc across (12)
- R3–R13: Expand incrementally: (1 sc, inc)×6 [18], (2 sc, inc)×6 [24]… continuing up to (11 sc, inc)×6 [78]
- R14–R27: Sc around (78)
- R28–R33: Taper steadily: (11 sc, dec)×6 [72] down to (6 sc, dec)×6 [42]
Firmly pack fiberfill into the head upper curve.
- R34–R39: (5 sc, dec)×6 [36] down to (dec)×6 [6]. Finish stuffing, fasten off, and weave opening closed.
Peter Pan Collar (White)
- R1: Ch 39. Beginning in 2nd ch from hook: dec, 4 dc, 26 sc, 4 dc, dec. Slst in same st (36). Leave a long strand for sewing.
Lower Limbs & Body
- Legs (Make 2 – Light Pink): R1: 6 sc in MR. R2: (2 sc, inc)×2 [8]. R3: (3 sc, inc)×3 [10]. Fasten off Leg 1. Repeat R1–3 for Leg 2, keeping yarn attached.
- Body:
- R4: Ch 6, join to Leg 1: (4 sc, inc, 4 sc, inc), along ch: (2 sc, inc, 2 sc, inc), around Leg 2: (4 sc, inc, 2 sc, inc), along opposite ch side: (2 sc, inc, 2 sc, inc) (40)
- R5: (7 sc, inc)×5 (45)
- R6–R8: Sc around (45)
- R9: Switch to Yellow; working in BLO: sc around (45)
- R10–R15: Sc around (45)
- R16: (7 sc, dec)×5 (40)
- R17–R18: Sc around (40). Stuff body firmly; leave a long tail to fasten.
Ears & Arms
- Ears (Make 2 – Light Pink): R1: 6 sc in MR (6). R2: Inc×6 (12). R3: (1 sc, inc)×6 (18). R4: (5 sc, inc)×3 (21). R5–14: Sc around (21). R15: (5 sc, dec)×3 (18). Do not stuff; flatten and secure base with long tail.
- Arms (Make 2): R1: 6 sc in MR (6) in Light Pink. R2: (1 sc, inc)×3 (9). R3: Sc around (9). R4: Switch to Yellow; FLO sc around (9). R5: Sc around (9). R6: 2 sc, 5 hdc, 2 sc (9). Lightly stuff lower half; leave long tail.
Accents & Details
- Muzzle (White): R1: Ch 9, start in 2nd ch: 7 sc, 3 inc, turn work, 6 sc, 3 inc (19). R2: 7 sc, inc, 3 inc, inc, 6 sc, inc, 3 inc, inc (27). R3: Sc around (27).
- Tail (White): R1: 6 sc in MR. R2: Inc×6 (12). R3: (3 sc, inc)×3 (15). R4: (3 sc, dec)×3 (12). R5: (1 sc, dec)×4 (8). Stuff lightly.
- Floral Accents (Make 2 – Dark Pink): R1: 5 sc in MR. R2: Sl st in 1st st, [ch 2, dc in same st, ch 2, slst in next st]×5.
Assembly
- Center and attach the body securely to the bottom of the head.
- Secure the collar flat around the neckline before attaching arms to the sides.
- Position ears between R2 and R10 at the top of the head.
- Place the muzzle between R21 and R28; position safety eyes between R21 and R22 (10 stitches apart).
- Trim felt into small ovals and fix beneath the eyes as cheeks; attach blossoms beside one ear and the tail to the back lower body.
