
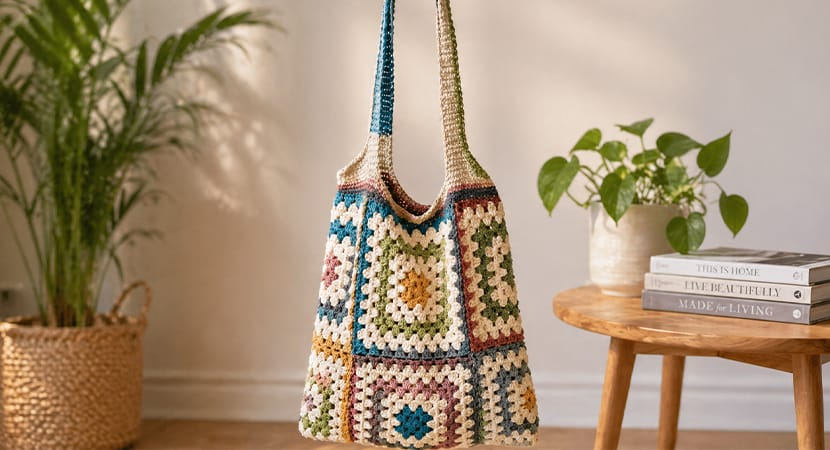
This stylish tote is made from classic granny squares and finished with sturdy straps. It’s roomy, durable, and perfect for everyday use.
Materials
- Yarn A (main color): DK weight (e.g., Hobbii Universe) – approx. 2 cakes
- Yarn B (contrast): DK cotton (e.g., Hobbii Rainbow 8/8) – approx. 4 skeins
- 4 mm crochet hook
- Scissors
- Tapestry needle
- Tape measure
- Steamer or steam iron (optional, for finishing)
Finished Size
- Width: ~16 inches
- Length: ~17.5 inches
- Handle length: ~18 inches
Gauge
- 1 granny square = 8 inches (after 9 rounds)
Abbreviations
- ch = chain
- dc = double crochet
- sc = single crochet
- sl st = slip stitch
- sp = space
- RS = right side
- WS = wrong side
Notes Before You Start
- Each square is worked in the round.
- Change colors every 2 rounds.
- Instead of cutting yarn at color changes, carry it along the wrong side.
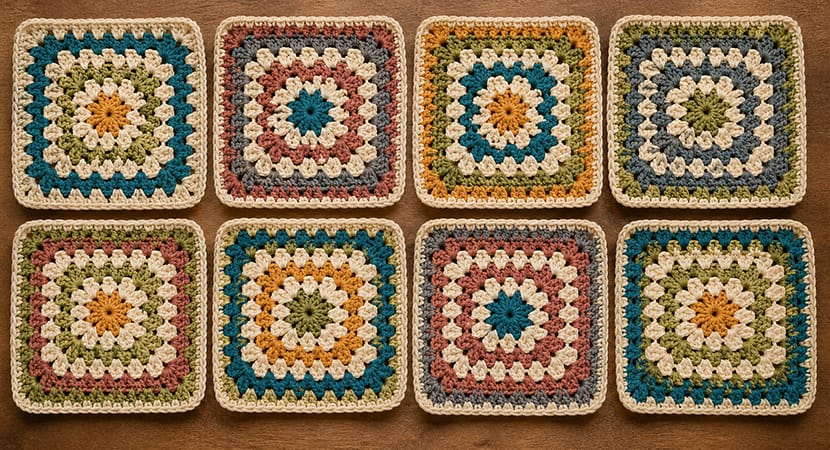
- You will make 8 total granny squares.
Step 1: Make the Granny Squares (Make 8)
Round 1 (RS)
- With Yarn A, create a magic ring.
- Ch 3 (counts as first dc).
- Work:
- 2 dc, ch 2
- (3 dc, ch 2) 3 times
- Close ring.
- Join with sl st to top of ch-3.
- Turn.
Round 2 (WS)
- Ch 3, 2 dc in same corner space.
- In each corner space:
- (3 dc, ch 2, 3 dc)
- In last corner: 3 dc, ch 2
- Switch to Yarn B and join with sl st.
- Turn.
Round 3
- Ch 3, 2 dc in same corner.
- Work 3 dc in each side space between clusters.
- In each corner:
- (3 dc, ch 2, 3 dc)
- Join and turn.
Round 4
- Continue building sides:
- 3 dc in each space
- Corners remain:
- (3 dc, ch 2, 3 dc)
- Switch back to Yarn A.
- Join and turn.
Round 5
Repeat the same pattern:
- 3 dc in each space
- Corners: (3 dc, ch 2, 3 dc)
Rounds 6–9
- Continue pattern exactly the same.
- Change color every 2 rounds.
- Finish Round 9 with Yarn A.
- Fasten off.
Each square should measure ~8 inches.
Step 2: Join the Squares
Layout:
- Arrange squares 2 high × 4 across.
Joining options:
- Join-as-you-go (preferred)
- OR seam with whip stitch afterward
You should now have a tube shape.
Step 3: Close the Bottom
- Lay the tube flat.
- Align bottom edges.
- Using Yarn A, whip stitch across to close the base.
Step 4: Top Edge (Part 1)
Round 1:
- Join Yarn A at any seam.
- Ch 1, sc in same spot.
- Work:
- sc in every stitch
- sc in each seam space
- Join with sl st.
Rounds 2–4:
- Ch 1, sc around
- Join each round
- Fasten off after Round 4
Step 5: Mark Strap Placement
- Lay bag flat.
- Mark the center stitch on front and back.
- From each center, measure 6.5 inches across.
- Place markers on both sides.
Step 6: Create the Straps
Row 1:
- Join Yarn A at first marker.
- Ch 1, sc across to second marker.
- Turn.
Rows 2–4:
- Ch 1, sc across
- Turn each row
Strap Extension:
- Ch 1, sc 7 stitches only
- Turn
- Repeat until strap measures 8 inches
Fasten off.
Repeat:
- Go back and repeat for the second side
- Then repeat entire process on opposite side of bag
You will now have 4 strap pieces.
Step 7: Join the Straps
- Pair the 2 front straps → whip stitch together
- Pair the 2 back straps → whip stitch together
Now you have 2 complete handles
Step 8: Finishing
- Using Yarn A:
- sc around entire handle edges
- sc around bag opening
- Stretch handles gently
- Weave in all ends
Final Touch
- Lightly steam block the bag
- This softens stitches and improves shape
You’re Done!
You now have a durable, stylish granny square tote perfect for everyday use—groceries, shopping, or travel.
