
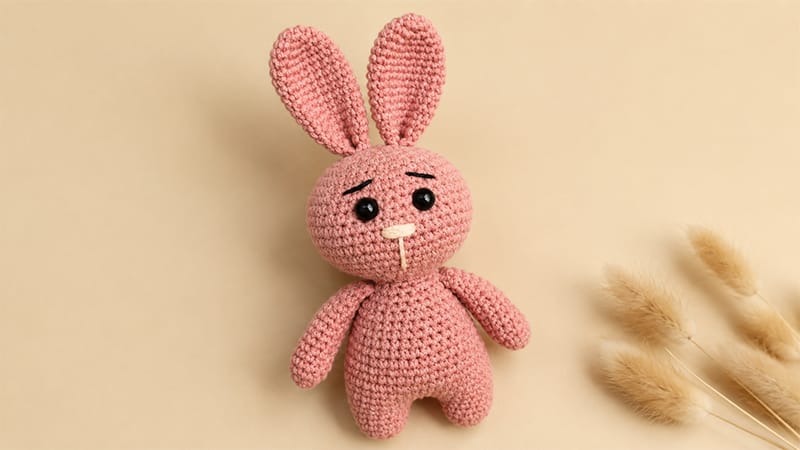
Utilizing seamless techniques, this pattern crafts the legs, body, and head as a single continuous piece, minimizing tedious assembly at the end.
With a finished height of around 17 to 18 cm when using recommended materials, this gentle bunny makes a wonderful gift, seasonal decoration, or plush companion.
Grab your hook, pick your favorite soft yarn, and let us dive into step-by-step instructions for creating your very own crocheted bunny friend!
Materials & Tools
- Yarn: Sport weight yarn (YarnArt Jeans or similar cotton-acrylic blend) in your choice of bunny color, plus dark thread for embroidery.
- Crochet Hook: 2.0 mm to 2.5 mm (or size appropriate for your yarn weight).
- Safety Eyes: 6 mm–8 mm (optional, or embroider eyes with dark thread).
- Fiberfill Stuffing: For body, head, and arms.
- Tapestry Needle: For sewing pieces and embroidering facial details.
- Stitch Marker & Scissors.
Abbreviations (US Terms)
- MR: Magic Ring
- sc: Single Crochet
- inc: Increase (2 sc in the same stitch)
- dec: Single Crochet Decrease (invisible decrease recommended)
- ch: Chain
- sl st: Slip Stitch
- st(s): Stitch(es)
Pattern Instructions
Continuous Base: Legs, Body & Head
First Leg
- Rnd 1: 6 sc into a MR [6]
- Rnd 2: 6 inc [12]
- Rnd 3: (3 sc, 1 inc) × 3 [15]
- Rnds 4–6: 15 sc around (3 rounds) [15]
Fasten off with a sl st and cut the yarn.
Second Leg & Joining
- Rnds 1–6: Repeat steps for the first leg, do not cut the yarn.
- Rnd 7 (Leg Join): Ch 3, sc in the first leg’s joining stitch, work 14 more sc around the first leg, work 3 sc along one side of the ch-3 bridge, work 15 sc around the second leg, and work 3 sc along the remaining side of the ch-3 bridge [36]
Place a stitch marker here to track the start of your rounds.
Body
- Rnd 8: (5 sc, 1 inc) × 6 [42]
- Rnds 9–12: 42 sc around (4 rounds) [42]
- Rnd 13: (12 sc, 1 dec) × 3 [39]
- Rnds 14–15: 39 sc around (2 rounds) [39]
- Rnd 16: (11 sc, 1 dec) × 3 [36]
- Rnd 17: 36 sc around [36]
- Rnd 18: (10 sc, 1 dec) × 3 [33]
- Rnd 19: 33 sc around [33]
- Rnd 20: (9 sc, 1 dec) × 3 [30]
- Rnd 21: 30 sc around [30]
- Rnd 22: (3 sc, 1 dec) × 6 [24]
- Rnd 23: 24 sc around [24]
- Rnd 24: (2 sc, 1 dec) × 6 [18]
- Rnd 25 (Neck): (1 sc, 1 dec) × 6 [12]
Stuff the legs and body firmly with fiberfill before continuing.
Head
- Rnd 26: (1 sc, 1 inc) × 6 [18]
- Rnd 27: (2 sc, 1 inc) × 6 [24]
- Rnd 28: (3 sc, 1 inc) × 6 [30]
- Rnd 29: (4 sc, 1 inc) × 6 [36]
- Rnd 30: (5 sc, 1 inc) × 6 [42]
- Rnd 31: (6 sc, 1 inc) × 6 [48]
- Rnds 32–37: 48 sc around (6 rounds) [48]
Tip: If using safety eyes, attach them between Rnds 35 and 36, placing them approximately 6 to 8 stitches apart.
- Rnd 38: (6 sc, 1 dec) × 6 [42]
- Rnd 39: (5 sc, 1 dec) × 6 [36]
- Rnd 40: (4 sc, 1 dec) × 6 [30]
- Rnd 41: (3 sc, 1 dec) × 6 [24]
- Rnd 42: (2 sc, 1 dec) × 6 [18]
- Stuff the head thoroughly.
- Rnd 43: (1 sc, 1 dec) × 6 [12]
- Rnd 44: 6 dec [6]
Fasten off, weave the tail through the remaining front loops, pull tight to close the opening, and hide the end inside the head.
Ears (Make 2)
(Do not stuff the ears)
- Rnd 1: 6 sc into a MR [6]
- Rnd 2: 6 inc [12]
- Rnd 3: (3 sc, 1 inc) × 3 [15]
- Rnd 4: 15 sc around [15]
- Rnd 5: (4 sc, 1 inc) × 3 [18]
- Rnds 6–10: 18 sc around (5 rounds) [18]
- Rnd 11: (4 sc, 1 dec) × 3 [15]
- Rnds 12–14: 15 sc around (3 rounds) [15]
- Rnd 15: (3 sc, 1 dec) × 3 [12]
- Rnd 16: 12 sc around [12]
- Rnd 17: (2 sc, 1 dec) × 3 [9]
Flatten the opening and work 4 sc through both layers to close. Fasten off, leaving a long strand for sewing.
Arms (Make 2)
(Stuff lightly at the lower end only)
- Rnd 1: 5 sc into a MR [5]
- Rnd 2: 5 inc [10]
- Rnds 3–12: 10 sc around (10 rounds) [10]
- Rnd 13: (3 sc, 1 dec) × 2 [8]
Flatten the top edge and work 3 to 4 sc across both layers to seal. Fasten off, leaving a yarn tail for attachment.
Tail
(Stuff lightly)
- Rnd 1: 6 sc into a MR [6]
- Rnd 2: 6 inc [12]
- Rnd 3: 12 sc around [12]
- Rnd 4: 6 dec [6]
Fasten off, leaving a tail for attachment.
Assembly & Finishing Details
- Facial Features: Using embroidery floss or dark yarn, stitch a small “V” or triangle shape for the nose between the eyes, adding a small vertical line underneath. Embroider small eyebrows a few rounds above the eyes.
- Attaching Ears: Position the ears near the top of the head (around Rnds 40–42) and secure them firmly using your yarn needle.
- Attaching Arms: Position the arms symmetrically on either side of the body, just below the neck turn (around Rnd 25), and sew in place.
- Attaching Tail: Center the tail on the lower back portion of the body so it serves as a support prop when seated. Secure tightly.
