
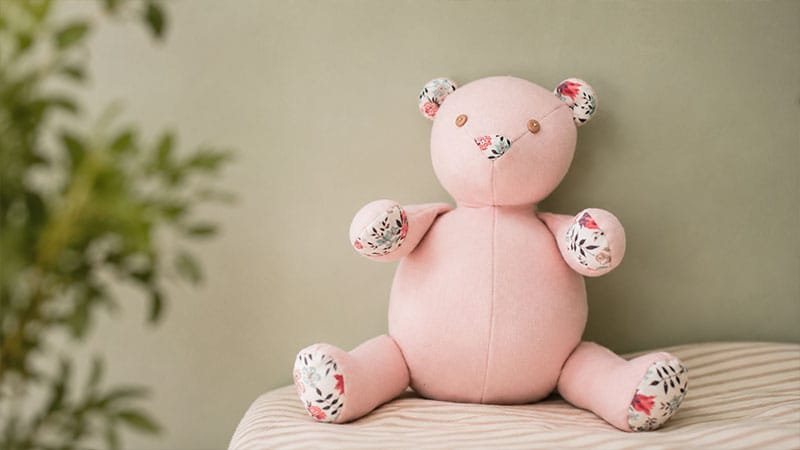
This charming, vintage-inspired teddy bear features a plump, cuddly belly and welcoming, outstretched arms.
Crafted primarily from soft, forgiving felted wool, it is elevated with elegant touches of Liberty of London Tana Lawn cotton on the ears, muzzle, paws, and tail.
Perfect for intermediate sewists, this project requires patience and a methodical approach, resulting in a timeless, huggable companion.
Materials & Prep
Required Supplies
- Main Body Fabric: A piece of felted wool yardage (approx. 27 x 19 inches) in a natural tone.
- Accent Fabric: One fat 1/8th of Liberty of London Tana Lawn cotton (Edenham print or similar).
- Fill: Approximately 6 ounces of high-quality polyester fiberfill.
- Eyes: Two small buttons.
- Thread: Sturdy 100% cotton sewing thread in a matching neutral shade.
- Template: Printed pattern pieces for the Head, Legs, Arms, and Body.
Crucial Prep Step: Before cutting your fabric, you must felt the wool. Machine-wash the wool fabric on a hot cycle, rinse with cold water, tumble-dry for about 20 minutes, and iron it completely flat.
General Note
Use a 1/4-inch seam allowance for the entirety of this project unless the step specifies otherwise.
Step-by-Step Instructions
1. Assembling the Head
Cutting the Pieces
- From Wool: 1 Top Head, 2 Back Heads, 2 Side Heads, 2 Ears.
- From Liberty Cotton: 1 Nose, 2 Ears.
Assembly
- Join the Face: Pin the top edges of both Side Head pieces to the corresponding sides of the Top Head piece (right sides together). Stitch them in place, stopping exactly 1/4 inch before you reach the edge meant for the nose.
- Form the Jaw: Keep the right sides together, pin the mouth seam of the two Side Heads, and sew them closed, again stopping 1/4 inch before the nose area.
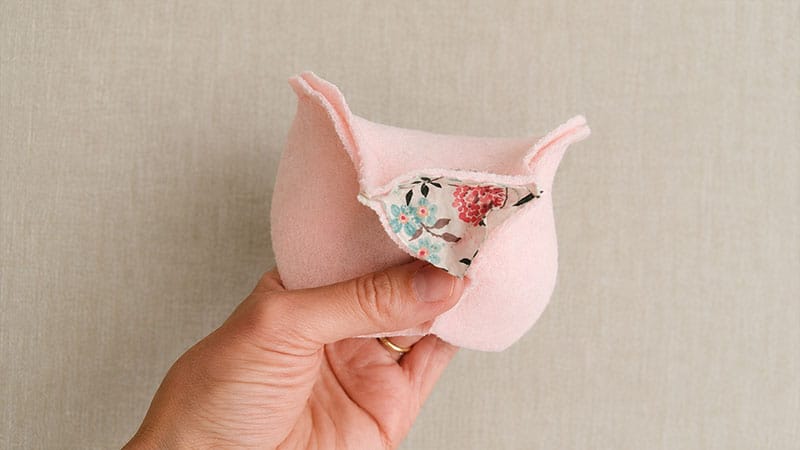
- Prepare the Ears: Pair one Wool Ear with one Cotton Ear (right sides together). Sew around the curved perimeter, leaving the straight bottom edge open. Trim the seam to 1/8 inch, flip right side out, fold a tiny 1/4-inch pleat at the base, and baste it closed with a 1/8-inch seam allowance to secure the fold.
- Construct the Back: Sew the two Back Head pieces together along their central back seam (right sides facing).
- Insert the Nose: Align the Cotton Nose piece into the muzzle opening on the front head assembly. Because you stopped sewing 1/4 inch early in previous steps, the fabric should lay flat. Pivot and sew each of the three sides of the nose carefully, stopping and starting 1/4 inch from the corners. Flip right side out to inspect the muzzle.
- Combine Front and Back: Flip the head pieces wrong side out again. Sandwich the prepared ears between the front face and the back head assembly. Ensure the cotton sides of the ears face forward and the bases line up with the head seams. Stitch all the way around, leaving the neck opening unsewn. Turn right side out.
2. Crafting the Legs
Cutting the Pieces
- From Wool: 4 Legs (transfer the opening/gap guide mark to two of these pieces).
- From Liberty Cotton: 2 Foot Pads.
Assembly
- Sew the Leg Sides: Match one marked leg piece with one unmarked leg piece (right sides together). Sew around the curved leg, leaving the flat bottom edge open and leaving the marked “gap” unsewn. Stop stitching 1/4 inch before you reach the bottom edge.
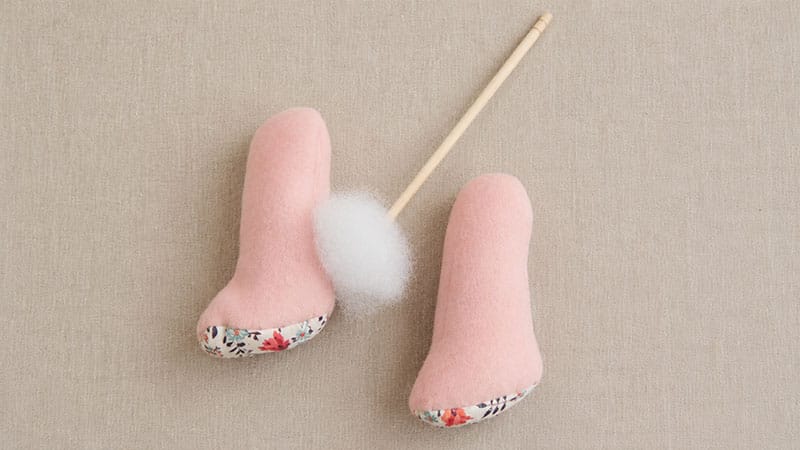
- Attach the Foot Pads: Open up the bottom of the leg. Pin the Cotton Foot Pad to the open circular base, ensuring the tapered heel aligns with the back leg seam and the rounded toe faces forward. Sew around the oval circumference in two halves to keep it smooth.
- Stuff and Close: Turn the legs right side out through the gap. Pack them tightly with fiberfill so they are firm, then secure the opening using a neat, invisible blind stitch.
3. Creating the Arms
Cutting the Pieces
- From Wool: 2 Outside Arms, 2 Inside Arms.
- From Liberty Cotton: 2 Paw Pads (cut mirror images by flipping your fabric for the second piece).
Assembly
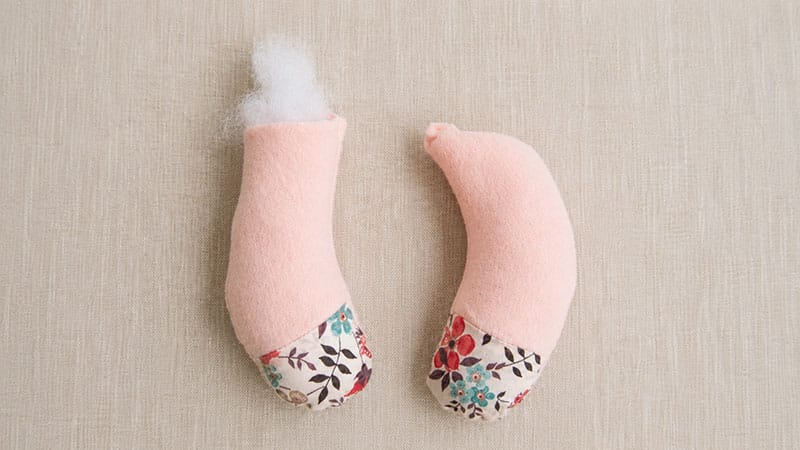
- Add Paw Pads: Align the straight edge of a Cotton Paw Pad to the straight edge of an Inside Wool Arm piece (right sides together). Stitch across, press flat, and ensure you have two matching mirror-image arms.
- Sew Arm Profiles: Pin the inner arm assemblies to the Outside Arm pieces (right sides together). Sew around the curved perimeter, leaving the straight shoulder edges open.
- Stuff and Baste: Flip the arms right side out. Push the stuffing down toward the paws, leaving the upper shoulder area empty. Flatten the raw shoulder edges together and baste them closed with a 1/8-inch seam allowance.
4. Building the Body & Final Assembly
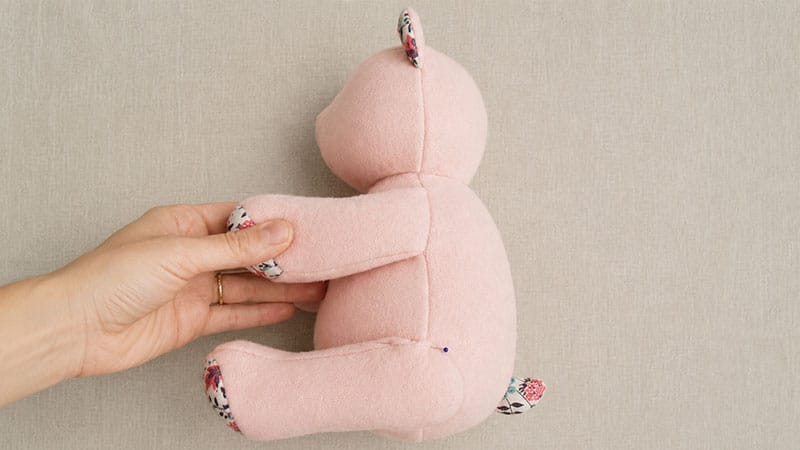
Cutting the Pieces
- From Wool: 4 Body pieces (transfer arm and gap marks to one piece, and just arm marks to a second piece).
- From Liberty Cotton: 2 Tail pieces (cut as mirror images).
Assembly
- The Tail: Sew the two Cotton Tail pieces right sides together along the curve. Flip right side out, stuff lightly, and baste the flat edge closed.
- Assemble the Back & Front: Place the two back body pieces right sides together. Slip the basted tail between them just under the bottom gap mark. Sew the back seam, leaving the marked gap open. Next, sew the remaining two body pieces together along the tummy seam to create the front.
- Attach the Arms and Join Body: Pin the front and back body pieces right sides together. Tuck the arms completely inside the body cavity, lining up their raw shoulder edges with the arm markings on the body seams (paws should face toward the belly). Sew around the entire perimeter of the body, leaving only the neck circle open.
- Attach the Head: Turn the body right side out through the back gap. With the head right side out (facing upright) and the body inside out, drop the head down into the neck opening. Align the raw neck edges and securely hand-sew them together using a tight backstitch. Go around the neck twice for durability.
- Stuffing: Pull the entire bear right side out through the back opening. Pack the head and body firmly with stuffing until the bear is plump and holds its shape, then blind-stitch the back gap closed.
- Attach the Legs: Position the legs on the lower left and right sides of the body so the bear sits balanced on its own. Use a strong blind stitch to hand-sew the legs securely to the torso, circling the joint twice.
- Secure the Eyes: Hand-sew the button eyes onto the face. Anchor the thread deeply, pull it slightly to create gentle eye sockets, tie the knot securely underneath the button, and bury the thread tails deep inside the head stuffing.
