
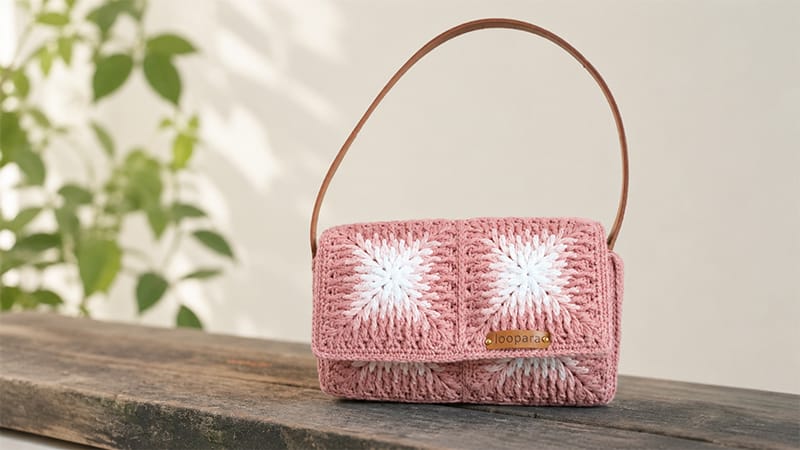
Create a stunning, structured messenger bag featuring a beautiful winter-inspired snowflake motif. This pattern utilizes a sophisticated gradient color palette, transitioning smoothly from soft pinks to deep purples, framed by crisp white borders.
By combining traditional granny square construction with front-post textures, this bag offers a modern aesthetic with excellent structural integrity.
Master Material List & Specifications
- Yarn: Loopara 5-ply combed cotton (or any sport/DK weight combed cotton yarn).
- Color A: Pink (Color 16)
- Color B: Light Purple (Color 47)
- Color C: Medium Purple (Color 48)
- Color D: Dark Purple (Color 49)
- Color E: White (Color 60)
- Hook Size: $3.0\text{ mm}$ (US C/2 or D/3) – Adjust hook size if necessary to achieve a tight, dense fabric.
- Notions & Tools: Stitch markers, yarn needle, sharp scissors, blocking grid board with pins, fabric clips.
- Structure & Hardware: Plastic canvas mesh sheets, fabric for inner lining, matching sewing thread, 1 magnetic snap button, and an adjustable bag strap with clasps.
Abbreviations (US Terms)
- ch: Chain
- sl st: Slip stitch
- sc: Single crochet
- dc: Double crochet
- FPdc: Front Post double crochet (Yarn over, insert hook from front to back to front around the post of the indicated stitch, yarn over, pull up a loop, and complete a standard dc).
- st(s): Stitch(es)
- sp: Space
Part 1: The Snowflake Granny Square
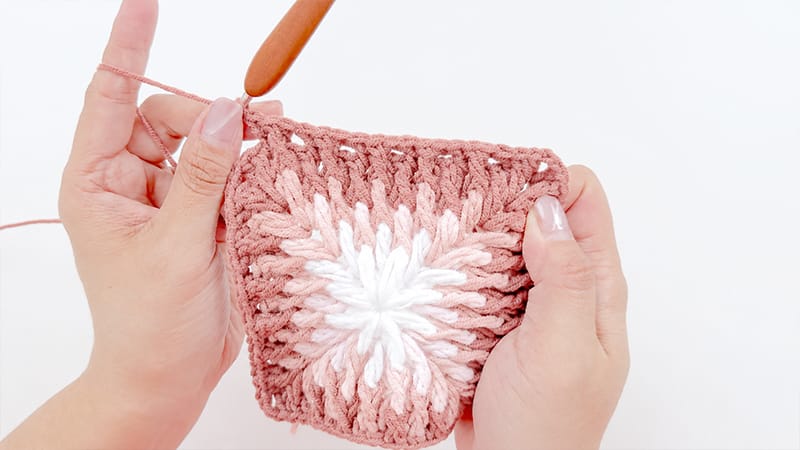
Make a total of 8 matching squares.
Color Sequence Chart:
- Round 1 to 3: Color A (Pink)
- Round 4: Color B (Light Purple)
- Round 5: Color C (Medium Purple)
- Round 6: Color D (Dark Purple)
- Rounds 7 & 8: Color E (White)
       [Corner: dc, FPdc, dc, ch 2, dc, FPdc, dc]
                        |
       -----------------x-----------------
      |                                   |
    [Side]                             [Side] (Repeated pattern of
  (dc, FPdc, dc)                      (dc, FPdc, dc) clusters)
      |                                   |
       -----------------x-----------------
                        |
       [Corner: dc, FPdc, dc, ch 2, dc, FPdc, dc]
Step-by-Step Round Instructions
Round 1 (Foundation): Using Color A, ch 6. Join with a sl st into the first ch to form a foundation ring. Ch 3 (counts as your first dc here and throughout).
Round 2: Work 1 dc into the center of the ring, ch 2. *Work 2 dc into the ring, ch 2.* Repeat from * to * 2 more times. Sl st into the top of the initial ch-3 to close the round. (You will have 4 distinct clusters of 2-dc separated by ch-2 corner spaces).
Round 3: Ch 3. Work 1 FPdc around the next dc from the previous round, then work 1 dc into the space before the corner. In the corner ch-sp, work (ch 2, 1 dc). *Work 1 FPdc around the next dc, followed by 1 dc in the next stitch. Work the corner cluster: (1 dc, ch 2, 1 dc) into the ch-sp.* Repeat from * to * around. Sl st to the top of the initial ch-3 to join. Fasten off Color A.
Round 4: Attach Color B to any corner ch-space. Ch 3, then work (1 FPdc, 1 dc, ch 2, 1 dc, 1 FPdc, 1 dc) all within that same corner space to establish your first corner. *Across the side, work a texture cluster: (1 dc, 1 FPdc, 1 dc) over the next three stitches. In the next corner ch-space, work the corner sequence: (1 dc, 1 FPdc, 1 dc, ch 2, 1 dc, 1 FPdc, 1 dc).* Repeat from * to * around all sides. Sl st to join, then fasten off.
Round 5: Attach Color C to any corner ch-space. Repeat the corner sequence established in Round 4. For the sides, you will now work two sets of the texture clusters (1 dc, 1 FPdc, 1 dc) across the expanded edge. Repeat this sequence for all four corners and sides. Sl st to join, then fasten off.
Round 6: Attach Color D to any corner ch-space. Repeat the corner sequence. Working across the sides, increase your texture clusters to three sets of (1 dc, 1 FPdc, 1 dc) per side. Complete the perimeter, sl st to join, then fasten off.
Round 7: Attach Color E. Repeat the corner sequence. For this round’s side texture, modify the pattern slightly to expand the snowflake rays: work four sets of (1 dc, 1 FPdc, 1 dc) across each side. Sl st to join, then fasten off.
Round 8: Using Color E, repeat the established corner sequence. Work five sets of the texture clusters (1 dc, 1 FPdc, 1 dc) across each of the four sides. Sl st to join, fasten off, and weave in all yarn tails cleanly on the wrong side.
Pro-Tip: Securely pin all 8 completed squares onto your grid blocking board. Lightly mist them with water and allow them to dry completely. This relaxes the cotton fibers, ensuring every square is perfectly identical in size for seamless assembly.
Part 2: Bag Body & Component Construction
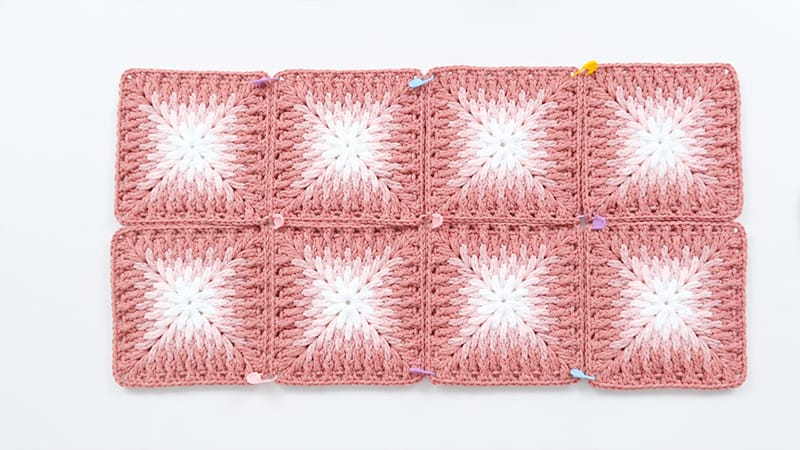
Flat Panel Layout & Seaming
Lay your 8 blocked squares out in a rectangular grid format ($2 \times 4$ layout). This flat panel forms the front flap, bottom, back, and front face of the bag.
       +------------+------------+
       |  Square 1  |  Square 2  |  <- Front Flap
       +------------+------------+
       |  Square 3  |  Square 4  |  <- Back Panel
       +------------+------------+
       |  Square 5  |  Square 6  |  <- Bottom / Lower Back
       +------------+------------+
       |  Square 7  |  Square 8  |  <- Front Panel
       +------------+------------+
- Vertical Seams: Place your squares with the wrong sides facing together. Join Color E at the outer corner. Using an inside-loop slip stitch method (picking up only the back loops that sit directly adjacent to one another), join the columns together. Keep your working yarn underneath your hook to create a flat, mock-braided decorative seam. Do not pull too tightly, or the panel will buckle.
- Horizontal Seams: Repeat the identical inside-loop slip stitch technique horizontally across the layout to lock all 8 squares into one uniform fabric panel. Fasten off and weave in ends.
Creating the Side Panels (Make 2)
The side panels give the messenger bag its depth.
- Using Color E, attach your yarn to the edge of your assembled panel where the side markers indicate (spanning a width of 15 stitches).
- Row 1: Ch 2 (does not count as a stitch), work 1 dc into each of the 15 marked stitches across. Turn.
- Rows 2–12: Ch 2, work 15 dc across the row. Turn. Fasten off after completing Row 12.
Working the Main Perimeter Border
To give the bag clean edges for assembly, work a unified border around the entire perimeter of the flattened piece:
- Join Color E into any stitch along the straight edge. Single crochet (sc) evenly around the entire perimeter.
- When encountering a square corner, work 2 sc into the corner stitch to smoothly transition around the bend.
- When crossing over a joined seam, place 1 sc directly into the seam junction.
- Along the raw edges of the side panels, work 2 sc around the post of each double crochet row-end. Join with a sl st to the first sc and fasten off.
Part 3: Structuring, Lining, and Final Assembly
Stabilizing with Plastic Canvas
To prevent your cotton bag from sagging over time, reinforce it with plastic canvas:
- Lay your completed crochet panel flat over a sheet of plastic canvas. Carefully trace the exact shape using a marker.
- Cut out one large central panel and two matching side pieces. Cut the canvas roughly 2-3mm smaller than your drawn lines so it fits comfortably inside the borders.
- Sandwich the plastic canvas pieces directly to the wrong side of your corresponding crochet panels. Secure them tightly using fabric clips.
- Whipstitch or sc through both the crochet fabric edge and the outer mesh holes of the plastic canvas to fuse them into rigid, durable panels.
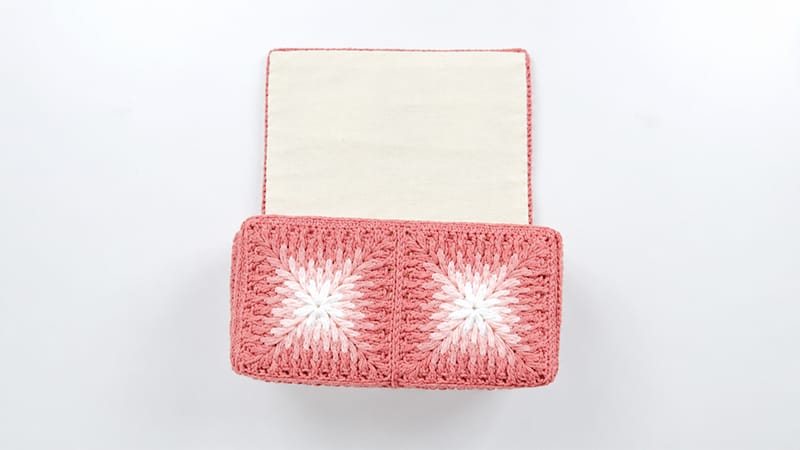
Cutting and Stitching the Fabric Lining
- Lay your cut plastic canvas pieces over your lining fabric. Trace around them with fabric chalk.
- Cut the fabric exactly 1 cm wider than your lines on all sides to allow for a seam allowance.
- Fold the 1 cm raw edges inward and iron them flat.
- Drop the lining into place over the canvas side of your panels. Hand-sew the lining using a blind slip stitch or whipstitch directly into the inside loops of your border crochet stitches.
3D Bag Assembly & Finishing Touches
          [ Front Flap ]  (Squares 1 & 2)
                |
                v  (Folds over the front)
         +--------------+
        /|              | \
       / |  Back Panel  |  \
      |  | (Sq 3 & 4)   |   |
[Side]|  +--------------+   |[Side]
Panel | /               /   |Panel
      |/  Front Panel  /    |
      +---------------+     /
       \ (Sq 7 & 8)    \   /
        \_______________ \/
           [ Bottom ] (Squares 5 & 6)
- Box Construction: Fold your prepared main flat panel into a “U” shape to define the front face, bottom, and back wall of the bag (leaving the top two squares free to act as the closing flap).
- Attaching Sides: Position your side panels between the front and back faces. Align the edges using stitch markers.
- Final Seaming: Join Color E yarn at the bottom corner. Working from the base upward to the top rim, slip stitch the side panels to the main body by grabbing the inside loops of both edge rows. Keep your tension uniform. Fasten off and bury the tails inside the lining.
- Hardware Attachment:
- Magnetic Snap: Measure and mark the exact center point on the inside of the front flap and the corresponding landing spot on the front face of the bag. Sew both halves of the magnetic snap securely into place through the lining and canvas layers.
- Strap Placement: Center your strap ends (or D-rings) on the top exterior of both side panels. Using a reinforced box stitch ($X$ inside a square) and heavy-duty sewing thread, stitch the straps firmly onto the side panels. Ensure you pierce through the crochet, canvas, and lining layers for maximum weight distribution.
