
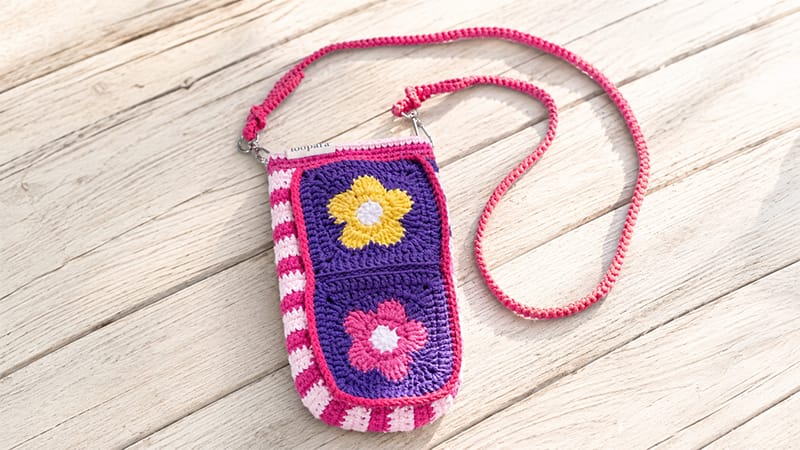
This project transforms four intricately worked multi-colored squares into a sturdy, cushioned home for your smartphone.
By using a distinct side-and-bottom border panel, the bag gains depth so your phone slides in easily without stretching out the motifs.
What You’ll Need
- Yarn: 5-ply combed cotton yarn (sport/DK weight). Cotton is highly recommended here as it prevents the bag from sagging under the weight of your device.
- Hook: 3.0 mm (US C/2 or D/3) to maintain a firm, dense tension.
- Notions:
- Sharp yarn needle for seamless seaming
- Stitch markers to align your panels
- Embroidery scissors
- One lobster clasp (for a removable strap option)
- A personalized cloth tag/label
Stitches & Terms (US)
- MR: Magic Ring
- ch / sl st: Chain / Slip stitch
- sc / hdc / dc / tr: Single / Half double / Double / Treble crochet
- inc: Work two of the designated stitches into the exact same space to expand the round.
Part 1: Crocheting the Four Textured Squares
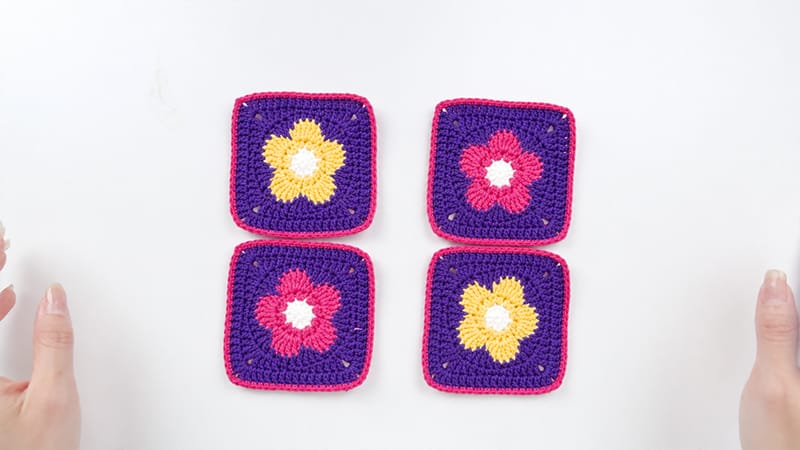
You will need to make 4 identical squares in total. Two will form the front panel, and two will form the back panel.
Round 1: The Core Foundation
Form a loose loop for a MR.
- ch 3 (this serves as your first dc).
- Work 9 dc directly into the center of the ring.
- Pull the yarn tail firmly to close the center hole completely.
- Join with a sl st into the 3rd chain of your opening ch-3. (Total: 10 stitches)
Round 2: Expanding the Circle
Cut your first color and pull through. Join your second yarn color into any dc stitch from the previous round.
- ch 2 (does not count as a stitch).
- In the next 9 stitches, work 2 hdc into each stitch (9 hdc increases).
- In the final remaining space, work just 1 hdc.
- Sl st into the top of the initial ch-2 to secure the round. (Total: 19 stitches)
Round 3: Creating the Petal Definition
- *Sl st into the next stitch.
- In the following stitch, work (1 dc, 1 tr).
- In the next stitch, work 3 tr all into that same loop.
- In the next stitch, work (1 tr, 1 dc).*
- Repeat the sequence from * to * 5 times total around the wheel.
- Finish by working a sl st into the very first sl st made at the start of the round. Fasten off this color.
Round 4: Transitioning from Flower to Square
Join your third yarn color into any treble crochet peak.
- ch 1. Work 1 hdc into the same starting space.
- Work 2 dc in the next stitch, followed by 1 tr in the next, then 2 dc in the following stitch, and 1 hdc after that.
- *Now introduce the repeat pattern: 1 sc, 1 hdc, 2 dc, 1 tr, 2 dc, 1 hdc.*
- Repeat from * to * 4 times around the perimeter.
- Join with a sl st to your initial hdc of the round.
Round 5: Squaring Off and Framing
- ch 5 (counts as 1 tr + ch-1 corner space).
- Work 1 tr into the base of that chain.
- Work 1 dc inc, 1 dc, 1 hdc, and then 3 sc across the flat edge.
- *For the corner: Work 1 hdc, 1 dc, 1 dc inc, then create the corner peak by working (1 tr, ch 1, 1 tr) all into the corner stitch.
- For the side: Work 1 dc inc, 1 dc, 1 hdc, and 3 sc.*
- Repeat from * to * 3 times to complete the square shape.
- End the final side with 1 hdc, 1 dc, and a dc inc.
- Sl st into the 3rd chain of your starting ch-5. Fasten off, leaving a clean edge.
Part 2: Assembling the Main Body Panels
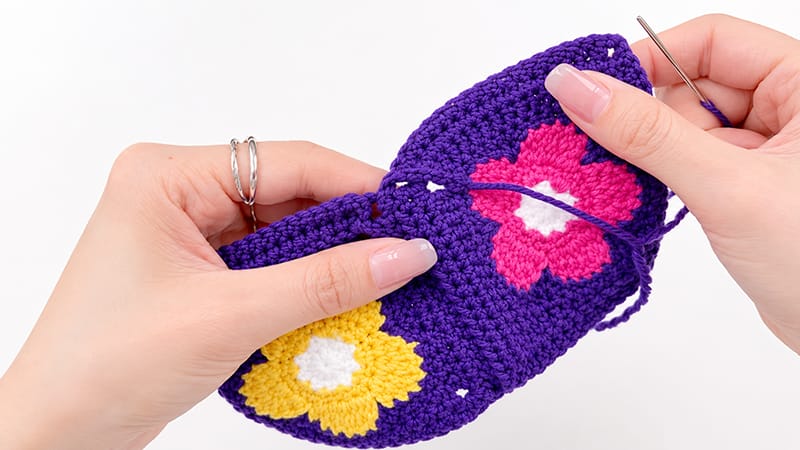
Step 1: Horizontal Assembly
Lay two of your finished squares flat on a table, right sides facing up. Flip one over onto the other so their right sides are touching (wrong sides facing out).
Step 2: The Outer-Loop Whip Stitch
Thread your yarn needle with a matching yarn color. Insert your needle only through the outside loops (the loops furthest away from each other) of the top stitches. This creates an invisible, flat seam that won’t add bulk to the inside of your bag.
Step 3: Stitch Matching
Sew across the edge, matching stitch-for-stitch until you reach the corner. Tie a secure, hidden knot and weave the remaining tail down into the stitches. Repeat this entire process for the remaining two squares. You now have a distinct Front Panel and Back Panel.
Part 3: Creating the Structural Border
Instead of sewing the front and back flat together, this structural ribbing gives the bag depth so your phone fits comfortably.
[Front Panel] <--- Whip stitched to ---> [Border Band] <--- Whip stitched to ---> [Back Panel]
- Foundation: Create a slip knot and ch 7.
- Row 1: Starting in the second chain from your hook, work 1 sc into each chain across. Turn your work. (6 sc)
- Rows 2-3: ch 1, work 1 sc into each stitch across. Turn.
- Color Striping: On the very last pull-through of the final stitch in Row 3, drop your yarn and pull through your accent color to change shades smoothly.
- Length Accumulation: Continue crocheting rows of 6 sc, changing colors every 3 rows if desired, until your long crocheted band perfectly matches the length of the left side, bottom, and right side of your assembled panels combined. Pin it along the panels with stitch markers to check the length before fastening off.
Part 4: Final Stitching & Edging
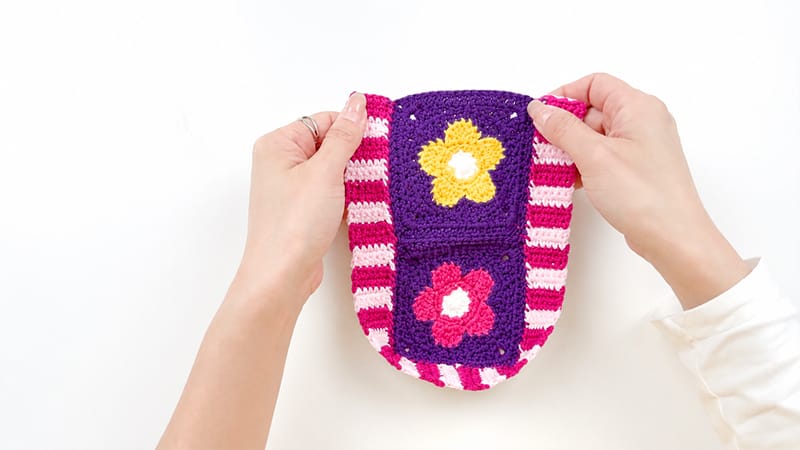
Joining the Border Band
- Place your Front Panel wrong-side up. Align your long border band along the left, bottom, and right edges.
- Using your yarn needle, whip stitch the band to the panel. Do not worry about a perfect stitch-to-stitch count match here; simply ensure the band is evenly distributed and lays completely flat around the corners.
- Repeat this process to attach the Back Panel to the remaining open side of the border band. Turn the bag right-side out.
Refinement Round (Top Opening)
- Contrast Round: Join a bright contrast yarn (e.g., Red) at the top side seam of the bag’s opening. Work 1 sc into the outer half-loop of every stitch around the entire rim of the bag to clean up the raw edges.
- Depth Rounds: Switch to your primary contrast color (e.g., Blue) and work 2 continuous rounds of sc around the opening.
- Accent Finish: Switch to a final accent color (e.g., Yellow) for one last round of sc. Fasten off invisibly.
- Centrally align your cloth artisan label on the front top band and sew it securely in place with regular sewing thread.
Part 5: Crafting the Sturdy Strap
To prevent the strap from stretching into a thin string over time, use a thermal or cord-style single crochet stitch:
Step 1: ch 2 ---> Step 2: sc in 2nd ch ---> Step 3: Turn, sc through side strands ---> Repeat
- Start with your main contrast yarn and make a slip knot. ch 2.
- Insert hook into the second chain from the hook and complete 1 sc.
- The Cord Technique: Turn your work slightly clockwise. Look for the small loop running along the side of the stitch you just made. Insert your hook under this side strand and work a sc.
- Turn your work slightly clockwise again. You will now see two parallel strands on the side of the stitch. Insert your hook under both of these side loops and complete your sc.
- Repeat this step continuously. Working through these double side-loops creates a thick, unstretchable, structural cord.
- Once the strap reaches your preferred crossbody length, loop the end securely through the eye of your lobster clasp, sew it down firmly with multiple passes of your yarn needle, and attach the clasp to the side rim of your bag.
Part 6: Polishing & Long-Term Care
Tail Management (Weaving in Ends)
Never cut your yarn immediately after a knot. Thread every loose tail onto a yarn needle and guide it horizontally through the center of at least 4 cluster stitches.
Reverse direction and weave it back through the stitches just below your first pass. Cut the yarn flush with the fabric; this zig-zag method ensures the ends will never pop out, even during washing.
Cleaning and Maintenance
| Care Aspect | Instruction |
| Washing | Submerge in lukewarm water mixed with a drop of gentle wool-wash or mild detergent. Press the soapy water through the fibers gently. Never twist, wring, or scrub the squares. |
| Drying | Roll the wet bag tightly inside a dry, clean bath towel and press firmly to extract the bulk of the water. Unroll, reshape the squares perfectly into shape with your fingers, and lay flat on a drying rack away from hot radiators or direct sunlight. |
| Storage | Cotton fibers have memory. Hanging a heavy phone bag on a hook long-term will distort the shoulder strap. Empty the contents after use and store the bag flat in a drawer or clean storage box. |
