
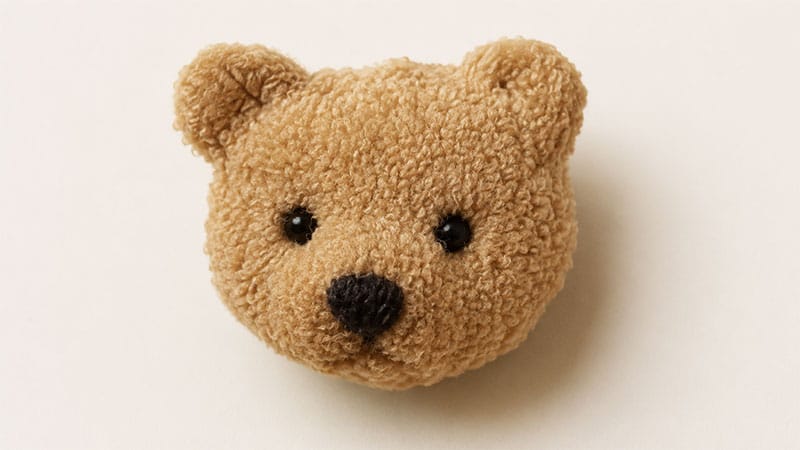
This project transforms simple wool yarn into a charming, fluffy teddy bear face. By utilizing different sizes of donut-shaped pom-pom makers, you can easily create a whole family of bears—from a larger “mama bear” to a tiny, sweet cub—using the same wrapping technique.
What You Will Need
- Pom-Pom Makers: A medium size for standard bears and a smaller size for cubs.
- Yarn: Aran-weight wool yarn. You will need a main head color (e.g., brown), a lighter shade for the snout, a small snippet of darker brown for the mouth, and black for the features.
- Securing String: Waxed thread or high-strength cord.
- Tools: Sharp fabric scissors and a felting needle.
Step-by-Step Instructions
Phase 1: Building the Face (First Half of the Tool)
- Step 1: The Nose: Using your black yarn, wrap about 18–20 rotations tightly around the middle of one arch, shifting slightly to one side. Tip: For a smaller baby cub, reduce this to about 15 wraps in a narrower bundle.
- Step 2: The Smile Base: Take your dark brown yarn and wrap a single layer immediately adjacent to the black nose, extending halfway down towards the edge of the tool.
- Step 3: The Snout: Cover the nose and mouth area entirely by wrapping your lighter snout yarn across roughly two-thirds of the arch. Build this up with 5 solid layers, allowing it to bulk up naturally over the nose. (For a simpler look, you can just use your main head color here).
- Step 4: The Upper Head: Fill in the remaining exposed section of the arch using your main brown yarn, overlapping the edges of the snout slightly. Layer this about 3 to 4 times.
- Step 5: Placing the Eyes: Right where the snout yarn meets the upper head yarn, wrap your black yarn very tightly in a concentrated spot about 12 times. Mark this side of the tool so you remember it represents the top of the head.
- Step 6: Filling out the Face: Encase the entire arch by wrapping your main brown yarn evenly over everything until the half-circle is full.
- Step 7: Creating Ear Tufts: Place your finger lightly over the “top of the head” section (where the eyes are hidden). Wrap your main yarn around your finger and the tool 18–20 times to create extra bulk that will become the ears.
Phase 2: The Back & Assembly
- Step 8: The Back of the Head: Wrap the second, empty arch of your pom-pom maker entirely with your main brown yarn until it matches the fullness of the first side. Tip: Hold 2 or 3 strands together simultaneously to speed up the process.
- Step 9: Close and Cut: Lock the two arches together. Insert your scissors into the center channel and cut all the exterior loops open to reveal the rough bear shape.
- Step 10: Binding: Slip your waxed thread into the center channel, pull it as tightly as possible, and secure it with multiple strong knots. Remove the plastic tool.
Phase 3: Sculpting & Needle Felting
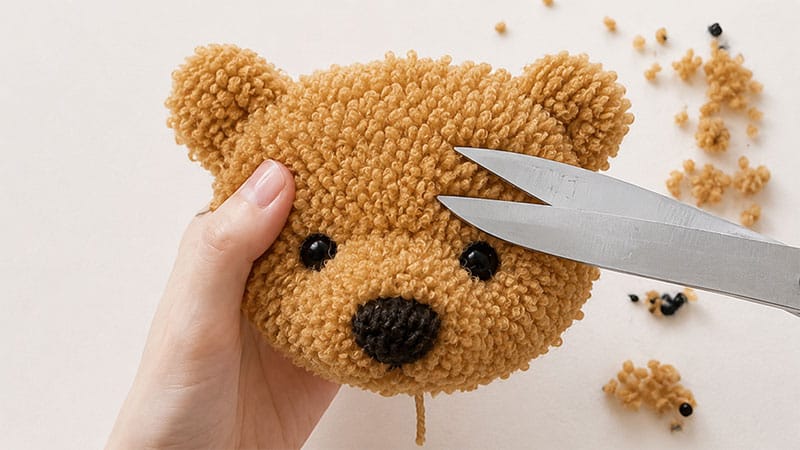
Safety Note: Felting needles are incredibly sharp. Work slowly, use a foam backing block, and consider wearing protective thimbles.
- Step 11: Eye Definition: Carefully trim away excess yarn immediately around the black eyes, creating a shallow “mask” impression. This helps the eyes stand out. Be careful not to accidentally snip into the snout area.
- Step 12: Shaping the Snout: Gather the snout and nose fibers together with your fingers. Use your felting needle to repeatedly poke from the outside inward toward the center of the pom-pom. This compresses the fibers into a solid, clean muzzle shape.
- Step 13: Detailing the Mouth: Locate the dark brown yarn beneath the nose and divide it into two paths. Needle-felt these fibers downward and outward while pushing the lower chin fluff upward. This creates a distinct, fixed, upside-down “Y” shape for a classic teddy bear smile.
- Step 14: Sculpting the Ears: Locate the extra tufts of yarn on top of the head. Use your felting needle to bond the fibers together from the sides until they form dense, sturdy shapes. Once felted, use your scissors to trim them into perfectly rounded bear ears.
Customization Ideas
Once you master the basic layout, you can experiment to give your bears unique personalities:
- Polar Bears: Use white, cream, and soft gray yarns.
- Panda Bears: Swap the layout for classic black patches around the eyes and black ears.
- Expressive Details: Try adding a tiny dash of pink yarn right under the nose during the mouth-wrapping stage to give your bear a peek-a-boo tongue!
